The Arduino IDE is a free and open-source program which lets you write, compile, and upload programs to a very large number of devices, including your ESP8266 module.
Follow these “Install the Arduino Software (IDE)” directions to get the IDE installed on your computer.
Note that the word “Arduino” often refers to a couple different things:
- Arduino IDE Software
- This is what you just installed
- Arduino hardware
- These are the microcontroller boards which are officially supported by the Arduino IDE
- The design of these boards is open-source, so there are plenty of cheap alternatives which are perfectly compatible
- Arduino programming language
- This is the language which we will use in this tutorial to program your ESP8266 module
- The official tutorials are the best way to learn this language - most of them will run on your ESP8266 module with a bit of tweaking, but you might find it easier to pick up something like this $8 Arduino Nano V3 Compatible Module which will run the examples unmodified
Install USB-Serial Drivers
There are a number of different USB-to-serial chips used in ESP8266 modules - depending on the chip and your operating system, you may or may not have drivers already built in. The Arduino IDE also installs a number of drivers.
The most common additional drivers you may want to install are:
- CH340/341 drivers - Windows, OSX
- This will be required if you’re using the Gizwits Witty and some NodeMCU modules
- FT232x drivers - All OS
- CP210x drivers - All OS
- This will be required if for some NodeMCU modules
Install ESP8266 Board Definition
The Arduino IDE you installed does not natively support the ESP8266. Fortunately it’s quite easy to add support via the “Boards Manager”.
Note: Official documentation for Arduino ESP8266 support can be found here.
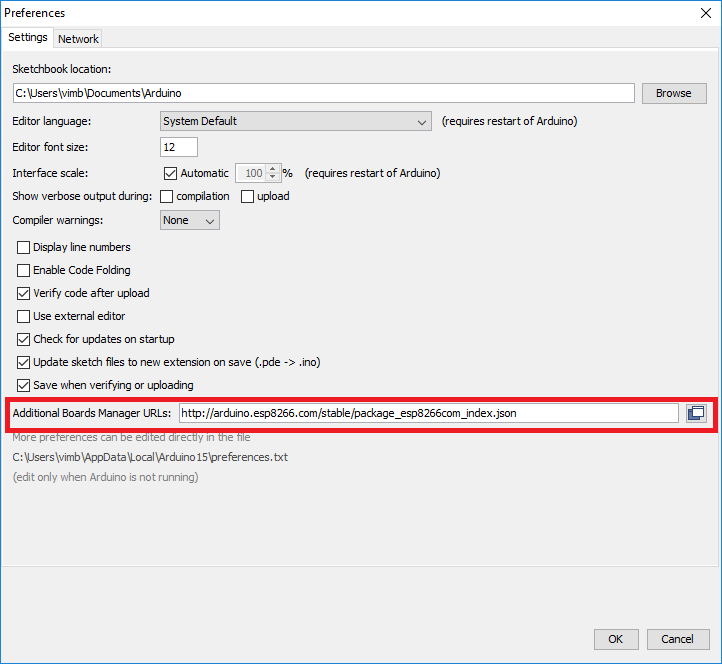
Add the ESP8266 Board Manager URL
- In the Arduino menu, go to File->Preferences on Windows and Arduino->Preferences on OSX
- Enter
http://arduino.esp8266.com/stable/package_esp8266com_index.jsoninto Additional Board Manager URLs field - Hit
OKso save your preferences

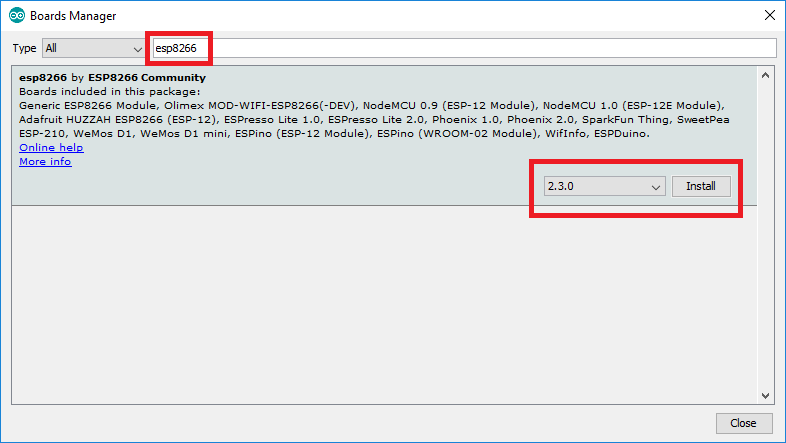
Install the ESP8266 Platform
- In the Arduino menu, go to Tools->Board->Boards Manager
- Search for
esp8266 - Click on the esp8266 entry, select the latest version, and hit
Install- This may take a couple minutes since it needs to download and install all of the ESP8266 tools
- Hit
Closeonce you are done

Install Arduino Libraries
Arduino libraries are code other members of the Arduino community have written, packaged, and released for you to use. One of the strengths of the Arduino community is the number and quality of libraries which make it simple and fast to add a lot of complex capabilities to your code. We will use the “Library Manager” in the Arduino IDE to install a couple libraries necessary for our tutorial.
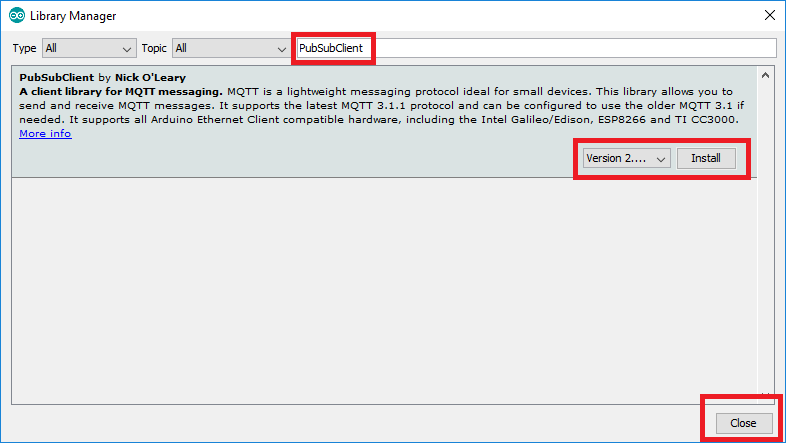
- In the Arduino menu, go to Sketch->Include Library->Manage Libraries
- Search for and install the latest versions of the PubSubClient library:
- This library supports publishing and subscribing to an MQTT server
- Official documentation
- Hit
Closeonce you are done

// Import required libraries
#include "ESP8266WiFi.h"
// WiFi parameters
const char* ssid = "74170287";
//const char* ssid = "wifi-name";
const char* password = "24063173";
//const char* password = "wifi-pass";
void setup(void)
{
// Start Serial
Serial.begin(115200);
// Connect to WiFi
WiFi.begin(ssid, password);
while (WiFi.status() != WL_CONNECTED) {
delay(500);
Serial.print(".");
}
Serial.println("");
Serial.println("WiFi connected");
// Print the IP address
Serial.println(WiFi.localIP());
}
void loop() {
}


沒有留言:
張貼留言