Getting started with Osoyoo NodedMCU
by using Arduino IDE
Post Time: 2017-05-02 02:05:45 Category: NodeMCU IoT Kit
The Osoyoo NodeMCU comes pre-programmed with Lua interpretter, but you don't have to use it! Instead,
you can use the Arduino IDE which may be a great starting point for Arduino lovers to familiarize themselves
with the technologies surrounding the IoT.Note that when you use the NodeMCU board with the Arduino IDE ,
it will write directly to the firmware, erasing the NodeMCU firmware.So if you want to back to Lua SDK,use the
"flasher" to re-install the firmware.
The NodeMCU programming can be as easy as in Arduino,the main difference is the distribution of pins in the
nodemcu board.Following below operations and enjoy your first NodeMCU & Arduino IDE travel!
1.CONNECT YOUR NODEMCU TO THE COMPUTER
Use the USB cable to connect your NodeMCU to the computer,you will see the blue onboard LED flicker when
powered up, but they will not stay lit.
powered up, but they will not stay lit.
2.INSTALL THE COM/SERIAL PORT DRIVER
In order to upload code to the ESP8266 and use the serial console, connect any data-capable micro USB cable to
ESP8266 IOT Board and the other side to your computer's USB port.
ESP8266 IOT Board and the other side to your computer's USB port.
The new version NodeMCUv1.0 comes with the CP2102 serial chip,you can download and install the driver here.
The NodeMCUv0.9 comes with the CH340 serial chip,you can download and install the driver here.
3.INSTALL THE ARDUINO IDE 1.6.4 OR GREATER
Download Arduino IDE from Arduino.cc (1.6.4 or greater) - don't use 1.6.2! You can use your existing IDE if you
have already installed it.
have already installed it.
You can also try downloading the ready-to-go package from the ESP8266-Arduino project, if the proxy is giving you
problems
problems
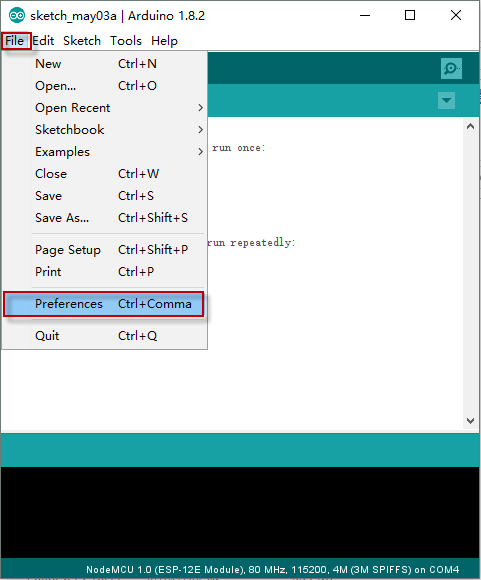
4.INSTALL THE ESP8266 BOARD PACKAGE
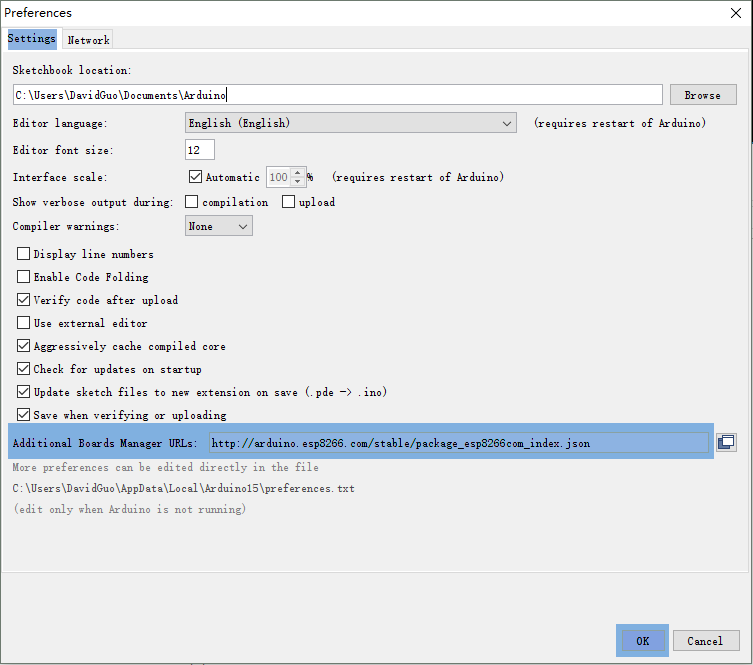
nto Additional Board Manager URLs field in the Arduino v1.6.4+ preferences
(Open Arduino IDE–>File–>Perferences–>Settings).
Enter the link and click "OK" to save your changes.
Next, use the Board Manager to install the ESP8266 package
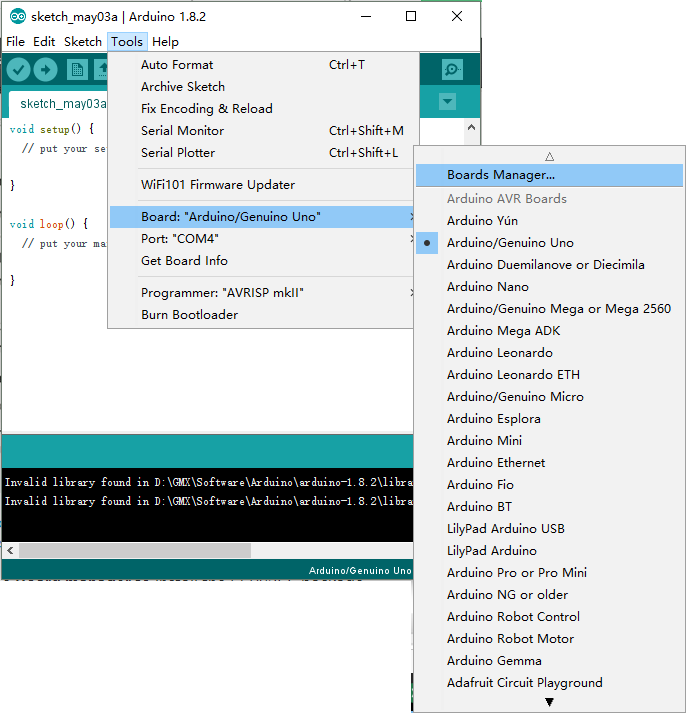
Enter the Boards Manager and find the board type as below:
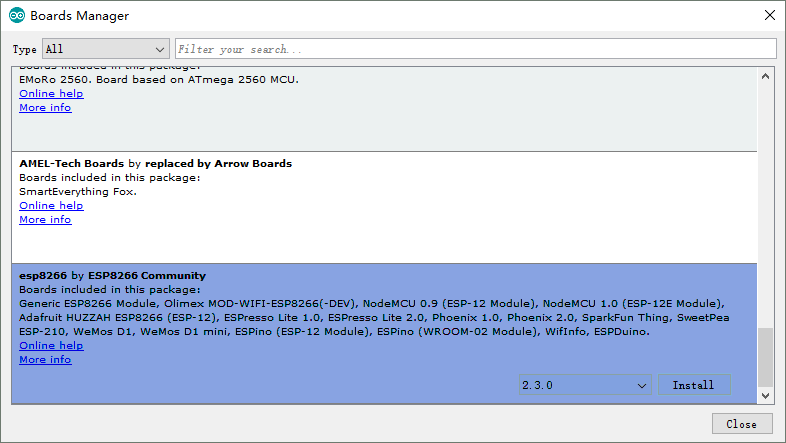
Scroll the Broads Manager screen down to the bottom, you will see A module called
“esp8266 by esp8266 Community” (see following picture), select the latest version and
click "Install".
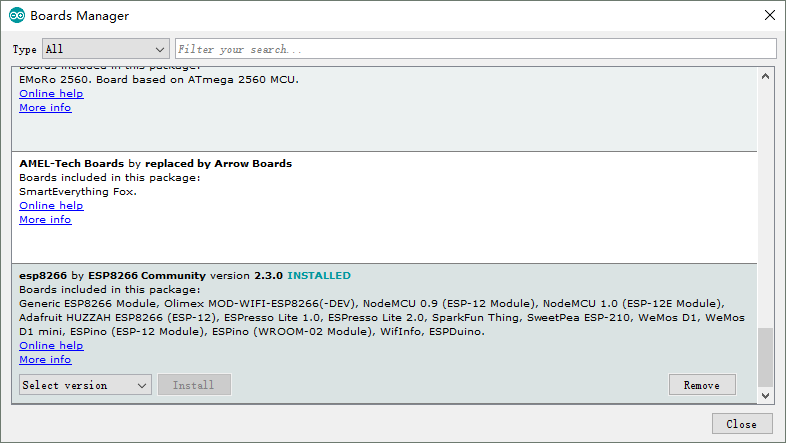
The ESP8266 package has benn installed successfully.
Note: You'd better close the Arduino IDE and restart it again.
5.SETUP ESP8266 SUPPORT
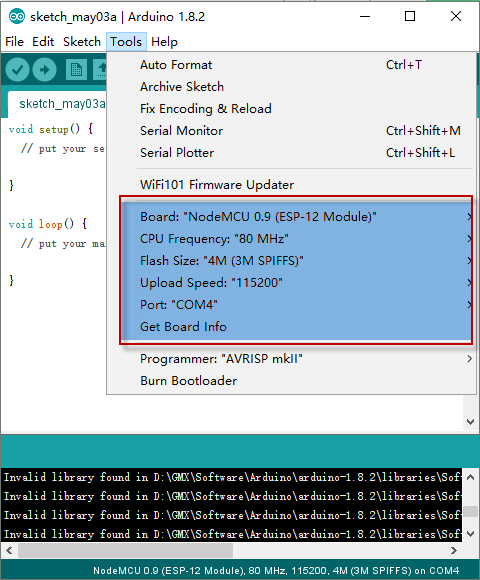
When you've restarted, select NodeMCU 0.9 (or NodeMCU 1.0) from the Tools->Board dropdown

Config the Board menu and choose the right Port for your device.
- CPU Frequency:80MHz,
- Flash Size:4M(3M SPIFFS),
- Upload Speed:112500
Now just proceed as the Arduino: Start your sketching!
Note: 115200 baud upload speed is a good place to start - later on you can try higher
speeds but 115200 is a good safe place to start.
6.BLINK TEST
Now,we will try to light the onboard LED as a simple test.
Enter this into the sketch window (and save since you'll have to)
void setup() {
pinMode(D0, OUTPUT)}
void loop() {
digitalWrite(D0, HIGH);
delay(1000);
digitalWrite(D0, LOW);
delay(1000);
}
Upload the sketch via the IDE

The sketch will start immediately - you'll see the LED blinking every sencond.
Now just proceed as the Arduino: Start your sketching!


沒有留言:
張貼留言