2018年5月25日 星期五

NodeMCU 將Data 透過WIFI 傳送至Web-Server 暨MQTT

NodeMCU 將Data 透過WIFI 傳送至Web-Server 暨MQTT . 由Node-RED 將MQTT Data 送至 Gmail . Twitter .
可以由Node-RED 與MQTT-BOX 送出信號控制NodeMCU


/*********
  Rui Santos
  Complete project details at http://randomnerdtutorials.com
*********/

// Including the ESP8266 WiFi library
#include <ESP8266WiFi.h>
#include <PubSubClient.h>
#include "DHT.h"

// Uncomment one of the lines below for whatever DHT sensor type you're using!
#define DHTTYPE DHT11   // DHT 11
//#define DHTTYPE DHT21   // DHT 21 (AM2301)
//#define DHTTYPE DHT22   // DHT 22  (AM2302), AM2321

// Replace with your network details
//const char* ssid = "YOUR_NETWORK_NAME";
//const char* password = "YOUR_NETWORK_PASSWORD";
const char* ssid = "PTS-2F";
const char* password = "";
const char* mqtt_server = "broker.mqtt-dashboard.com";
//const char* mqtt_server = "iot.eclipse.org";

WiFiClient espClient;
PubSubClient client1(espClient);
long lastMsg = 0;
char msg[50];
int value = 0;

// Web Server on port 80
WiFiServer server(80);

// DHT Sensor
const int DHTPin = D3;
// Initialize DHT sensor.
DHT dht(DHTPin, DHTTYPE);

// Temporary variables
static char celsiusTemp[7];
static char fahrenheitTemp[7];
static char humidityTemp[7];

void callback(char* topic, byte* payload, unsigned int length)
{
  Serial.print("Command is : [");
  Serial.print(topic);
  int p =(char)payload[0]-'0';

  // if MQTT comes a 0 message, show humidity
  if(p==0)
  {
    Serial.println("to show humidity!]");
    Serial.print(" Humidity is: " );
    Serial.print(dht.readHumidity(), 1);
    Serial.println('%');
  }
  // if MQTT comes a 1 message, show temperature
  if(p==1)
  {
   // digitalWrite(BUILTIN_LED, HIGH);
   Serial.println(" is to show temperature!] ");
   Serial.print(" Temp is: " );
   Serial.print(dht.readTemperature(), 1);
   Serial.println(' C');
  }
  Serial.println();
} //end callback

void reconnect() {
  // Loop until we're reconnected
  while (!client1.connected())
  {
    Serial.print("Attempting MQTT connection...");
    // Create a random client ID
    String clientId = "ESP8266Client-";
    clientId += String(random(0xffff), HEX);
    // Attempt to connect
    //if you MQTT broker has clientID,username and password
    //please change following line to    if (client.connect(clientId,userName,passWord))
    if (client1.connect(clientId.c_str()))
    {
      Serial.println("connected");
     //once connected to MQTT broker, subscribe command if any
      client1.subscribe("alex9ufo_Command");
    } else {
      Serial.print("failed, rc=");
      Serial.print(client1.state());
      Serial.println(" try again in 5 seconds");
      // Wait 6 seconds before retrying
      delay(6000);
    }
  }
} //end reconnect()


// only runs once on boot
void setup() {
  // Initializing serial port for debugging purposes
  Serial.begin(115200);
  delay(10);

  dht.begin();

  // Connecting to WiFi network
  Serial.println();
  Serial.print("Connecting to ");
  Serial.println(ssid);

  WiFi.begin(ssid, password);

  while (WiFi.status() != WL_CONNECTED) {
    delay(500);
    Serial.print(".");
  }
  Serial.println("");
  Serial.println("WiFi connected");

  // Starting the web server
  server.begin();
  Serial.println("Web server running. Waiting for the ESP IP...");
  delay(10000);

  // Printing the ESP IP address
  Serial.println(WiFi.localIP());

  client1.setServer(mqtt_server, 1883);
  client1.setCallback(callback);

  Serial.print(" Starting Humidity: " );
  Serial.print(dht.readHumidity(), 2);
  Serial.println('%');
  Serial.print(" Starting Temparature ");
  Serial.print(dht.readTemperature(), 2);
  Serial.print('*C');
  Serial.print(dht.readTemperature(true), 2);
  Serial.println('*F');

}
//=================================================================================
// runs over and over again
//=================================================================================
void loop() {
  // Listenning for new clients
  WiFiClient client = server.available();

  if (client) {
    Serial.println("New client");
    // bolean to locate when the http request ends
    boolean blank_line = true;
    while (client.connected()) {
      if (client.available()) {
        char c = client.read();
     
        if (c == '\n' && blank_line) {
            // Sensor readings may also be up to 2 seconds 'old' (its a very slow sensor)
            float h = dht.readHumidity();
            // Read temperature as Celsius (the default)
            float t = dht.readTemperature();
            // Read temperature as Fahrenheit (isFahrenheit = true)
            float f = dht.readTemperature(true);
            // Check if any reads failed and exit early (to try again).
            if (isnan(h) || isnan(t) || isnan(f)) {
              Serial.println("Failed to read from DHT sensor!");
              strcpy(celsiusTemp,"Failed");
              strcpy(fahrenheitTemp, "Failed");
              strcpy(humidityTemp, "Failed");       
            }
            else{
              // Computes temperature values in Celsius + Fahrenheit and Humidity
              float hic = dht.computeHeatIndex(t, h, false);     
              dtostrf(hic, 6, 2, celsiusTemp);           
              float hif = dht.computeHeatIndex(f, h);
              dtostrf(hif, 6, 2, fahrenheitTemp);       
              dtostrf(h, 6, 2, humidityTemp);
              // You can delete the following Serial.print's, it's just for debugging purposes
              Serial.print("Humidity: ");
              Serial.print(h);
              Serial.print(" %\t Temperature: ");
              Serial.print(t);
              Serial.print(" *C ");
              Serial.print(f);
              Serial.print(" *F\t Heat index: ");
              Serial.print(hic);
              Serial.print(" *C ");
              Serial.print(hif);
              Serial.print(" *F");
              Serial.print("Humidity: ");
              Serial.print(h);
              Serial.print(" %\t Temperature: ");
              Serial.print(t);
              Serial.print(" *C ");
              Serial.print(f);
              Serial.print(" *F\t Heat index: ");
              Serial.print(hic);
              Serial.print(" *C ");
              Serial.print(hif);
              Serial.println(" *F");
            }
            client.println("HTTP/1.1 200 OK");
            client.println("Content-Type: text/html");
            client.println("Connection: close");
            client.println();
            // your actual web page that displays temperature and humidity
            client.println("<!DOCTYPE HTML>");
            client.println("<html>");
            client.println("<head></head><body><h1>ESP8266 - Temperature and Humidity</h1><h3>Temperature in Celsius: ");
            client.println(celsiusTemp);
            client.println("*C</h3><h3>Temperature in Fahrenheit: ");
            client.println(fahrenheitTemp);
            client.println("*F</h3><h3>Humidity: ");
            client.println(humidityTemp);
            client.println("%</h3><h3>");
            client.println("</body></html>");   
            break;
        }
        if (c == '\n') {
          // when starts reading a new line
          blank_line = true;
        }
        else if (c != '\r') {
          // when finds a character on the current line
          blank_line = false;
        }
      }
    }
    // closing the client connection
    delay(1);
    //client.stop();
    //Serial.println("Client disconnected.");
  }

  if (!client1.connected()) {
    reconnect();
  }
  client1.loop();

  long now = millis();
  // read DHT11 sensor every 6 seconds
  if (now - lastMsg > 6000) {
     lastMsg = now;
     float h = dht.readHumidity();
     // Read temperature as Celsius (the default)
     float t = dht.readTemperature();
     // Read temperature as Fahrenheit (isFahrenheit = true)
     float f = dht.readTemperature(true);
 
     String msg="Temperature: ";
     msg= msg+ String(dht.computeHeatIndex(t, h, false),2);
     msg = msg+" *C ;" ;
     msg= msg+ String(dht.computeHeatIndex(f, h),2);
     msg = msg+" *F ; Humidity: " ;
     msg=msg+ String(dht.readHumidity(),2);
     msg=msg+"%";
     char message[58];
     msg.toCharArray(message,58);
     Serial.println(message);
     //publish sensor data to MQTT broker
     client1.publish("alex9ufo_Data", message);
  }

2018年5月24日 星期四

Using Yahoo's Weather API ----高雄天氣

Most of these rely on API calls to OpenWeatherMap or Weather Underground (Wunderground), and both are great. OpenWeatherMap allows users to build their own weather stations and push data to their servers to be accessed by anyone. Wunderground is owned by The Weather Company and also lets users connect weather stations and contribute to weather/forecast data.
The one downside to pulling data from those two is that you are forced to create an account and use API keys. While I recommend using OpenWeatherMap or Wunderground for most of your needs (they support citizen science contributions!), if you need to obtain weather information without API keys (e.g., classroom), then another alternative exists: Yahoo Weather API.
There are limitations on its use, like noncommercial and 2,000 calls per day, but it still works well for an open API to get weather information. If you click on the link below, you can check out how to craft HTTP calls to the API:
It relies on a query language called “Yahoo Query Language (YQL)” that works similarly to SQL. If I enter the following into the query box, I can get a 10-day forecast for Boulder:
select item.forecast from weather.forecast where woeid in (select woeid from geo.places(1) where text="boulder, co")
The Endpoint also changes (see screenshot), which gives me an HTTP GET request that I can just paste into my code. Note that you might have to click “Test” a few times to get the correct response to show up instead of a "results": null. The YQL test page seems to be slow as of late.
Yahoo Weather API
Yahoo’s Weather API seems to pull its information from weather.com, which is owned by The Weather Channel, so it’s a fairly reliable source.
It would seem that the Yahoo Weather API was originally intended for website-embedded content, but we’re going to use it for a different kind of embedded content: microcontrollers!
For this demo, you’ll just need a SparkFun ESP8266 Thing Dev Board. Follow the hookup guide to install the Arduino library and copy in the following code (changing ssid and password to your WiFi’s SSID and password, respectively):
#include <ESP8266WiFi.h>

// WiFi config
const char ssid[] = "<SSID>";
const char password[] = "<PASSWORD>";

// Server, file, port
const char hostname[] = "query.yahooapis.com";
const String url = "/v1/public/yql?q=select%20item.condition.temp%20from%20weather.forecast%20where%20woeid%20in%20(select%20woeid%20from%20geo.places(1)%20where%20text%3D%22boulder%2C%20co%22)&format=json&env=store%3A%2F%2Fdatatables.org%2Falltableswithkeys&diagnostics=true";
const int port = 80;

// Timeout
unsigned long timeout = 10000;  // ms

// WiFi Client
WiFiClient client;

void setup() {

  // Init Serial
  Serial.begin(9600);
  delay(100);

  // Connect to WiFi
  Serial.print("Connecting to ");
  Serial.print(ssid);
  WiFi.begin(ssid, password);
  while ( WiFi.status() != WL_CONNECTED ) {
    delay(500);
    Serial.print(".");
  }
  Serial.println();

  // Show we are connected
  Serial.println("Connected!");
}

void loop() {

  unsigned long timestamp;
  int temp;

  // Establish TCP connection
  Serial.print("Connecting to ");
  Serial.println(hostname);
  if ( !client.connect(hostname, port) ) {
    Serial.println("Connection failed");
  }

  // Send GET request
  String req = "GET " + url + " HTTP/1.1\r\n" + 
                "Host: " + hostname + "\r\n" +
                "Connection: close\r\n" +
                "\r\n";
  client.print(req);

  // Wait for response from server
  delay(500);
  timestamp = millis();
  while ( !client.available() && (millis() < timestamp + timeout) ) {
    delay(1);
  }

  // Parse temperature
  if ( client.find("temp\":") ) {
    temp = client.parseInt();
    Serial.print("Local temperature: ");
    Serial.print(temp);
    Serial.println(" F");
  }

  // Flush receive buffer
  while ( client.available() ) {
    client.readStringUntil('\r');
  }

  // Close TCP connection
  client.stop();
  Serial.println();
  Serial.println("Connection closed");

  delay(30000);
}
You can change the URL to whatever you’d like from the Yahoo Weather API page in order to, for example, find the temperature in a different city. Here, I’m fetching the current temperature in Boulder, CO. Open a Serial monitor to get the parsed temperature:
Fetching local weather from Yahoo Weather API

#include <ESP8266WiFi.h>
//高雄市天氣
// WiFi config
const char ssid[] = "PTS-2F";
const char password[] = "";

// Server, file, port
const char hostname[] = "query.yahooapis.com";
const String url = "/v1/public/yql?q=select%20item.condition.temp%20from%20weather.forecast%20where%20woeid%20in%20(select%20woeid%20from%20geo.places(1)%20where%20text%3D%22kaohsiung%22)&format=json&env=store%3A%2F%2Fdatatables.org%2Falltableswithkeys&diagnostics=true";
const int port = 80;

/*
//select item.forecast from weather.forecast where woeid in (select woeid from geo.places(1) where text="boulder, co") 美國波得市
//kaohsiung-city-2306180
// Server, file, port
const char hostname[] = "query.yahooapis.com";
const String url = "/v1/public/yql?q=select%20item.condition.temp%20from%20weather.forecast%20where%20woeid%20in%20(select%20woeid%20from%20geo.places(1)%20where%20text%3D%22boulder%2C%20co%22)&format=json&env=store%3A%2F%2Fdatatables.org%2Falltableswithkeys&diagnostics=true";
const int port = 80; */

// Timeout
unsigned long timeout = 10000;  // ms

// WiFi Client
WiFiClient client;

void setup() {

  // Init Serial
  Serial.begin(115200);
  delay(100);

  // Connect to WiFi
  Serial.print("Connecting to ");
  Serial.print(ssid);
  WiFi.begin(ssid, password);
  while ( WiFi.status() != WL_CONNECTED ) {
    delay(500);
    Serial.print(".");
  }
  Serial.println();

  // Show we are connected
  Serial.println("WiFi connected");
  Serial.println("IP address: ");
  Serial.println(WiFi.localIP());
  
}

void loop() {

  unsigned long timestamp;
  int temp;

  // Establish TCP connection
  Serial.print("Connecting to ");
  Serial.println(hostname);
  if ( !client.connect(hostname, port) ) {
    Serial.println("Connection failed");
  }

  // Send GET request
  String req = "GET " + url + " HTTP/1.1\r\n" + 
                "Host: " + hostname + "\r\n" +
                "Connection: close\r\n" +
                "\r\n";
  client.print(req);

  // Wait for response from server
  delay(500);
  timestamp = millis();
  while ( !client.available() && (millis() < timestamp + timeout) ) {
    delay(1);
  }

  // Parse temperature
  if ( client.find("temp\":") ) {
    temp = client.parseInt();
    Serial.print(" kaohsiung-city temperature: ");
    Serial.print(temp);
    Serial.print(" F , ");
    float t1= (temp-32) * 5 /9;    //攝氏 = (華氏-32)*5/9
    Serial.print(t1,2);
    Serial.print(" C ");
  }

  // Flush receive buffer
  while ( client.available() ) {
    client.readStringUntil('\r');
  }

  // Close TCP connection
  client.stop();
  Serial.println();
  Serial.println("Connection closed");

  delay(30000);
}


2018年5月23日 星期三

Red-Node Cookbook HTTP recipes

HTTP recipes

HTTP endpoints

HTTP requests

Node-RED 的基礎概念(HTTP Endpoint)網頁服務功能


Node-RED 的基礎概念(HTTP Endpoint)網頁服務功能

源自於
https://hugolin168.wordpress.com/2018/03/01/nodered401/
Node-RED 在[1]官方網站Cookbook 之中,將它整個系統分為下列幾個區塊的基礎課課,進行討論,本篇針對Messages 訊息處理進行讀後心得分享。
  • Messages
  • Flow control
  • Error handling
  • HTTP Endpoint
  • HTTP requests
  • MQTT
試用一下,即然Node-RED的操作功能是用web 方式來進行的,那是不是可以新增一頁來放網頁資料,並且做與Node-RED流程的輸入及輸出介面之一,舉例說明:假設我將Raspberry Pi 3安裝好Node-RED (己有HTTP Endpoint)那我何須再另外再寫再開一個http 的服務或Linux API 或Console 來狀態做即時的展示出來呢?
本篇即是再探討關於網頁服務功能,應用在Node-RED是要如何進行的,在網頁服務功能(HTTP Endpoint) 說明,分成下列幾類進行說明:
  1. 創建一個HTTP服務端點 (Create an HTTP Endpoint)
  2. 傳遞給HTTP端點使用查詢參數方式(Handle query parameters passed to an HTTP endpoint)
  3. 處理HTTP端點使用URL參數方式(Handle url parameters in an HTTP endpoint)
  4. 存取HTTP請求標頭設計(Access HTTP request headers)
  5. 從另一個流程控制中抓數數據(Include data captured in another flow)
  6. 提供JSON內容(Serve JSON content)
  7. 提供本地文件(Serve a local file)
  8. 將原始數據發佈到流程(Post raw data to a flow)
  9. 將表單數據發佈到流程(Post form data to a flow)
  10. 將JSON數據發佈到流程(Post JSON data to a flow)
  11. cookie應用範例(Work with cookies)

1.創建一個HTTP服務端點 (Create an HTTP Endpoint)

如同Hello World !!的第101課程一樣,如何開啟網頁並秀出Hello World !! 即是本章節要引導大家來進行的,假設我的Node-RED 服務的電腦的IP 為 192.168.1.100,所以我可以用http://192.168.1.100:1880/ 來開啟Node-RED 編輯器,若我想要在下面的網址上秀Hello World !! 要怎麼做呢?
利用IP SCAN來測試自己的IP  192.168.1.100:1880/hello

如下圖1,先拉一個Input->http,後面再接一個function->template,最後再接一個output->http response 。
02202-03.png
如下圖2,將Input->http 點2下開啟,將URL 填hello ( 因為我們目標是 http://192.168.1.100:1880/hello ,如果你網址後面要是ooxx ,記得要改URL的文字喲。
02202-01
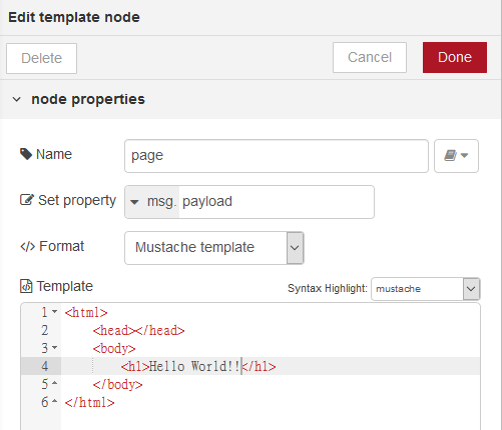
如下圖3,在function->template 上面點2下開啟,在Template 裏面填寫HTML5 的網頁語法。
02202-02
最後按下Deploy 後,如下圖在瀏覽器開啟新頁輸入 http://192.168.1.100:1880/hello即可會出現下面的畫面。
02202-04

範例程式碼:Node-RED的json code , 請在Node-RED編輯畫面上按[Ctrl]+[I]將json 碼貼上即可
[{“id":"2fb4c941.7b44e6″,"type":"http in","z":"ddb34c49.89684″,"name":"","url":"/hello","method":"get","upload":false,"swaggerDoc":"","x":180,"y":220,"wires":[[“40559a3f.1ca6d4″]]},{“id":"40559a3f.1ca6d4″,"type":"template","z":"ddb34c49.89684″,"name":"page","field":"payload","fieldType":"msg","format":"handlebars","syntax":"mustache","template":"<html>\n <head></head>\n <body>\n <h1>Hello World!!</h1>\n </body>\n</html>","x":330,"y":220,"wires":[[“f22db627.b84f2″]]},{“id":"f22db627.b84f2″,"type":"http response","z":"ddb34c49.89684″,"name":"","statusCode":"","headers":{},"x":470,"y":220,"wires":[]}]


MQTT Explorer 與 Node-Red 介面的實驗

 MQTT Explorer 與 Node-Red 介面的實驗 MQTT EXplorer 與 Node-Red介面的設定 (1) 設定  MQTT EXplorer Client    (2)        Node-Red LED ON  --> MQTT Explor...