2018年7月29日 星期日

NodeMCU Lesson 2—Hello World!


/*
 Basic ESP8266 MQTT example
 To install the ESP8266 board, (using Arduino 1.6.4+):
  - Add the following 3rd party board manager under "File -> Preferences -> Additional Boards Manager URLs":
      http://arduino.esp8266.com/stable/package_esp8266com_index.json
  - Open the "Tools -> Board -> Board Manager" and click install for the ESP8266"
  - Select your ESP8266 in "Tools -> Board"
*/

#include <ESP8266WiFi.h>
#include <PubSubClient.h>

// Update these with values suitable for your network.
const char* ssid = "PTS-2F";
const char* password = "";
//const char* ssid = "your_ssid";
//const char* password = "your_password";

#define MQTTid              ""                           //id of this mqtt client
#define MQTTip              "broker.mqtt-dashboard.com"  //ip address or hostname of the mqtt broker
#define MQTTport            1883                         //port of the mqtt broker
#define MQTTuser            "alex9ufo"                   //username of this mqtt client
#define MQTTpsw             "alex9981"                   //password of this mqtt client
//#define MQTTuser            "your_username"              //username of this mqtt client
//#define MQTTpsw             "your_password"              //password of this mqtt client
#define MQTTpubQos          2                            //qos of publish (see README)
#define MQTTsubQos          1                            //qos of subscribe

long lastMsg = 0;
int value = 0;
char jsonChar[100];

boolean pendingDisconnect = false;
void mqttConnectedCb(); // on connect callback
void mqttDisconnectedCb(); // on disconnect callback
void mqttDataCb(char* topic, byte* payload, unsigned int length); // on new message callback

WiFiClient wclient;
PubSubClient client(MQTTip, MQTTport, mqttDataCb, wclient);

void mqttConnectedCb() {
  Serial.println("connected");
 
  // Once connected, publish an announcement...
  client.publish("alex9ufo/outTopic/json", jsonChar, MQTTpubQos, true); // true means retain
  // ... and resubscribe
  client.subscribe("alex9ufo/inTopic", MQTTsubQos);

}

void mqttDisconnectedCb() {
  Serial.println("disconnected");
}

void mqttDataCb(char* topic, byte* payload, unsigned int length) {

  /*
  you can convert payload to a C string appending a null terminator to it;
  this is possible when the message (including protocol overhead) doesn't
  exceeds the MQTT_MAX_PACKET_SIZE defined in the library header.
  you can consider safe to do so when the length of topic plus the length of
  message doesn't exceeds 115 characters
  */
  char* message = (char *) payload;
  message[length] = 0;

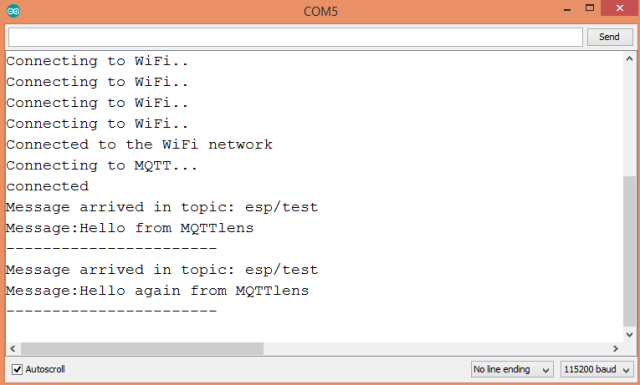
  Serial.print("Message arrived [");
  Serial.print(topic);
  Serial.print("] ");
  Serial.println(message);

  // Switch on the LED if an 1 was received as first character
  if (message[0] == '1') {
    digitalWrite(BUILTIN_LED, LOW);   // Turn the LED on (Note that LOW is the voltage level
    // but actually the LED is on; this is because
    // it is acive low on the ESP-01)
    Serial.println("Received 1 , LED turn on");
  }
  else
  {
      digitalWrite(BUILTIN_LED, HIGH);  // Turn the LED off by making the voltage HIGH
      Serial.println("LED turn off ");
  }
}
//======================================================
void setup_wifi() {
  delay(10);
  // We start by connecting to a WiFi network
  Serial.println();
  Serial.print("Connecting to ");
  Serial.println(ssid);

  WiFi.begin(ssid, password);

  while (WiFi.status() != WL_CONNECTED) {
    delay(500);
    Serial.print(".");
  }

  Serial.println("");
  Serial.println("WiFi connected");
  Serial.println("IP address: ");
  Serial.println(WiFi.localIP());
}
//======================================================
void setup() {
  pinMode(BUILTIN_LED, OUTPUT);     // Initialize the BUILTIN_LED pin as an output
  Serial.begin(115200);
  setup_wifi();
}

void process_mqtt() {
  if (WiFi.status() == WL_CONNECTED) {
    if (client.connected()) {
      client.loop();
    } else {
    // client id, client username, client password, last will topic, last will qos, last will retain, last will message
      if (client.connect(MQTTid, MQTTuser, MQTTpsw, MQTTid "/status", 2, true, "0")) {
          pendingDisconnect = false;
          mqttConnectedCb();
      }
    }
  } else {
    if (client.connected())
      client.disconnect();
  }
  if (!client.connected() && !pendingDisconnect) {
    pendingDisconnect = true;
    mqttDisconnectedCb();
  }
}

void loop() {

  process_mqtt();

  long now = millis();
  if (now - lastMsg > 6000) {
    lastMsg = now;
    ++value;
   // Convert data to JSON string
   String json =
   "{\"data\":{"
   "\"hello world\": \"" + String(value) + "\"}"
   "}";

   // Convert JSON string to character array
   json.toCharArray(jsonChar, json.length()+1);

   if (client.connected()) {
       Serial.print("Publish message: ");
       Serial.println(json);
       // Publish JSON character array to MQTT topic
       client.publish("alex9ufo/outTopic/json",jsonChar);
    }
  }
}


[{"id":"97bc1ce5.5db0e","type":"mongodb out","z":"2070d58e.5f652a","mongodb":"9913f70e.21caf8","name":"mongodb save","collection":"helloworld","payonly":true,"upsert":true,"multi":false,"operation":"insert","x":740,"y":100,"wires":[]},{"id":"f2e3c6b.b9fb538","type":"mqtt in","z":"2070d58e.5f652a","name":"alex9ufo/outTopic/json","topic":"alex9ufo/outTopic/json","qos":"2","broker":"b0f7c1ff.aede5","x":140,"y":80,"wires":[["50f748a2.c43ce8"]]},{"id":"5f14b11b.58652","type":"mongodb in","z":"2070d58e.5f652a","mongodb":"9913f70e.21caf8","name":"helloworld","collection":"helloworld","operation":"find","x":360,"y":300,"wires":[["79628a43.e9b804"]]},{"id":"79628a43.e9b804","type":"http response","z":"2070d58e.5f652a","name":"Hello response","statusCode":"","headers":{},"x":580,"y":300,"wires":[]},{"id":"ccdbf699.adc548","type":"http in","z":"2070d58e.5f652a","name":"[get] /showhello","url":"/showhello","method":"get","upload":false,"swaggerDoc":"","x":120,"y":300,"wires":[["5f14b11b.58652"]]},{"id":"2a47be08.c16ef2","type":"comment","z":"2070d58e.5f652a","name":"Lesson2 Hello World Data in HTML/JSON View","info":"","x":220,"y":240,"wires":[]},{"id":"74cdf07e.e1aa4","type":"function","z":"2070d58e.5f652a","name":"timestamp and format data","func":"msg.payload.data.date = new Date();\nmsg.payload = msg.payload.data;\nreturn msg;","outputs":1,"noerr":0,"x":480,"y":140,"wires":[["97bc1ce5.5db0e","165986d6.43bd49"]]},{"id":"50f748a2.c43ce8","type":"json","z":"2070d58e.5f652a","name":"","x":330,"y":80,"wires":[["74cdf07e.e1aa4"]]},{"id":"165986d6.43bd49","type":"debug","z":"2070d58e.5f652a","name":"json debug","active":true,"tosidebar":true,"console":false,"tostatus":false,"complete":"payload","x":730,"y":180,"wires":[]},{"id":"c8efd5d5.f64358","type":"comment","z":"2070d58e.5f652a","name":"Lesson2 Hello world MQTT Flow","info":"","x":170,"y":40,"wires":[]},{"id":"9913f70e.21caf8","type":"mongodb","z":"","hostname":"127.0.0.1","port":"27017","db":"lesson2","name":""},{"id":"b0f7c1ff.aede5","type":"mqtt-broker","z":"","name":"mqtt","broker":"broker.mqtt-dashboard.com","port":"1883","clientid":"","usetls":false,"compatmode":true,"keepalive":"60","cleansession":true,"willTopic":"","willQos":"0","willPayload":"","birthTopic":"","birthQos":"0","birthPayload":""}]

2018年7月27日 星期五

ESP8266: Connecting to MQTT broker

ESP8266: Connecting to MQTT broker

The objective of this post is to explain how to connect the ESP8266 to a MQTT broker, hosted on CloudMQTT.


Introduction

The objective of this post is to explain how to connect the ESP8266 to a MQTT broker. If you are not familiar with the protocol, you can read more about here.
Although this example should work fine with other brokers, we will assume that the broker will be hosted on CloudMQTT.
Since CloudMQTT has a free plan, we can just create an account and test it. Setting an account is really simple and it’s outside the scope of this post. You can check here how to do it and how to create a broker instance.
After completing the procedure, check the instance information page, which should be similar to the one shown in figure 1. The important credentials that we will be using on the ESP8266 code are the server, the user, the password and the port.
ESP8266 CloudMQTT Credentials
Figure 1 – CloudMQTT instance information.
In the ESP8266 side, we will be using an MQTT that supports the ESP8266, called PubSubClient. The library can be installed via Arduino IDE library manager. The coding shown here is based on the examples provided in the library, which I encourage you to try.
Regarding the hardware, the tests shown on this tutorial were performed using a ESP8266 NodeMCU board.


The code

First, we start by including the libraries needed for all the functionality. We need the ESP8266WiFi library, in order to be able to connect the ESP8266 to a WiFi network, and the PubSubClient library, which allows us to connect to a MQTT broker and publish/subscribe messages in topics.
1
2
#include <ESP8266WiFi.h>
#include <PubSubClient.h>
Then, we will declare some global variables for our connections. Naturally, we need the WiFi credentials, to connect to the WiFi network.  You can check here a previous post explaining in detail how to connect to a WiFi network using the ESP8266.
1
2
const char* ssid = "YourNetworkName";
const char* password =  "YourNetworkPassword";
We will also need the information and credentials of the MQTT server. As explained in the introduction, you will need to know the server address, the port, the username and the password. Use your values in the variables bellow.
1
2
3
4
const char* mqttServer = "m11.cloudmqtt.com";
const int mqttPort = 12948;
const char* mqttUser = "YourMqttUser";
const char* mqttPassword = "YourMqttUserPassword";
After that, we will declare an object of class WiFiClient, which allows to establish a connection to a specific IP and port [1]. We will also declare an object of class PubSubClient, which receives as input of the constructor the previously defined WiFiClient.
The constructor of this class can receive other number of arguments, as can be seen in the API documentation.
1
2
WiFiClient espClient;
PubSubClient client(espClient);
Now, moving for the setup function, we open a serial connection, so we can output the result of our program. We also connect to the WiFi network.
1
2
3
4
5
6
7
8
9
Serial.begin(115200);
WiFi.begin(ssid, password);
 
while (WiFi.status() != WL_CONNECTED) {
delay(500);
Serial.print("Connecting to WiFi..");
}
 
Serial.println("Connected to the WiFi network");
Next, we need to specify the address and the port of the MQTT server.  To do so, we call the setServer method on the PubSubClient object, passing as first argument the address and as second the port.  These variables were defined before, in constant strings.
1
client.setServer(mqttServer, mqttPort);
Then, we use the setCallback method on the same object to specify a handling function that is executed when a MQTT message is received. We will analyse the code for this function latter.
1
client.setCallback(callback);
Now, we will connect to the MQTT server, still in the setup function. As we did in the connection to the WiFi network, we connect to the server in a loop until we get success.
So, we do a while loop based on the output of the connected method called on the PubSubClient, which will return true if the connection is established or false otherwise.
To do the actual connection, we call the connect method, which receives as input the unique identifier of our client, which we will call “ESP8266Client”, and the authentication username and password, which we defined early. This will return true on connection success and false otherwise
In case of failure, we can call the state method on the the PubSubClient object, which will return a code with information about why the connection failled [2]. Check here the possible returning values.
Check bellow the whole connecting loop.
1
2
3
4
5
6
7
8
9
10
11
12
13
14
15
while (!client.connected()) {
    Serial.println("Connecting to MQTT...");
 
    if (client.connect("ESP8266Client", mqttUser, mqttPassword )) {
 
      Serial.println("connected"); 
 
    } else {
 
      Serial.print("failed with state ");
      Serial.print(client.state());
      delay(2000);
 
    }
}
To finalize the setup function, we will publish a message on a topic. To do so, we call the publish method, which receives as input arguments the topic and the message. In this case, we will publish a “Hello from ESP8266” message on the “esp/test” topic.
1
client.publish("esp/test", "Hello from ESP8266");
Then, we will subscribe to that same topic, so we can receive messages from other publishers. To do so, we call the subscribe method, passing as input the name of the topic.
1
client.subscribe("esp/test");
Check the full setup function bellow.
1
2
3
4
5
6
7
8
9
10
11
12
13
14
15
16
17
18
19
20
21
22
23
24
25
26
27
28
29
30
31
32
33
34
35
void setup() {
 
  Serial.begin(115200);
 
  WiFi.begin(ssid, password);
 
  while (WiFi.status() != WL_CONNECTED) {
    delay(500);
    Serial.println("Connecting to WiFi..");
  }
  Serial.println("Connected to the WiFi network");
 
  client.setServer(mqttServer, mqttPort);
  client.setCallback(callback);
 
  while (!client.connected()) {
    Serial.println("Connecting to MQTT...");
 
    if (client.connect("ESP8266Client", mqttUser, mqttPassword )) {
 
      Serial.println("connected"); 
 
    } else {
 
      Serial.print("failed with state ");
      Serial.print(client.state());
      delay(2000);
 
    }
  }
 
  client.publish("esp/test", "Hello from ESP8266");
  client.subscribe("esp/test");
 
}


The callback function

After the initialization, we need to specify the callback function, which will handle the incoming messages for the topics subscribed.
The arguments of this function are the name of the topic, the payload (in bytes) and the length of the message. It should return void.
In this function, we will first print the topic name to the serial port, and then print each byte of the message received. Since we also have the length of the message as argument of the function, this can be easily done in a loop.
Check bellow the whole function code.
1
2
3
4
5
6
7
8
9
10
11
12
13
14
void callback(char* topic, byte* payload, unsigned int length) {
 
  Serial.print("Message arrived in topic: ");
  Serial.println(topic);
 
  Serial.print("Message:");
  for (int i = 0; i < length; i++) {
    Serial.print((char)payload[i]);
  }
 
  Serial.println();
  Serial.println("-----------------------");
 
}

The main loop

In the main loop function, we will just call the loop method of the PubSubClient. This function should be called regularly to allow the client to process incoming messages and maintain its connection to the server [2].
1
2
3
void loop() {
  client.loop();
}
Check the full code bellow
1
2
3
4
5
6
7
8
9
10
11
12
13
14
15
16
17
18
19
20
21
22
23
24
25
26
27
28
29
30
31
32
33
34
35
36
37
38
39
40
41
42
43
44
45
46
47
48
49
50
51
52
53
54
55
56
57
58
59
60
61
62
63
64
65
66
67
#include <ESP8266WiFi.h>
#include <PubSubClient.h>
 
const char* ssid = "YourNetworkName";
const char* password =  "YourNetworkPassword";
const char* mqttServer = "m11.cloudmqtt.com";
const int mqttPort = 12948;
const char* mqttUser = "YourMqttUser";
const char* mqttPassword = "YourMqttUserPassword";
 
WiFiClient espClient;
PubSubClient client(espClient);
 
void setup() {
 
  Serial.begin(115200);
 
  WiFi.begin(ssid, password);
 
  while (WiFi.status() != WL_CONNECTED) {
    delay(500);
    Serial.println("Connecting to WiFi..");
  }
  Serial.println("Connected to the WiFi network");
 
  client.setServer(mqttServer, mqttPort);
  client.setCallback(callback);
 
  while (!client.connected()) {
    Serial.println("Connecting to MQTT...");
 
    if (client.connect("ESP8266Client", mqttUser, mqttPassword )) {
 
      Serial.println("connected"); 
 
    } else {
 
      Serial.print("failed with state ");
      Serial.print(client.state());
      delay(2000);
 
    }
  }
 
  client.publish("esp/test", "Hello from ESP8266");
  client.subscribe("esp/test");
 
}
 
void callback(char* topic, byte* payload, unsigned int length) {
 
  Serial.print("Message arrived in topic: ");
  Serial.println(topic);
 
  Serial.print("Message:");
  for (int i = 0; i < length; i++) {
    Serial.print((char)payload[i]);
  }
 
  Serial.println();
  Serial.println("-----------------------");
 
}
 
void loop() {
  client.loop();
}


Testing the code

First, make sure the MQTT server is running. Then, to test the code, just upload it and run it on your ESP8266. Open the Arduino IDE serial console, so the output gets printed.
Upon running, the ESP8266 will send the “Hello from ESP8266” message, which will not be printed on the serial. After that, the ESP8266 subscribes the same topic to which the hello message was sent.
If any other producer sends a message to the “esp/test” topic, then it will be printed in the serial console, as shown in figure 2.
ESP8266 MQTT test
Figure 2 – Messages sent to the “esp/test” topic.
For this tutorial, I used MQTTlens, a Google Chrome application, which connects to a MQTT broker and is able to subscribe and publish to MQTT topics [3]. This is a very useful application that I really recommend for this type of tests.
For the test, MQTTlens was subscribing the “esp/test” topic before connecting the ESP8266. As seen in figure 3, the “Hello from ESP8266” message was printed. After that, two hello messages were sent by MQTTlens, which can be seen in the same figure. The messages sent are the ones shown in figure 2, which were received by the ESP8266, as expected.
ESP8266 MQTT MQTTlens messages
Figure 3 – Testing the program with MQTTlens.


Related content


References


MQTT Explorer 與 Node-Red 介面的實驗

 MQTT Explorer 與 Node-Red 介面的實驗 MQTT EXplorer 與 Node-Red介面的設定 (1) 設定  MQTT EXplorer Client    (2)        Node-Red LED ON  --> MQTT Explor...