https://alselectro.wordpress.com/2015/07/03/port-forwarding-part-1-tips-troubleshooting/
Port Forwarding– part 1 . Tips & Troubleshooting
In the previous post we’ve seen the ways to control the ESP8266 WIFI module from anywhere in the world.The key to success depends on the PORT FORWARDING , where we route the contact on particular port to the local IP address of the WIFI module.
Nowadays USB dongles are used widely for internet access .This post will help you troubleshoot PORT FORWARDING.
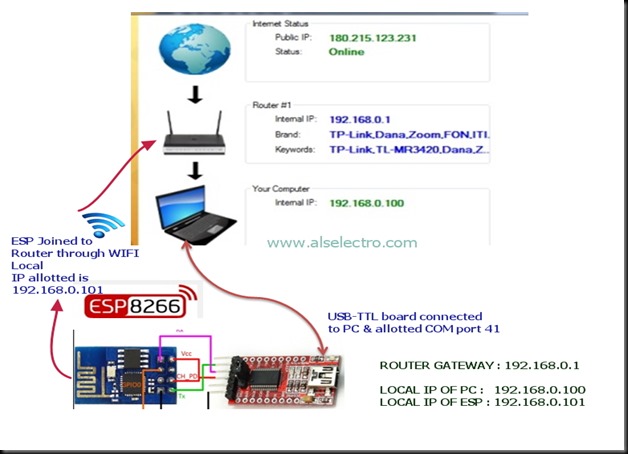
Following is the SETUP diagram .
TPLINK ROUTER is on the top of the NETWORK. An MTS USB dongle is plugged to TPLINK Router (model TL-MR 3420 with 3G/4G support).
A Laptop is connected to TPLINK Router on Ethernet using RJ45 cable.
A USB to TTL board is connected to PC on which the ESP 8266 module is wired.
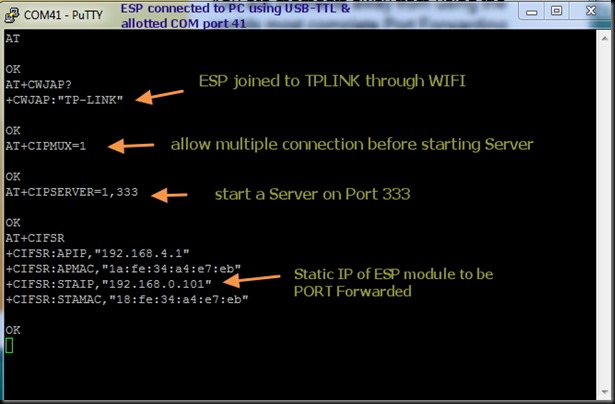
The ESP module is linked to TPLINK Router on WIFI using the AT Command AT+CWJAP=”SSID”,”password”
On switching ON the ROUTER , it assigns LOCAL IP address to the modules connected to it either on RJ45 (wired) or on WIFI.
In our set up the LAPTOP which is connected by wire is assigned 192.168.0.100
& the ESP module which is connected on WIFI is assigned 192.168.0.101.
Note that the allotment of address is on first come basis.When you power off & on the Router again , this allotment may vary.
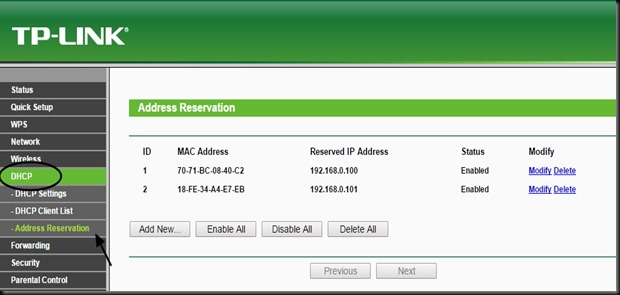
You can RESERVE the address by selecting the DHCP tab of TPLINK configuration.Here select
Address Reservation & then feed in the MAC address of the devices you’ve connected to the Router.
To know the MAC address you can use the ADVANCED IP SCANNER TOOL.
Download & install the tool. Start the scanner to know the IP address & MAC address of the devices connected .
STEP 1:
Confirm that you’ve Internet access after plugging the USB dongle to the TPLINK Router .You need to login the TPLINK configuration with address 192.168.0.1 & enter the QUICK SETUP for this process.
STEP 2 :
Start the SERVER on ESP module
STEP 3 :OPEN PORT SCANNER
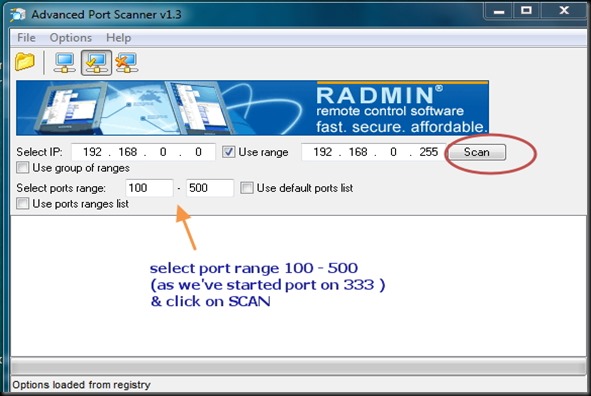
To confirm that the port we’ve started server ( here port no. 333) is OPEN , we use a port scanner tool .
Advanced Port Scanner is a small, fast, robust and easy-to-use port scanner for Win32 platform. It uses a multithread technique, so on fast machines you can scan ports very fast.
Also, it contains descriptions for common ports, and can perform scans on predefined port ranges.
Download it & install.
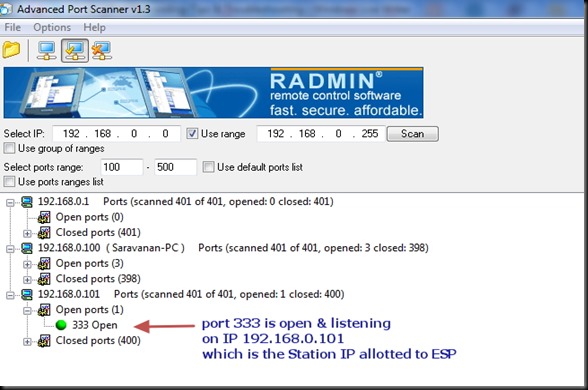
Open Port scanner & under Select port range enter 100 to 500 . As we’ve to check port 333 , we enter the range below 500 .Click on SCAN .
The PORT SCANNER displays the result regarding status of PORTs of your PC as well as the module connected to PC.
Here we can confirm that port 333 is OPEN on IP 192.168.0.101 (ESP module).
STEP 4 : SET UP FORWARDING RULE on TPLINK CONFIGURATION
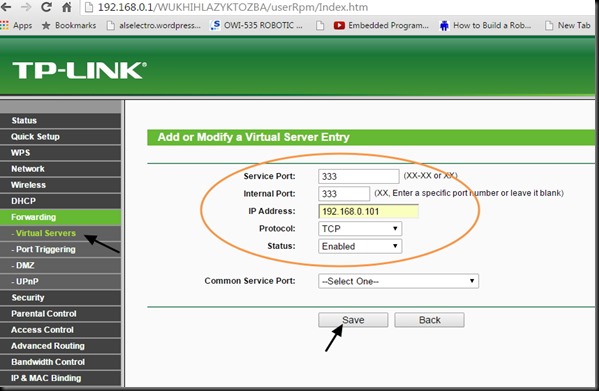
On TPLINK configuration window , under FORWARDING select the tab VIRTUAL SERVERS.
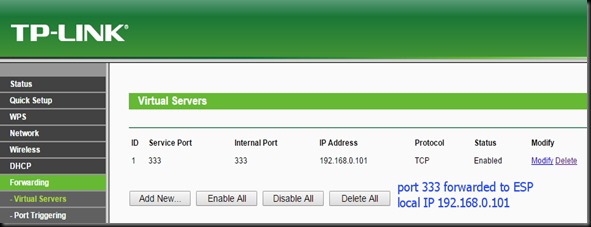
Click on ADD NEW.. & enter the Service & Internal port as 333 .
IP Address as 192.168.0.101 , which is the local IP allotted by Router to ESP module.
Select Protocol as TCP & then SAVE the settings.
STEP 5 : WINDOWS FIREWALL SETTINGS
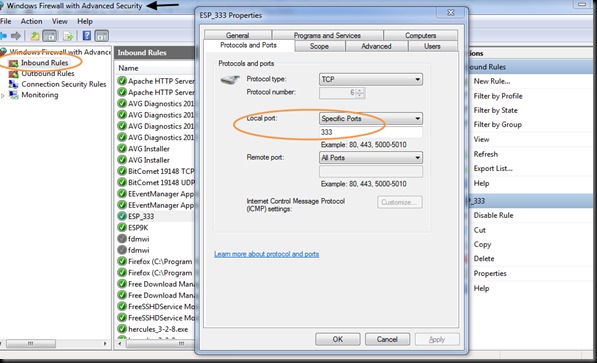
Open Windows Firewall Advanced settings & click on INBOUND RULES.
SET the rule to allow communication on port 333.
Now you are set to check the condition of PORT 333 externally.
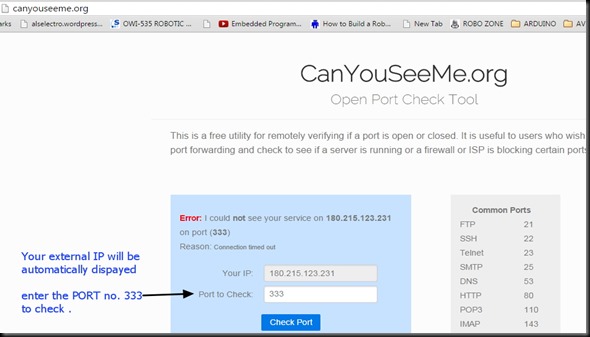
For this we make use of an online tool www.canyouseeme.org
On opening the site your external IP will be automatically displayed.Enter the port number to check.
Click on CHECK PORT.
Unless you see SUCCESS on this test , you can’t contact your ESP module from external world.
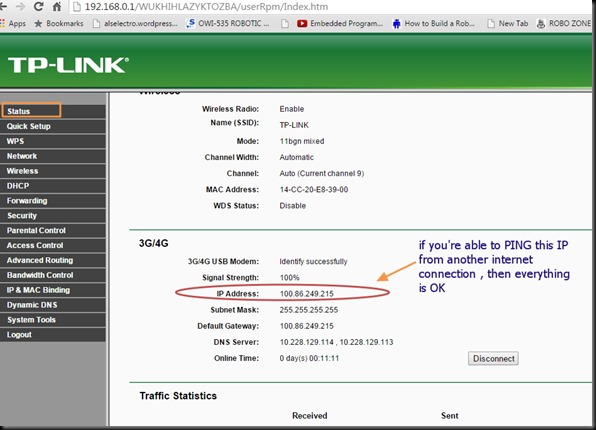
If you get ERROR , open the TPLINK configuration & click on STATUS.
Note IP Address displayed under 3G/4G.
From another computer with a different internet connection try to PING this IP address.
Open CMD & type in PING x.x.x.x
If the PING result is OK , you can be sure that the ESP module can be contacted from outside world.
If the PING result is TIMED OUT , you can’t communicate with ESP.
The STATUS tab in my case , as shown in above screen shot , indicates an IP address starting 100.86.x.x
Generally following IP address ranges are PRIVATE IP ADDRESS RANGES :
10.x.x.x
172.16.x.x
192.168.x.x
These are reserved by IANA for private Intranets & NOT ROUTABLE TO INTERNET.
Private addresses are not reachable on the Internet. Therefore, Internet traffic from a host that has a private address must either send its requests to an Application layer gateway (such as a proxy server), which has a valid public address, or have its private address translated into a valid public address by a network address translator (NAT) before it is sent on the Internet.
In my case , the MTS ISP provider hide the PUBLIC IP address.
The MTS dongle does not support VIRTUAL SERVER settings , which means PORT FORWARDING IS NOT POSSIBLE with MTS.
What I couldn’t understand was , while writing my previous blog ,it worked sometimes.While MTS customer support was contacted repeatedly , they finally accepted that port forwarding is blocked by them.
After sleepless nights I’ve found a solution….. Read on my next post ….


沒有留言:
張貼留言