https://alselectro.wordpress.com/category/esp8266/
https://alselectro.wordpress.com/2016/10/05/how-to-make-your-devices-ip-address-static-port-forward-a-practical-demo-part-1/
How to make your device’s IP address Static & Port Forward – A Practical Demo – part 1
This post is all about converting your device address in Network to STATIC & establish PORT FORWARDING.
For IOT projects it is easy to test in local setup using the LAN IP starting with 192.x.x.x .But from outside world this IP cannot be reached.Here I will walk you through the steps to contact the local IP from outside world.This procedure is a major step needed in IOT projects , without which external control is not possible.
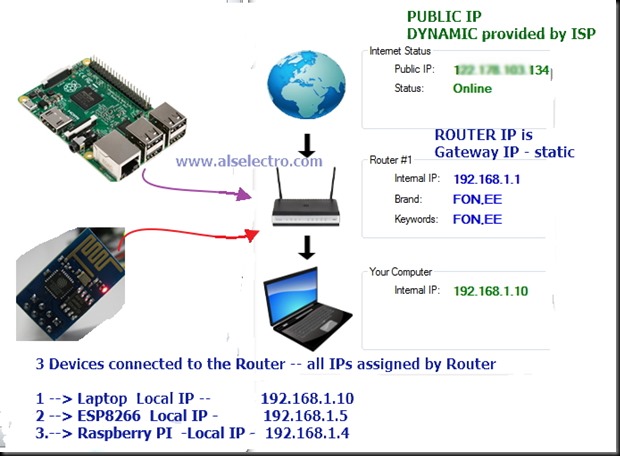
Following is the setup of my Network. A ROUTER is on the top of the network for which the Internet Service Provider is Airtel . The Router is WIFI enabled so that I can connect multiple devices wirelessly.
Total 3 devices are connected to the Router as shown below.
On switching on the power , the Router (DHCP enabled) assigns local IP addresses to all the devices connected.The IP address assigned is DYNAMIC which means , it changes every time I switch on the Router.
There are two types of IP addresses: STATIC & DYNAMIC
STATIC addresses are just that – unchanging
Dynamic IP addresses are assigned on-the-fly & keeps on changing by every reboot.
Because most home users tend to turn their computers off, even broadband connections, such as DSL and cable, continue to use dynamic addresses. If your computer is off, you don’t need an IP address so someone else might get to use it.
Each time you connect to the internet, your ISP assigns you an IP address to use. This IP address is the Public IP which others use to communicate to your PC.This IP address is DYNAMIC which changes every time you newly connect to web.
The next time you connect, you might get a different address. If you’re only connecting out to the internet, that’s all you need.
If you expect people to connect in, say you want to run a web server that you want people to be able to find and visit, you’ll most likely need a STATIC IP address. A static IP is assigned by your ISP at an extra cost which is unnecessary for a home network.
In this post I shall explain the ways of changing the LOCAL IP address as well as the PUBLIC IP address to STATTIC.Suppose you run a web server on your ESP or Raspberry PI & wish to connect from external world.It will work only for the first time , as you use Dynamic IP to communicate.
Next time you power up , the IP address might have changed.So using a STATIC IP is a must .
SETTING the Local IP of PC / Laptop to STATIC :
In my network the PC assigned a Dynamic IP of 192.168.1.10
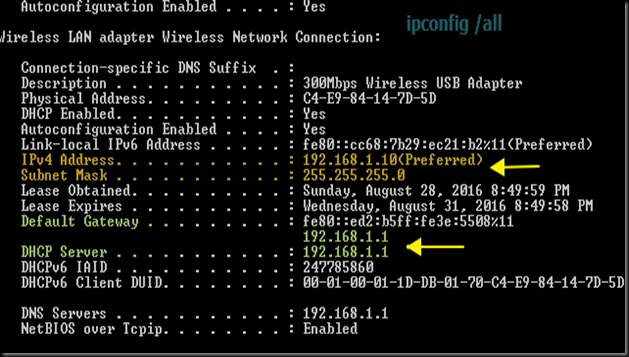
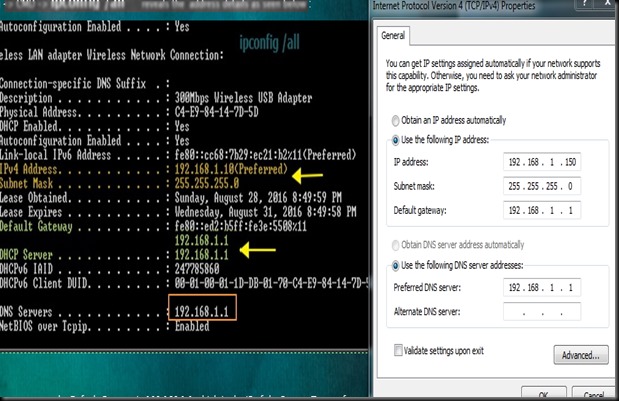
Run –> CMD –> ipconfig /all reveals the address details as seen below :
Here you can see the Default Gateway is 192.168.1.1 which is the IP of the Router .To port forward settings we need to use this IP on a browser to enter the settings , which we will see later in the post.
Local IP assigned to the PC is the IPV4 address 192.168.1.10
Let us change this to STATIC now.
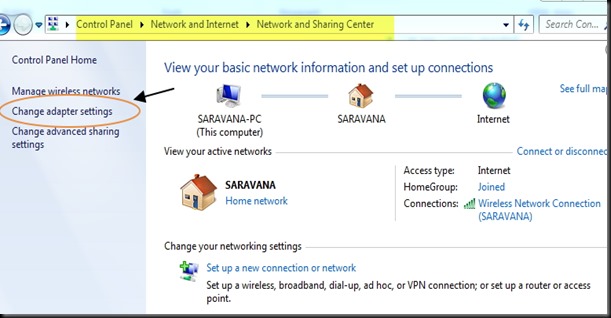
Open the CONTROL PANEL –> NETWORK and Internet –> Network and Sharing center
Click on “Change adapter settings”
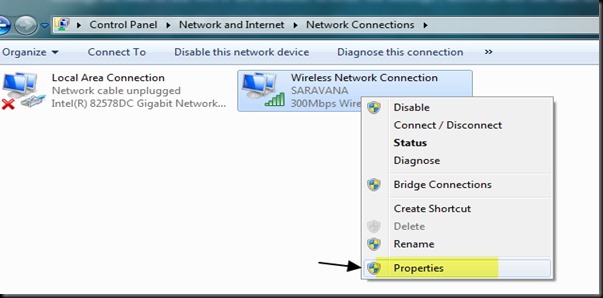
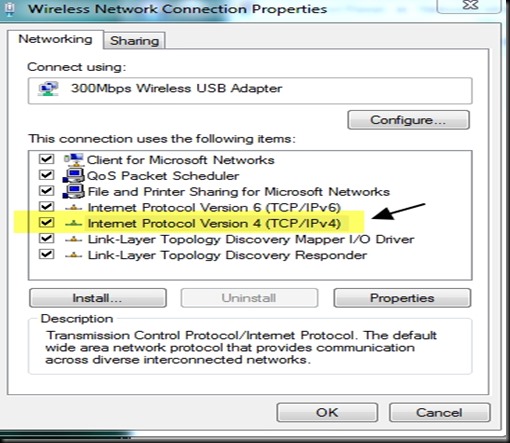
Right Click on the Network connection & select Properties
Select the Internet Protocol Version 4 & double click on it.
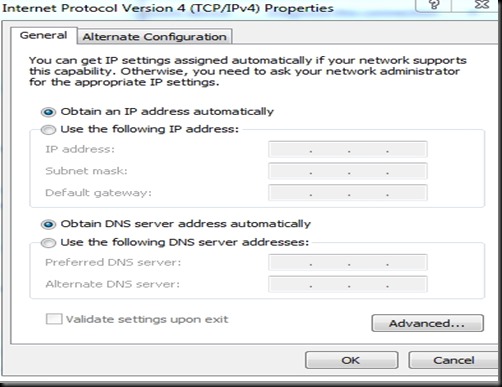
Now you see the following screen where selection is done by default to obtain IP automatically.
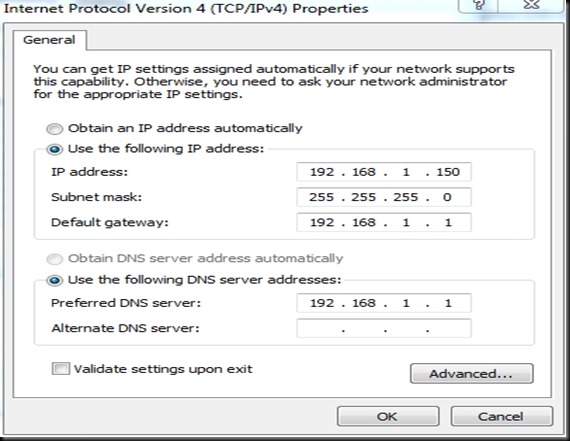
Change this selection o “USE the following IP address “ & enter the IP as 192.168.1.150
The first three bytes must match that of the default gateway address which is 192.168.1.1
The last byte can be assigned at your will , within the IP range allowed by the router.
Here I change the IP to 192.168.1.150. Note that only the last byte I’ve changed.
Subnet mask & Default gateway are entered as seen in the ipconfig /all window above.
DNS server address also changed as seen in the screen shot below
Reboot your PC to see the changes effective.
Now the IP address of my PC will be 192.168.1.150 & remains STATIC even after reboot.
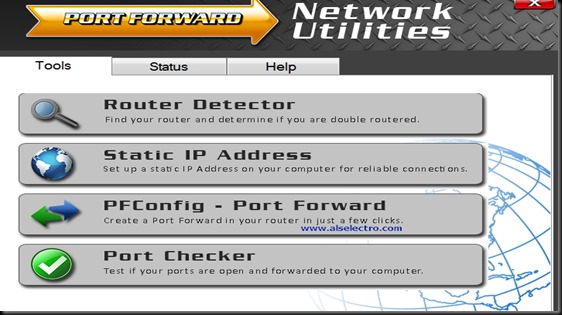
The above task can also be done automatically by a trial software :
You can download the trial version here :
The trial version allows all other tools except port forwarding.Open the tool & click on STATIC IP Address & follow the guidelines to fix your PC’s IP as STATIC.
STATIC IP for other devices ESP & Raspberry PI:
For making the Raspberry Pi’s Local IP to STATIC you can follow this blog :
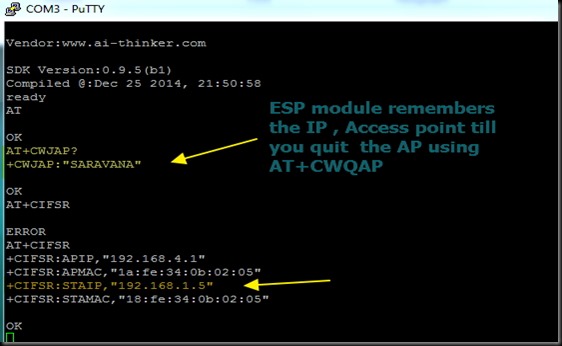
Regarding the IP of ESP8266 we need not change anything.Once the STATION IP is assigned to ESP8266 , the module remembers the Access Point it has connected & the STA IP assigned .
or issue the command
AT+CIPSTA=”192.168.1.5”
The ESP module remembers the Access Point it has joined with & the IP till you quit the AP.
But on Reset it seems to get changed.
The only way to assign STATIC IP to ESP module is through the Router settings.
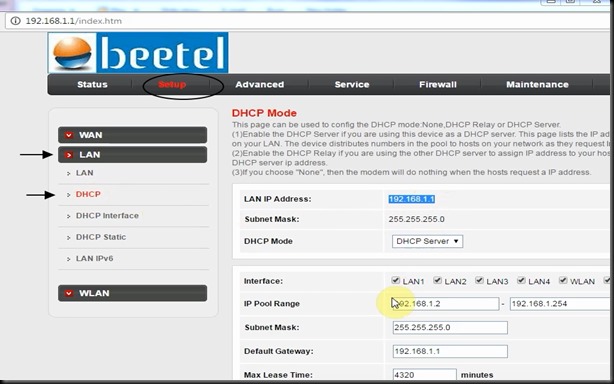
In your browser type in the IP address of your Gateway , here it is 192.168.1.1
Under LAN setup look out for DHCP settings.
In latest Routers you see a setting called DHCP RESERVATIONS.
In the IP Address field, type the IP address to assign to the computer or server.
Choose an IP address from the router’s LAN subnet, such as 192.168.1.x.
Choose an IP address from the router’s LAN subnet, such as 192.168.1.x.
Type the MAC address of the ESP MODULE server.
As the ESP has already joined the AP, it is already on your network, you can copy its MAC address from the Attached Devices screen and paste it here.
As the ESP has already joined the AP, it is already on your network, you can copy its MAC address from the Attached Devices screen and paste it here.
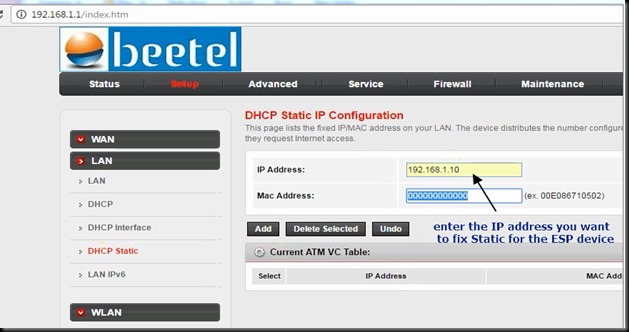
Here I will show an example of setting the Static IP in DHCP Reservation under BEETEL Router
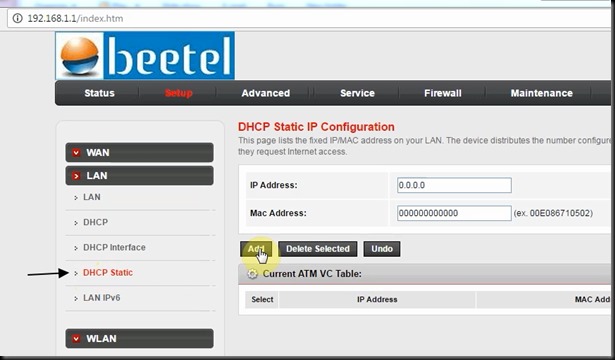
In almost all the Routers the settings are the same.Just look out for the wordings  HCP RESERVATION” or “DHCP STATIC “ under the LAN setup.
Under DHCP STATIC tab , enter the IP address you want to fix for the ESP module
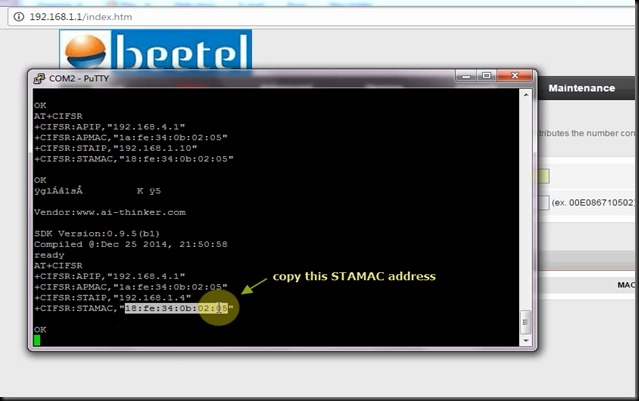
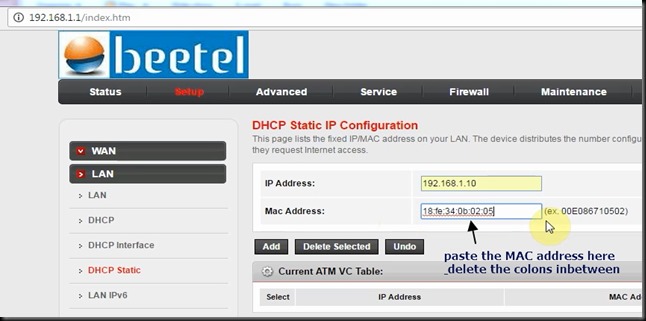
Feed in the MAC ADDRESS of the ESP device.
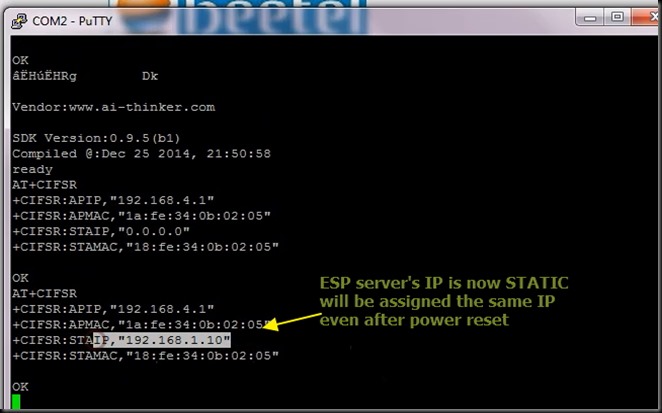
You can learn the MAC address from the AT command AT+CIFSR of ESP module.
The MAC address to be entered without any special character like colon.Please check out your Router settings for entering the MAC address (generally given near the MAC address box , how to feed in the address).
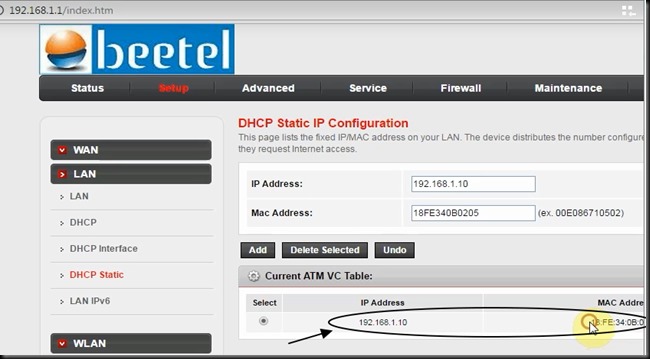
Click on ADD to save the settings
Now RESET or power back the ESP module.
The IP address will be the same for ever.The Router will always assign the IP you’ve set for the ESP module.
In a D-Link router, it is under the setup.Go to Setup / Network settings / DHCP reservation. You can then ask the router to give a given MAC address a fixed IP address.
Alternatively, the ESP can request a certain IP address from the router which we’ve seen in the example of Beetel Router above.
Alternatively, the ESP can request a certain IP address from the router which we’ve seen in the example of Beetel Router above.
Now that the STATIC IP is assigned, let us see the methods of PORT FORWARDING & converting your public IP to STATIC using NO-IP account in PART 2.


沒有留言:
張貼留言