How to make your device’s IP address Static & Port Forward – A Practical Demo – part 2
In the previous post PART 1 we explored the ways to make the local IP address of PC/ESP8266 STATIC.
In this part 2 we shall see how to make your Dynamic Public IP as STATIC using NO-IP account & then Port forward to the server started on port 350 of ESP.
PORT FORWARDING
First let us do the PORT FORWARD settings.
For this , type in your Router’s Gateway IP in the browser & log in to Router’s Settings.Here my Router’s gateway is 192.168.1.1
The PORT Forwarding is done under VIRTUAL SERVER.
For different Router , you can check out this excellent link which guides settings for almost all types of Routers in the World.
In my case the VIRTUAL SERVER is under ADVANCED —> NAT

Under Virtual Server feed in the WAN & LAN ports as 350.
Under LAN IP feed in the static IP of our ESP8266.Here it is 192.168.1.10 which we made static as described in part 1.
Once the APPLY CHANGES button is clicked , the entry appears under Forwarding Table.

WINDOWS FIREWALL SETTINGS
Next is the Windows firewall settings to allow communication through port 350.
Open Windows Firewall with Advanced Security.
Click on Inbound Rules & then New Rule.

Select Rule Type as PORT.
protocol as TCP.

Under Action select “Allow the Connection”
& tick mark all under the Profile.
Provide a Name for the Rule & save it.

START SERVER ON ESP8266
Now open the Putty window where you’ve connected ESP8266 ( refer part 1 for details)
Before starting server , issue the command
AT+CIPMUX=1
Then start the server on port 350 using
AT+CIPSERVER=1,350

Now the Server starts listening on PORT 350.
Convert Public IP to STATIC
The external world communicates with your ESP server using the Public IP of your Network.This IP is generally DYNAMIC which means it changes on every boot of your Router.
To make it STATIC we shall use a service called NO-IP which converts your public IP to a Domain name & follows the changes.
Visit www.noip.com
Sign up by providing your EMAIL.

LOG IN your NO-IP account.
Under Dynamic DNS click on ADD HOSTNAME.

Enter the host name, for e.g , as testmyiot & from the dropdown select a domain , say, ddns.net.
Now your new host name is
testmyiot.ddns.net

Next , click on Device Configuration Assistant.

Under the dropdown select the host name we created , testmyiot.ddns.net

Next step is to fill in the Device details.
Device type is SERVER
Device Brand is WEB SERVER
Router make – select your router name .If not found in list then select other
& then enter Router type as Home.

On the Next window answer NO
We shall come back to this window shortly after setting the Router for NO-IP.

On the next window , before clicking YES to log in device, go to the Router settings in browser where you typed in 192.168.1.1

Click on SERVICE & then DDNS.
Most of the Routers support NO-IP & is listed on the drop down.
Select NO-IP

Feed in the Host Name as testmyiot.ddns.net
Provide the email & password you used to create the NO-IP account.

Click on ADD to save to DDNS Table of Router.
Now go back to your NO-IP account window.
Click YES to log in device.

On next window click on TEST CONNECTION

After a short time you should see SUCCESS.
Now you’re done with DDNS settings.You need not go further to Port forward tab, as we’ve already done it.

Following is the procedure , in case your Router doesn’t support NO-IP .
If you do not see NO-IP under drop down of DDNS settings of Router,
go back to your NO-IP account & click YES to the question “Is there a computer always running on your Network?”.

You’ll be taken to next window to download DUC.
DUC- Dynamic Update Client is a software which runs in the background of your PC to follow your public IP.
Download it & install.

Before FINISH ensure to tick mark “Run DUC in the background”

Now you’ll be asked to login your NO-IP account again

Once you log in, the following windows appear.
Select the host name you created & click save.

Now you can see all TICK marks in the DUC window.
DUC runs in the background & follows your public IP to the domain name you created.

You can test the access to ESP server now from a distant PC.
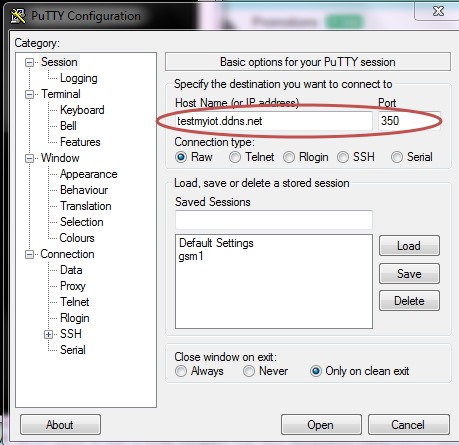
From anywhere in the world , make open a PUTTY window.
Select RAW & feed in the host name testmyiot.ddns.net & port as 350.

You get CONNECTED to the ESP server
Watch this demo video :


沒有留言:
張貼留言