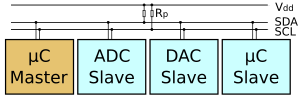
I2C 匯流排(Internal IC Bus)是串列通訊的一種。I2C 匯流排俱有如下的優
點:
1. 不需額外的解碼電路。
2. 資料傳送的協定可以用軟體規劃,具有高度的彈性。
3 具有 I2C 匯流排無論從系統中移去或加入,都不會影響其他裝置的功能。
4. I2C 匯流排是兩線式的匯流排,除錯、維修變得很容易。
5. 不僅硬體模組化且軟體亦是,可減少軟體開發時間。
I2C 雖然有很多優點,但是它速度不快、祇適合當 IC 間溝通的橋樑。她和常用的 UART 通訊埠雖然同屬串列通訊的一種方法,但功能和目的並不相同,所以不能混為一談。
通常我們可以在一些簡單的系統或者晶片組 IC 間溝通(命令傳遞,不是資料傳遞)的場合看到她的影子。所以 I2C 適用情況大致可歸納如下:
1.系統包含微控制器及其他週邊。
2.希望將連接的成本降至最低。
3.系統不需很
快的傳輸速度。
維基百科,自由的百科全書
I²C(Inter-Integrated Circuit)是內部整合電路的稱呼,是一
種串列通訊匯流排,使用多主從架構,由飛利浦公司在1980年代為了讓主機板、嵌入式系統或手機用以連接低速週邊裝置而發展。I²C的正確讀法為"I-squared-C" ,而"I-two-C"則是另一種錯誤但被廣泛使用的讀法,在中國則多以"I方C"稱之。截至2006年11月1日為止,使用I²C協定不需要為其專利付費,但製造商仍然需要付費以獲得I²C從屬裝置位址。
[編輯]設計概說
I²C的參考設計使用一個7位元長度的位址空間但保留了16個位址,所以在一組匯流排最多可和112個節點通訊。常見的I²C匯流排依傳輸速率的不同而有不同的模式:標準模式(100 Kbit/s)、低速模式(10 Kbit/s),但時脈頻率可被允許下降至零,這代表可以暫停通訊。而新一代的I²C匯流排可以和更多的節點(支援10位元長度的位址空間)以更快的速率通訊:快速模式(400 Kbit/s)、高速模式(3.4 Mbit/s)。
雖然最大的節點數目是被位址空間所限制住,但實際上也會被匯流排上的總電容所限制住,一般而言為400 pF。
接線方式為:
- SDA – 接 Arduino 的 Analog Pin 4 (Arduino Mega 為 Pin 20)
- SCL – 接 Arduino 的 Analog Pin 5 (Arduino Mega 為 Pin 21)
- GND – 接 GND
- VCC – 接 +5V
下載 I2C LCD Library
//Program 3
//***************************************************
//Display "Hello world" To I2C 1602 LCD
//
//***************************************************
#include <Wire.h>
#include <LiquidCrystal_I2C.h>
LiquidCrystal_I2C lcd(0x27,16,2); // set the LCD address to 0x27 for a 16 chars and 2 line display
void setup()
{
lcd.init(); // initialize the lcd
// Print a message to the LCD.
lcd.backlight();
lcd.print("Hello, world!");
}
void loop()
{
}
//Program 2
//***************************************************
//Custom Cahrs
//
//***************************************************
#include <Wire.h>
#include <LiquidCrystal_I2C.h>
#if defined(ARDUINO) && ARDUINO >= 100
#define printByte(args) write(args);
#else
#define printByte(args) print(args,BYTE);
#endif
uint8_t bell[8] = {0x4,0xe,0xe,0xe,0x1f,0x0,0x4};
uint8_t note[8] = {0x2,0x3,0x2,0xe,0x1e,0xc,0x0};
uint8_t clock[8] = {0x0,0xe,0x15,0x17,0x11,0xe,0x0};
uint8_t heart[8] = {0x0,0xa,0x1f,0x1f,0xe,0x4,0x0};
uint8_t duck[8] = {0x0,0xc,0x1d,0xf,0xf,0x6,0x0};
uint8_t check[8] = {0x0,0x1,0x3,0x16,0x1c,0x8,0x0};
uint8_t cross[8] = {0x0,0x1b,0xe,0x4,0xe,0x1b,0x0};
uint8_t retarrow[8] = { 0x1,0x1,0x5,0x9,0x1f,0x8,0x4};
LiquidCrystal_I2C lcd(0x27,16,2); // set the LCD address to 0x27 for a 16 chars and 2 line display
void setup()
{
lcd.init(); // initialize the lcd
lcd.backlight();
lcd.createChar(0, bell);
lcd.createChar(1, note);
lcd.createChar(2, clock);
lcd.createChar(3, heart);
lcd.createChar(4, duck);
lcd.createChar(5, check);
lcd.createChar(6, cross);
lcd.createChar(7, retarrow);
lcd.home();
lcd.print("Hello world...");
lcd.setCursor(0, 1);
lcd.print(" i ");
lcd.printByte(3);
lcd.print(" arduinos!");
delay(5000);
displayKeyCodes();
}
// display all keycodes
void displayKeyCodes(void) {
uint8_t i = 0;
while (1) {
lcd.clear();
lcd.print("Codes 0x"); lcd.print(i, HEX);
lcd.print("-0x"); lcd.print(i+16, HEX);
lcd.setCursor(0, 1);
for (int j=0; j<16; j++) {
lcd.printByte(i+j);
}
i+=16;
delay(4000);
}
}
void loop()
{
}
//Program 3
//*****************************************************
//Send Chars from PC serial monitor to I2C LCD
//*****************************************************
#include <Wire.h>
#include <LiquidCrystal_I2C.h>
LiquidCrystal_I2C lcd(0x27,16,2); // set the LCD address to 0x27 for a 16 chars and 2 line display
void setup()
{
lcd.init(); // initialize the lcd
lcd.backlight();
Serial.begin(9600);
}
void loop()
{
// when characters arrive over the serial port...
if (Serial.available()) {
// wait a bit for the entire message to arrive
delay(100);
// clear the screen
lcd.clear();
// read all the available characters
while (Serial.available() > 0) {
// display each character to the LCD
lcd.write(Serial.read());
}
}
}
//*************************************************
//LCD1602 2 lins Chars Display
//
//*************************************************
#include <Wire.h>
#include <LiquidCrystal_I2C.h>
LiquidCrystal_I2C lcd(0x27,16,2); // set the LCD address to 0x27 for a 16 chars and 2 line display
void setup()
{
lcd.init(); // initialize the lcd
lcd.init();
lcd.backlight();
}
void loop()
{
// Print a message to the LCD.
lcd.setCursor(0,0);
lcd.print("Hello, world!");
lcd.setCursor(0,1);
lcd.print("I Love Arduino!");
}


沒有留言:
張貼留言