SNMP Environmental Monitoring using ESP8266-based Sensors
This is a somewhat large project, combining two ‘experiments’ I wanted to try: providing environmental monitoring with ESP8266-based sensors and using NET-SNMP’s extend facility to interface external data to SNMP.
Long ago, I managed a large international network with hundreds of routers. SNMP was used heavily to monitor many aspects of the network. Then I ended up managing a data center. The building monitoring systems were a hodge-podge so I figured out how to convert each system to an SNMP-based monitoring system. That allowed all building systems to be monitored from the same SNMP console that I knew exhaustively.
I would have liked to have placed temperature sensors in every rack in the data center, but it was cost prohibitive. The devices we were using at the time were hundreds of dollars each so there weren’t many of them (a quick check shows the cheapest current models to cost $200). So I have long wanted to come up with a system where I could place several DS18B20 temp sensors in each rack and tie perhaps a few racks together with an MCU and a network connections.
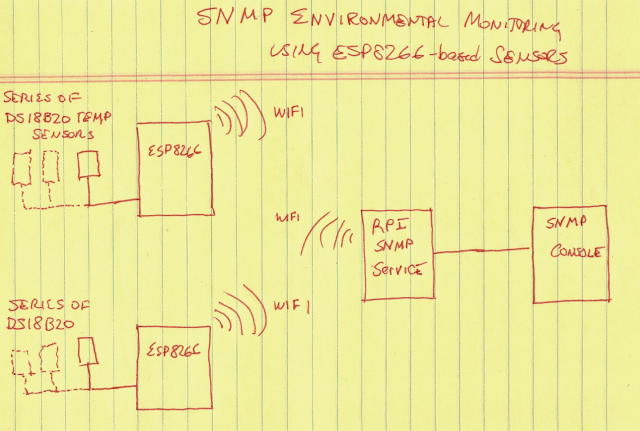
That desire is the basis for this project. Here is a diagram of the concept I’m implementing in this post.
While the broad idea would be to support multiple ESP8266’s with multiple temperature sensors on each ESP8266, for this experiment, I will implement one ESP8266 with one temperature sensor.
The flow of data is as follows:
- ESP8266 reads the DS18B20 temperature sensor every 10 seconds
- That temperature is transmitted, along with the ESP8266’s MAC address to the Raspberry Pi
- The Raspberry Pi receives the temperature update and writes it to a file. The file is named after the MAC address (allowing for multiple ESP8266’s).
- The SNMP server will then use the contents of that file if an SNMP request is made for the temperature.
Resources
Here are some of the resources I used when creating this project.
The ESP8266 code is based on the accumulation of projects I’ve done so far
Extending SNMP is described here
- http://www.net-snmp.org/wiki/index.php/Tut:Extending_snmpd_using_shell_scripts
- http://www.net-snmp.org/docs/mibs/NET-SNMP-EXTEND-MIB.txt
- http://vincent.bernat.im/en/blog/2012-extending-netsnmp.html
Install SNMP on the Raspberry Pi
For the Raspberry Pi to act as a SNMP server between the ESP8266 and the SNMP console, the SNMP service must be installed on the Raspberry Pi. I covered this some time ago here:
After snmpd is installed and running, snmpwalk should work much like this:
rpi/snmp:snmpwalk -v 1 -c public localhost system
SNMPv2-MIB::sysDescr.0 = STRING: Linux rpi 3.18.7+ #755 PREEMPT Thu Feb 12 17:14:31 GMT 2015 armv6l
SNMPv2-MIB::sysObjectID.0 = OID: NET-SNMP-MIB::netSnmpAgentOIDs.10
DISMAN-EVENT-MIB::sysUpTimeInstance = Timeticks: (852799) 2:22:07.99
SNMPv2-MIB::sysContact.0 = STRING: Me <me@example.org>
SNMPv2-MIB::sysName.0 = STRING: rpi
SNMPv2-MIB::sysLocation.0 = STRING: Sitting on the Dock of the Bay
SNMPv2-MIB::sysServices.0 = INTEGER: 72
Testing Extended SNMP
The next step is to make sure Extended SNMP is working. The snmpd.conf file that was installed onto my RPI already has some test Extended SNMP calls:
snmpwalk -v 1 -c public localhost NET-SNMP-EXTEND-MIB::nsExtendOutput1Line
NET-SNMP-EXTEND-MIB::nsExtendOutput1Line."test1" = STRING: Hello, world!
NET-SNMP-EXTEND-MIB::nsExtendOutput1Line."test2" = STRING: Hello, world!
snmpwalk should give you 2 test OID (test1 and test2) and both will have the value ‘Hello World’.
If not, edit your snmpd.conf file and add these two lines:
extend    test1   /bin/echo  Hello, world!
extend-sh test2   echo Hello, world! ; echo Hi there ; exit 35
Restart the snmpd service:
service snmpd restart
and the snmpwalk above should properly return the ‘hello world’ lines. If not, you need to troubleshoot until you resolve the problem, as the succeeding steps require extended SNMP.
Write ESP8266/nodeMCU Lua Code to Transmit the Temperature
This part of the project is based fairly closely on my prior blog:
Every 10 seconds, I will read the temperature from the DS18B20, then transmit that and the ESP8266’s MAC address via UDP (port 9999) to the RPI.
Note the temperature transmitted is in Celsius * 10000 to get rid of the decimal point. The Raspberry Pi can handle floating point and will convert it to floating point Fahrenheit.
The ESP8266 program consists of the file getTemp.lua and init.lua.
getTemp.lua
function getTemp()

    local addr      = nil
    local count     = 0
    local data      = nil
    local pin       = 4             -- pin connected to DS18B20
    local s         = ''

    -- setup gpio pin for oneWire access
    ow.setup(pin)

    -- do search until addr is returned
    repeat
        count   = count + 1
        addr    = ow.reset_search(pin)
        addr    = ow.search(pin)
        tmr.wdclr()
        until((addr ~= nil) or (count > 100))

    -- if addr was never returned, abort
    if (addr == nil) then
        print('DS18B20 not found')
        return -999999
        end

    -- validate addr checksum
    crc = ow.crc8(string.sub(addr,1,7))
    if (crc ~= addr:byte(8)) then
        print('DS18B20 Addr CRC failed');
        return -999999
        end

    if not((addr:byte(1) == 0x10) or (addr:byte(1) == 0x28)) then
        print('DS18B20 not found')
        return -999999
        end

    ow.reset(pin)               -- reset onewire interface
    ow.select(pin, addr)        -- select DS18B20
    ow.write(pin, 0x44, 1)      -- store temp in scratchpad
    tmr.delay(1000000)          -- wait 1 sec

    present = ow.reset(pin)     -- returns 1 if dev present
    if present ~= 1 then
        print('DS18B20 not present')
        return -999999
        end

    ow.select(pin, addr)        -- select DS18B20 again
    ow.write(pin,0xBE,1)        -- read scratchpad

    -- rx data from DS18B20
    data = nil
    data = string.char(ow.read(pin))
    for i = 1, 8 do
        data = data .. string.char(ow.read(pin))
        end

    -- validate data checksum
    crc = ow.crc8(string.sub(data,1,8))
    if (crc ~= data:byte(9)) then
        print('DS18B20 data CRC failed')
        return -9999
        end

    -- compute and return temp as 99V9999 (V is implied decimal-a little COBOL there)
    return (data:byte(1) + data:byte(2) * 256) * 625

    end -- getTemp

function xmitTemp()
    local temp = 0

    temp = getTemp()
    if temp == -999999 then
        return
        end

    cu:send(wifi.sta.getmac() .. ':' .. tostring(temp))

    end -- xmitTemp

function initUDP()

    -- setup UDP port
    cu=net.createConnection(net.UDP)
    cu:connect(9999,"192.8.50.106")
    end -- initUDP

function initWIFI()
    print("Setting up WIFI...")

    wifi.setmode(wifi.STATION)

    wifi.sta.config("SSID","PASSWORDwifi.stawifi.sta.connect()
    tmr.alarm(1, 1000, 1,
        function()
            if wifi.sta.getip()== nil then
                print("IP unavailable, Waiting...")
            else
                tmr.stop(1)
                print("Config done, IP is "..wifi.sta.getip())
                end
            end -- function
        )
    end -- initWIFI

initWIFI()
initUDP()
tmr.alarm(0, 5000, 1, xmitTemp)
init.lua
function startup()
    if abort == true then
        print('startup aborted')
        return
        end
    print('Starting xmitTemp')
    dofile('xmitTemp.lua')
    end

abort = false
print('Startup in 5 seconds')
tmr.alarm(0,5000,0,startup)
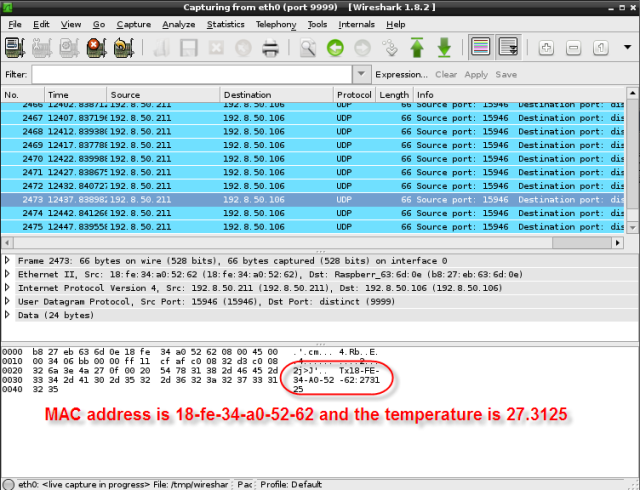
Once the code is installed onto the ESP8266, I run wireshark on the Raspberry Pi to verify I’m getting UDP packets to port 9999 AND that the data within the packet contains the MAC address and a reasonable temperature in Celsius:
Receiving the Data on the Raspberry Pi
If you don’t already have Lua setup on your Raspberry Pi, here are instructions:
Again, I’m going to use another post as the basis for this code:
I am going to modify that program slightly to receive the data packet from the ESP8266, split the MAC address from the temperature, convert the temperature to fahrenheit, and finally write the temperature to a file named after the MAC address.
Here is the code:
#!/usr/bin/lua

-- Setup UDP socket. Bind to localhost, port 9999.
local socket = require "socket"
local udp = socket.udp()
udp:settimeout(0) -- indicates not to wait. If no data, return immediately
udp:setsockname('*', 9999)

local data              = ''
local mac               = ''
local msg_or_ip
local port_or_nil
local tempC             = ''
local tempF             = 0.0

print 'Beginning server loop'

while true do
    data, msg_or_ip, port_or_nil = udp:receivefrom() -- receive UDP packet
    if data then
        mac, tempC = string.match(data, '(.+):(.+)')
        tempF = (tonumber(tempC)/10000)*2 + 30
        print('temp: ' .. tempF .. 'F')
        os.execute('echo '..tempF..'>/tmp/'..mac)
    elseif msg_or_ip ~= 'timeout' then
        error("Unknown network error: "..tostring(msg))
    end
    socket.sleep(0.01) -- sleep .01 secs
end
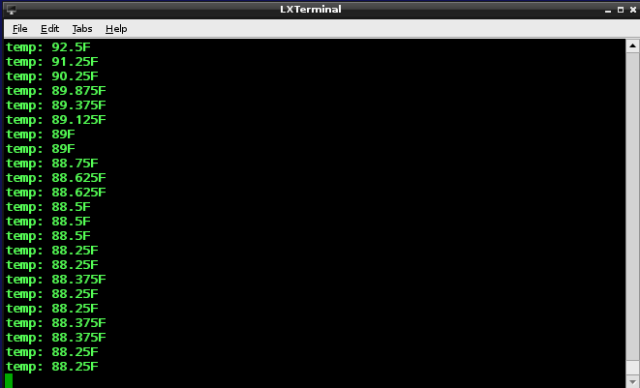
When you run this program on the RPI, it should see the data from the ESP8266 and display the current temp:
and if you look in the /tmp dir, you should see a file being updated:
rpi/tmp:cd /tmp
rpi/tmp:ll
total 376K
-rw-r--r-- 1 danh danh    7 Apr 28 17:21 18-FE-34-A0-52-62
-rw------- 1 danh danh    0 Apr 28 13:39 hist8497
-rw------- 1 danh danh    0 Apr 28 13:41 hist8523
-rw------- 1 root root    0 Apr 28 14:21 hist8591
drwx------ 2 danh danh 4.0K Apr 27 14:42 ssh-JFZoo8p8BQDL/
-rw------- 1 danh danh 263K Apr 28 17:21 wireshark_eth0_20150428133554_hwJwTi
-rw-r--r-- 1 danh danh  97K Apr 27 17:12 xx.txt
rpi/tmp:cat 18-FE-34-A0-52-62
86.375
rpi/tmp:
Modifying SNMP to Read the File Data
Now that the temperature is being recorded properly into a file, we merely need to get SNMP to recognize this data. This is really quite easy to do.
Edit the /etc/snmp/snmpd.conf file and add the following line (I am using the file name based on my ESP8266’s MAC address. You will need to change that to your own MAC address):
extend-sh tempSensor01 cat /tmp/18-FE-34-A0-52-62; exit 35
The name of this OID will be ‘tempSensor01’. When that OID is retrieved, it will execute the shell command ‘cat /tmp/18-FE-34-A0-52-62; exit 35‘. The output of that command is sent back to the SNMP console.
Once you are done editing snmpd.conf, save it and restart snmpd:
service snmpd restart
Now do this snmpwalk command:
snmpwalk -v 1 -c public localhost NET-SNMP-EXTEND-MIB::nsExtendOutput1Line
NET-SNMP-EXTEND-MIB::nsExtendOutput1Line."test1" = STRING: Hello, world!
NET-SNMP-EXTEND-MIB::nsExtendOutput1Line."test2" = STRING: Hello, world!
NET-SNMP-EXTEND-MIB::nsExtendOutput1Line."tempSensor01" = STRING: 85.125
or to get just the tempSensor01 OID:
snmpget -v 1 -c public localhost 'NET-SNMP-EXTEND-MIB::nsExtendOutput1Line."tempSensor01"'
NET-SNMP-EXTEND-MIB::nsExtendOutput1Line."tempSensor01" = STRING: 84.75
Conclusion
Putting together these various tools works quite well and the goal to allow an SNMP console the ability to read ESP8266-based is (very) roughly achieved. This is a long ways from a usable project, but I at least proved the concept to myself.
The one glaring issue that must be addressed to make this usable is the fact that the temperature is being returned as a string and not an integer. That makes it hard to apply tests and set alarms (for example, if the temp were > 100 I might want to set an alarm on the management console).
From what I’ve seen of the Net-SNMP EXTEND facility so far, it appears this is doable, but would require writing an actual MIB. Not hard, but beyond the scope of this little ‘experiment’.


沒有留言:
張貼留言