Integrate Firebase Realtime Database with Node-Red
源自於https://mkt-sampath97.medium.com/connect-iot-system-with-firebase-realtime-database-891114b1b9e5
Storage is an essential component of a complete IoT system so the system can have more features and capabilities.
In this tutorial, we will discuss basic steps of,
- Set up Firebase Realtime Database.
- Connect the database to IoT system with the help of NodeRed.
- Read data from the database.
- Manipulate data in the database using HTTP.
If you need help with basic steps of setting up simple IoT system, please follow this tutorial first.
Pre-requestees
- Google account
- Node-Fred Account
Step 1 : Create a Firebase Realtime Database
All we need to complete this step is a Google account. Visit https://console.firebase.google.com/ . This link will be directed to the firebase console.
- Go to Create a project.
- Give a name that you prefer(this name can not be changed later❗) and click Continue.
- we can turn off google analytic because it is not an essential option(for this).
- Google will create a project for you and it will take few seconds to set up.
- Click on Continue to your brand-new project 😍.
- Browse to the Realtime Database tab (you can find it in the left side navigation bar).
- Hit the Create Database button.
- Keep database location as it is (United States (us-central1) is the default ) and click Next.
- Select Start in Test mode❗ and click Enable.
- you will be prompted to a screen as follows,


- Yeyyyyyyyyyyyyyyyyy 🥳🥳… we have your Firebase Realtime database up and running now.
- Next, let’s add a key and value to our database. (Note: in Firebase Realtime Database data is stored more like JSON objects which are key-value pairs)


click this small plus (+) icon to add a child (a data entry).
Then, give a name (key ), and value (value for the key) and click Add.
likewise, we can add data to database manually.
we can add nested data objects as well.
Step 2 : Set up NodeRed and Read data
- In this case, we have few options,
—Run Node-Red server locally
— Install Node-red in a cloud server
— Use Node-Fred.
Note: The easiest way is using Node-Fred, and you can read the official documentation of Node-Red here.
here, I describe how to set up and work with Node-Fred. Build Prototype IoT System With Node-Red, MQTT, and NodeMCU. | by Thushara Sampath | Jun, 2021 | Medium
Hope that you have your Node-Red instance up and running. For rest of the tutorial I’m using Node-Red in Node-Fred 😁.


Reading data from Database
In Node-Red we can install additional nodes(packages) to do various task. Even though there is a Node package for Firebase Realtime Database, that package is not updated or maintained; therefore, it results in bugs. Once you install and use it, your node server will crash and have to be re-installed. As a solution to this, the same can be implemented with HTTP nodes.
Hence, we need three nodes which are Inject node, HTTP request node, and Debug node. (you can drag and drop nodes from the left side tray.)
- Inject Node: The Inject node can be used to manually trigger a flow by clicking the node’s button within the editor. It can also be used to automatically trigger flows at regular intervals and pass desired payload.
- Debug Node: The Debug node can be used to display messages in the Debug console.
- HTTP Request Node: this node can be used to send an HTTP request to a server and get the response. after response received this node pass it as a payload.
The connect nodes are as follows,


Now, go to the Realtime Database that we created. Then go to one key. say nested_example.


Copy the URL which is up there. Go to Node-Fred and double click on the HTTP node, and a window will open. In the URL field, paste the copied URL there. select HTTP method to GET.


❗Then at the end of the URL add .json this is very important❗.
for example, https://your_database_id.firebaseio.com/nested_example.json
Note: This node sends an HTTP GET request to this URL. Similarly, we can send any HTTP calls such as POST, PUT, etc. to a URL. Also, We can add a payload, queries, authentication, proxy to HTTP calls. For simplicity, I will not go into such depth in this tutorial.
Then Deploy the flow (there is a deploy button in the right upper corner).
Click the little button on the Inject Node, and it will trigger the flow, signal HTTP node to GET data from the Database. Once the data is received, HTTP would node pass data into debug node and it prints data on debug console. You can debug console by clicking the bug 🐞 button. Data from the database should be there.


Step 3: Manipulate Data in The Database
There are five actions which could be done using the HTTP node, as follows.
- Create a new entry and add data to it.
- Update an existing entry with new data.
- Create a new array and push an entry to it.
- Push entries into an existing array.
- Delete an entry.
The Node-Red HTTP node doesn’t have the PATCH method. If it was there, it could have been used to update the selected child value of the data entry.
1.Create a new entry and add data to it.
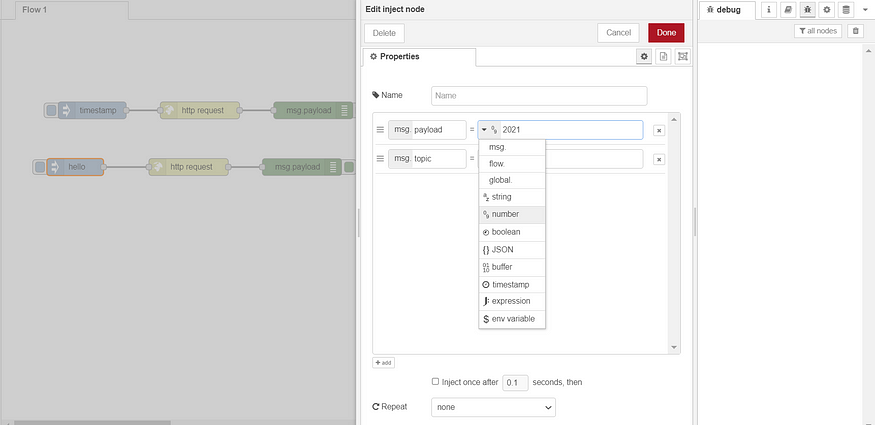
For this, in the HTTP node settings, set method to PUT, and update the URL as follows. new_key will be the name of the new entry.
https://your-database-id.firebaseio.com/new_key.json
In the Inject node, select any msg.payload type and enter a value. The value you add here, will be written into the database under the given name.

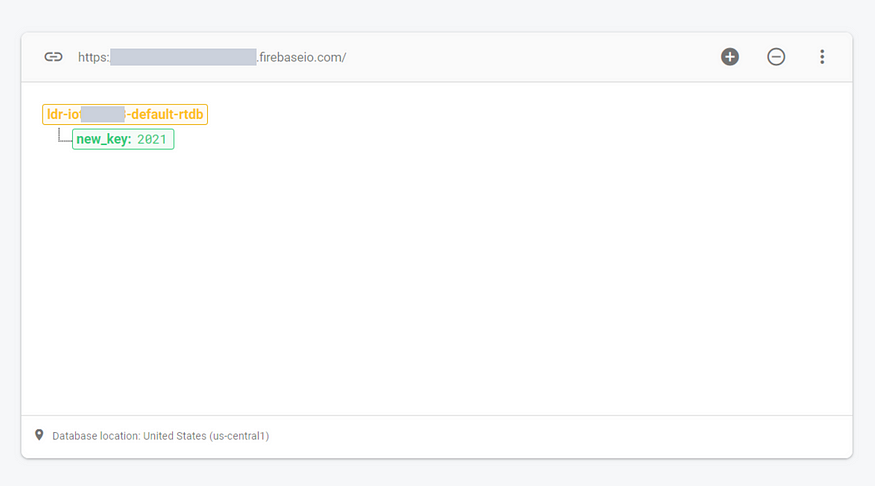
Click on Deploy to trigger the flow, and go to the Database to see that your new entry will be there 💓.
In the firebase realtime database, when an entry is created, it is highlighted in green🟩 for few seconds. when entry is updated, it is highlighted in yellow🟨; and highlighted in red🟥 when entry is deleted before disappearing.

2.Update existing entry with new data
In the HTTP node settings, set the method to PUT, and give existing key in the URL (the entry you want to update) at the end add .json.
https://your-database-id.firebaseio.com/existing_key.json
In the Inject node, select any msg.payload type and enter new value.
3.Create a new array and push an entry to it
sometimes we need to store data in an array; for example, an array of sensor values. In such cases,
set the method in HTTP node settings to POST, update the URL as newArray (This will be the name of the array).
https://your-database-id.firebaseio.com/newArray.json
In the Inject node, select any msg.payload type and enter a suitable value.
Next click on Deploy and Trigger the flow. Firebase will create an array and add the value as an element of it.
Firebase internally adds a unique ID to each array element. The array will be in a JSON format as follows.
{randomId1 : data1,randomId2 : data2,…}


4. Push entries into an existing array
In the HTTP node settings set the method to POST; in the URL, add the name of the array you want to update and at the end add .json
https://your-database-id.firebaseio.com/existingArray.json
You can add as many as elements you want to an array.


5. Delete an entry
In the HTTP node settings set method to DELETE; in the URL, add the name of the entry you want to delete; and at the end add .json
https://your-database-id.firebaseio.com/existingArray.json
Deploy and Trigger, Firebase will remove that entry permanently 📛Heads-up : This action cannot be reversed📛.
Conclusion
🥳🥳 we complete our second tutorial on IoT. This tutorial is a basic guideline of connecting and using Firebase Realtime Database to Node-Red. Using these steps you can add many cool features to your system, such as,
- Providing Sign-Up and Sign-In by functionalities by saving user data
- Visualizing historic data gathered from sensors
- Training machine learning models using gathered data
- etc.!


沒有留言:
張貼留言