源自於https://hackaday.com/2020/01/15/automate-your-life-with-node-red-plus-a-dash-of-mqtt/
AUTOMATE YOUR LIFE WITH NODE-RED (PLUS A DASH OF MQTT)
For years we’ve seen a trickle of really interesting home automation projects that use the Node-RED package. Each time, the hackers behind these projects have raved about Node-RED and now I’ve joined those ranks as well.
This graphic-based coding platform lets you quickly put together useful operations and graphic user interfaces (GUIs), whether you’re the freshest greenhorn or a seasoned veteran. You can use it to switch your internet-connected lights on schedule, or at the touch of a button through a web-app available to any device on your home network. You can use it as an information dashboard for the weather forecast, latest Hackaday articles, bus schedules, or all of them at once. At a glance it abstracts away the complexity of writing Javascript, while also making it simple to dive under hood and use your 1337 haxor skills to add your own code.
You can get this up and running in less than an hour and I’m going to tackle that as well as examples for playing with MQTT, setting up a web GUI, and writing to log files. To make Node-RED persistent on your network you need a server, but it’s lean enough to run from a Raspberry Pi without issue, and it’s even installed by default in BeagleBone distributions. Code for all examples in this guide can be found in the tutorial repository. Let’s dive in!
WHAT IT IS
Node-RED is a graphical programming language built on Node.js. It implements a server and runs what are called “Flows”: programs based on Javascript. Why would you want to run a server-side IDE for your programs? Because Node-RED also makes it dead simple to spin up web apps and use them as your online information and control system.
INSTALLATION
To make your Node-RED programs persistent you do need a server, however, if you just want to play for now you can run locally. Your server can be as simple as installing the platform on a Raspberry Pi or an always-on computer on your LAN. Prerequisites include Node.js and npm (the Node.js package manager) which on a Linux system are an easy install.
sudo apt install nodejs
Now we can install Node-RED and, to follow the examples below, you should also install the dashboard package:
npm install node-red
npm install node-red-dashboard
To run locally you can just type node-red in the terminal. However, the more eloquent way to run this is as a systemd service. Copy the contents of the nodered.service file to /etc/systemd/system/nodered.service and update the User, Group, and WorkingDirectory variables in that file to match an actual user on your system. With that in place, just enable and start the service. It will now restart on a crash or system reboot from here on out.
1 2 | systemctl enable nodered.servicesystemctl start nodered.service |
You can now load up the Node-RED IDE simply by visiting localhost:1880 in a web browser.
HELLO WORLD
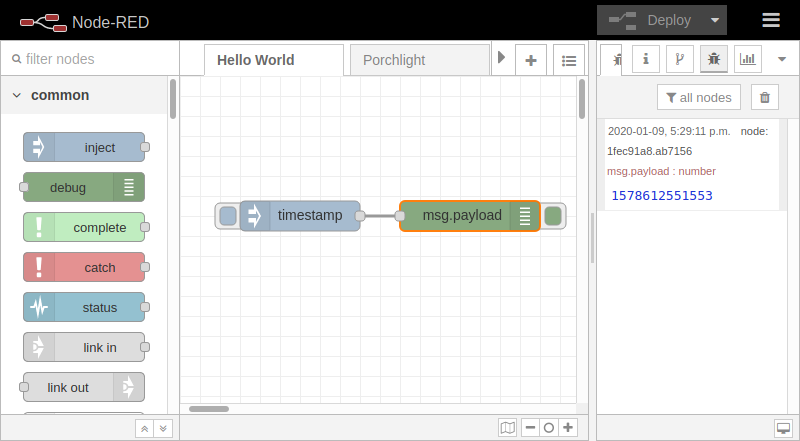
The simplest thing to do as your first “flow” in Node-RED is: click button, get timestamp. To make the image above I did nothing more than drag the “Inject” and “Debug” nodes from the left column into the center, then drag the line that connects the two nodes. You need to click the “Deploy” button on the upper right any time you make changes, and then clicking the button hanging off the left side of the inject node, which has the “timestamp” label by default, to spit out the time in the debug window. Click the bug icon in above the right window if you’re not seeing the debug output.
This example isn’t very useful, but that’s not the point of Hello World code. This drives home the power of the graphical code system. What’s also interesting is that flows can be exported as json files. Here’s what this Hello World looks like and it can be imported to your own Node-RED installation.
MQTT QUICKSTART
Node-RED feels like it’s made specifically to be used with MQTT, the popular Internet of Things protocol for which Elliot Williams has written a fantastic guide. It feels that way because an MQTT client is built in and most of the nodes have “topics” as well as message payloads which is all you really need to communicate with an MQTT broker.
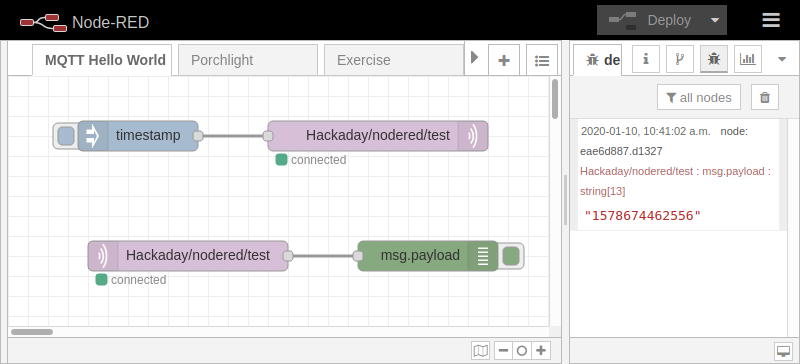
As you can see above, I’m doing the exact same inject/debug trick but now I’ve dragged an “mqtt in” and “mqtt out” node from the “Network” column of possible nodes.


There’s slightly more setup here as we need to choose an MQTT server and select a topic to publish to and listen for. But the interface makes this very easy, just double-click one of the MQTT nodes. Here I’m using the mosquitto test server (test.mosquitto.org)and the topic Hackaday/nodered/test. Just realize that anyone looking at messages on that server can see this and if you use the exact same topic you may see other readers sending test messages. Node-RED can actually be used as an MQTT broker as well.
Try double-clicking the inject node and changing the payload from timestamp to a string and you can send your own custom messages. For the most part I find it easy to find my way around Node-RED and playing with settings is low-effort. Just make sure to hit the deploy button — your changes won’t actually be in place until you do.
WEB GUI HELLO WORLD
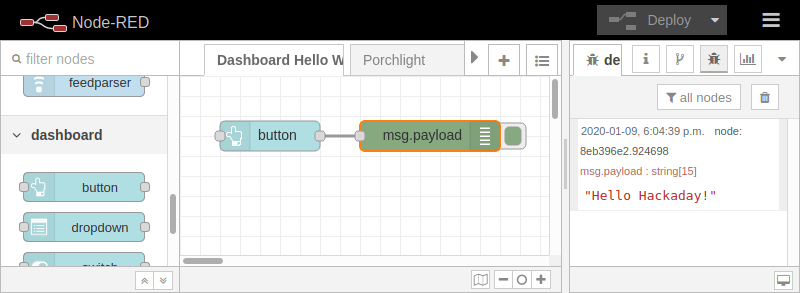
 Let’s get to the really exciting part of Node-Red, the ability to spin up a web app with very little effort.
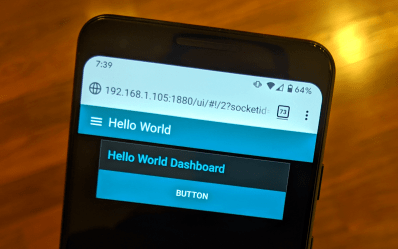
Here you can see a smartphone displaying our app. The only really useful part here is the button. Click it and you’ll get “Hello Hackaday!” in the debug window of Node-RED as seen above. All it took to create this page was to install the dashboard package for Node-RED and then drag a button onto the canvas. Once deployed, your web app will be located at localhost:1880/ui
Installation of the package is a simple one-liner:
npm install node-red-dashboard
Dragging the button onto the canvas and hooking it to a debug node is also simple, but you need to do just a bit of configuration. Double-clicking on the button node you can change the payload to affect what message is sent to the debug window, but you also need to set a Group, and within the group edit dialog you’ll need to set a Tab. This affects the web app, with Groups organizing blocks on each page of the web app, and Tabs selecting different pages from the hamburger menu at the upper left. You can name groups and tabs however you like.
LET’S BUILD A WEB APP!
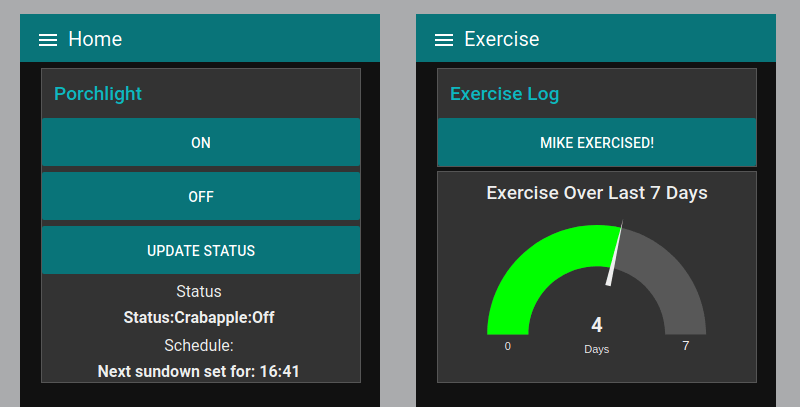
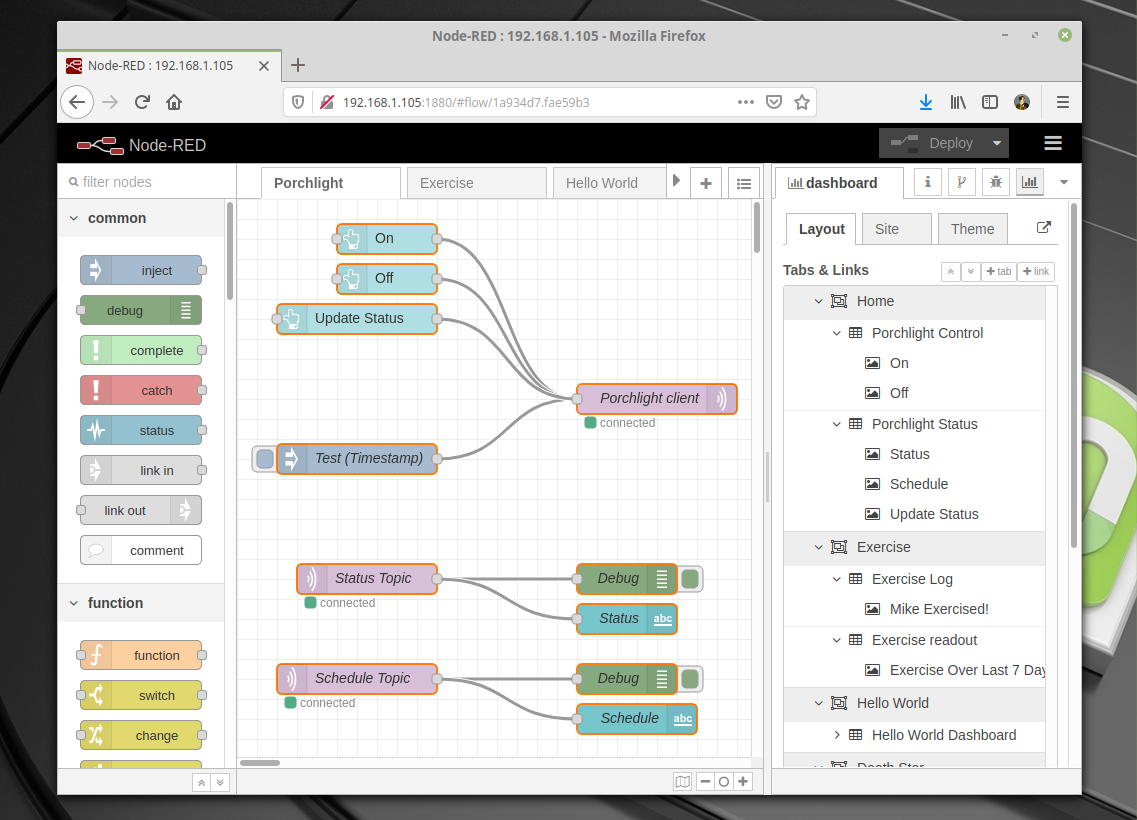
Enough with the Hello World code, let’s build something useful. I’ve been using Node-RED for a month or so and have built up a couple of useful apps, one interacts with my MQTT broker to control and monitor my front porchlight, the other I use as a simple button-press to keep track of the days I exercise. Let’s build up the exercise app bit by bit because there’s more to it than merely sending MQTT packets back and forth.
Here is the current state of the exercise app, which includes a button that records today’s date to a log file and a gauge that reads the log file to display how many of the last seven days have included exercise. Let’s build it up one block at a time.
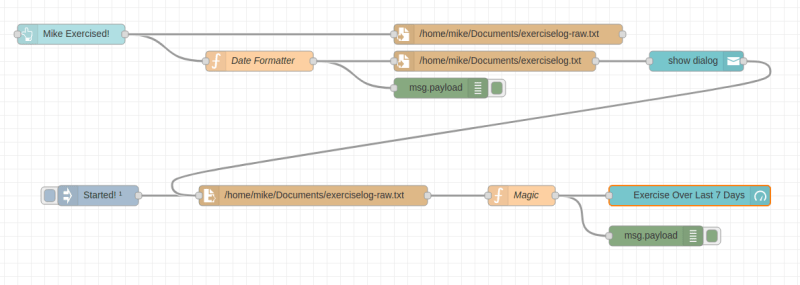
GUI Button Writing to Files

This is where the flow begins. It consists of a button from the Dashboard package that sends a timestamp when clicked. This message will be logged to two “file” nodes, the first is exerciselog-raw.txt which simply records one UNIX timestamp for each line. That’s not human readable, so the second file node has a function node which translates the timestamp using the following JavaScript snippet. There’s a bit of magic in there to make sure the month and day are always two digits.
1 2 3 4 5 6 7 8 9 | var date;date = new Date();var year = date.getFullYear();var month = date.getMonth();month = (month < 9 ? '0' : '') + (month+1)var day = date.getDate();day = (day < 10 ? '0' : '') + daymsg.payload = year + '-' + month + '-' + day;return msg; |
Adding a User Notification


The button works as expected, but it gives no feedback to the user. To improve upon this I added a notification node from the dashboard package. It is connected after the file node to confirm that the date had been written to the log file.
Reading a File, Displaying Data, Refreshing at Startup

This last part of the flow uses the tan “file in” node to read UNIX timestamps from the raw log file and displays it on the teal “gauge” node from the dashboard package. It is activated by two different triggers, one updates after a new date is written to the log files. The other is the lavender “inject” node which has an “index once after n seconds” option to populate the initial data when Node-RED starts.
The gauge is just looking for a number to populate and this is fed by a function node (I called it Magic). The following code reads in the logfile as an array, figures out the UNIX date code for seven days ago, and then iterates back through the last seven timestamps in the log file.
1 2 3 4 5 6 7 8 9 10 11 12 13 14 15 16 17 18 19 20 21 22 23 24 25 | //Turn incoming timestamps log into an array:var exercisearray = msg.payload.split("\n");if (exercisearray.slice(-1)[0] === "") exercisearray.length = exercisearray.length-1//Get timestamp for week ago to compare againstvar thismorning = new Date()thismorning.setHours(0)thismorning.setMinutes(0)thismorning.setSeconds(0)thismorning.setMilliseconds(0)var sixdays = 1000*60*60*24*6var oneweekago = thismorning.getTime()-sixdays//Iterate and count past week of exercisevar count = 0var secondsinday = 60*24*7for (var i=1; i<8; i++) { if (i>exercisearray.length) break; var testval = parseInt(exercisearray.slice(-i)[0]); if (testval >= oneweekago) ++count;}//Store our answer as the payload and pass alongmsg.payload = count;return msg; |
GIVE NODE-RED A TRY!
 One of my first concerns with the platform was version control but that’s available too. There is git integration built-in called Node-RED projects but it’s not enabled by default. I’m not accustomed to using a GUI for git, but then again I’m not accustomed to graphical programming interfaces so it doesn’t hurt to try something new.
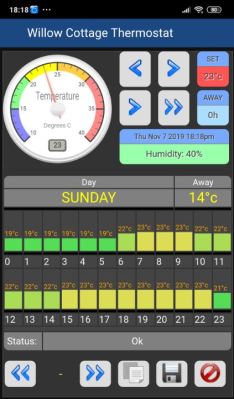
The examples I’ve shown here are really the tip of the iceberg. Look around and you’ll find a ton of enthusiasm for Node-RED which translates to incredible flows and awesome web apps. For instance, I’ve been reading Scargill’s Tech Blog for years and there you’ll find a ton examples of what can be accomplished. Here we see Scargill’s thermostat control panel that has all kinds of customization to give it a special look. Finding examples that you like isn’t hard, and copying their code is even easier.
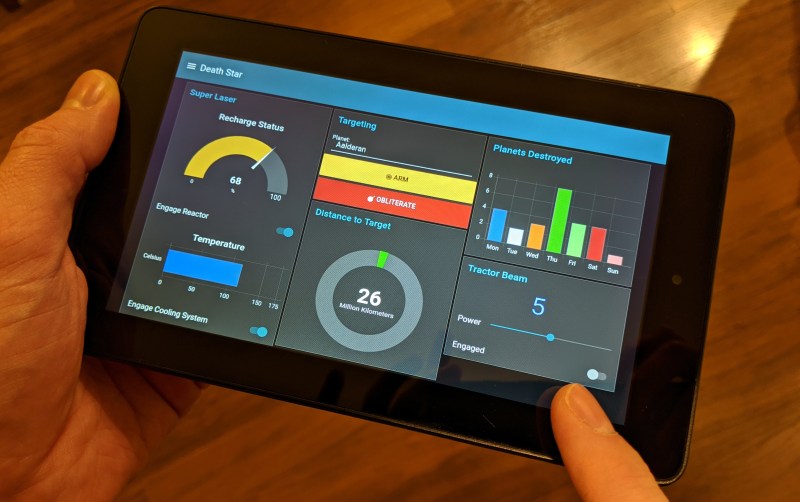
You can easily pick up Node-RED in an afternoon and end up with something useful. For those who want to spend more time, the sky’s the limit. If you have any kind of home automation, it’s something you must try as it unlocks the ability for anyone on your LAN to access information and control without installing an app. You can easily pull a disused smartphone out of the drawer and turn it into a dedicated control panel, something I did for the image at the top of this article with the help of an Android app called Fully Kiosk Browser Lockdown for a true fullscreen browser experience not provided by Chrome or Firefox for Android. Give it a try with your own surplus gear!


沒有留言:
張貼留言