NodeMCU ESP8266 MQTT LED on off Example
In this tutorial we will see how to turn on and off LED over the internet using MQTT protocol using NodeMCU ESP8266? You can get much more information on ESP8266 Protocols in my latest book NodeMCU Protocols and Communication methods.
Introduction
MQTT is a machine-to-machine (M2M)/”Internet of Things” connectivity protocol. It was designed as an extremely lightweight publish/subscribe messaging transport. It is useful for connections with remote locations where a small code footprint is required and/or network bandwidth is at a premium. For example, it has been used in sensors communicating to a broker via satellite link, over occasional dial-up connections with healthcare providers, and in a range of home automation and small device scenarios. It is also ideal for mobile applications because of its small size, low power usage, minimised data packets, and efficient distribution of information to one or many receivers.
Application Messages are transported by MQTT they have an associated Quality of Service and a Topic Name.
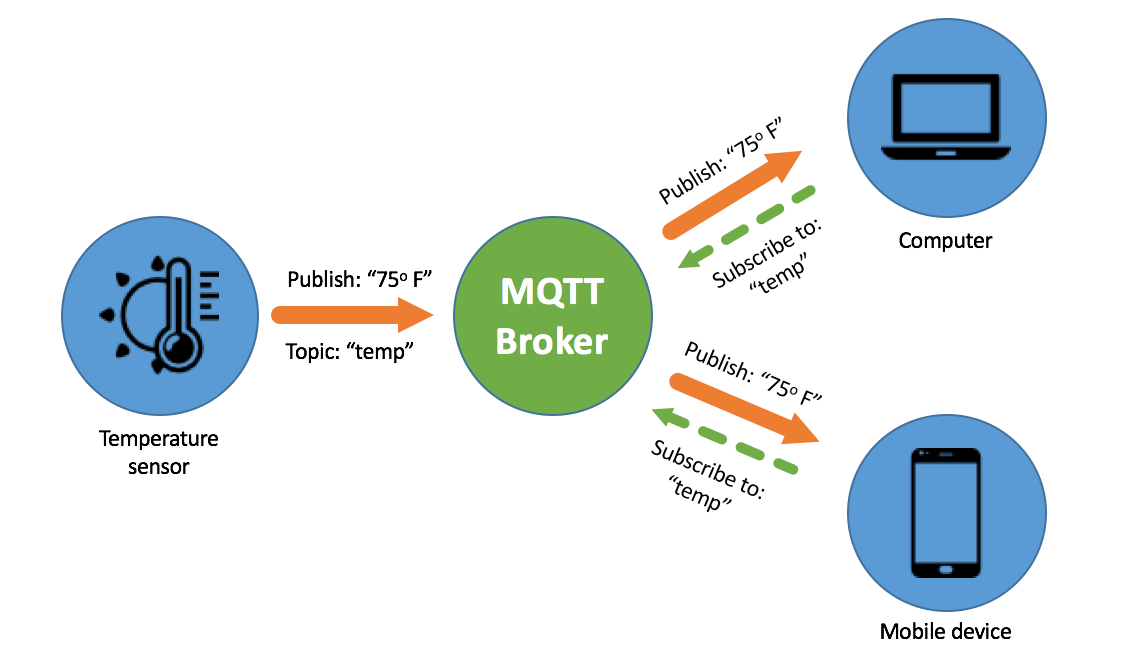 Client:
A program or device that uses MQTT. A Client always establishes the Network Connection to the Server. It can
- Publish Application Messages that other Clients might be interested in.
- Subscribe to request Application Messages that it is interested in receiving.
- Unsubscribe to remove a request for Application Messages.
- Disconnect from the Server.
Server:
A program or device that acts as an intermediary between Clients which publish Application Messages and Clients which have made Subscriptions. A Server
- Accepts Network Connections from Clients.
- Accepts Application Messages published by Clients.
- Processes Subscribe and Unsubscribe requests from Clients.
- Forwards Application Messages that match Client Subscriptions.
Subscription:
A Subscription comprises a Topic Filter and a maximum QoS. A Subscription is associated with a single Session. A Session can contain more than one Subscription. Each Subscription within a session has a different Topic Filter.
Topic Name:
The label attached to an Application Message which is matched against the Subscriptions known to the Server. The Server sends a copy of the Application Message to each Client that has a matching Subscription.
Topic Filter:
An expression contained in a Subscription, to indicate an interest in one or more topics. A Topic Filter can include wildcard characters.
Session:
A stateful interaction between a Client and a Server. Some Sessions last only as long as the Network Connection, others can span multiple consecutive Network Connections between a Client and a Server.
MQTT Control Packet:
A packet of information that is sent across the Network Connection. The MQTT specification defines fourteen different types of Control Packet, one of which (the PUBLISH packet) is used to convey Application Messages.
Configuring MQTT Server
For this mqtt demonstration we are using free plan from
Step 1: Choose free plan
Step 2: Enter your email id and register
Step 3: Click email verification link and enter password
Step 4: Create New Instance

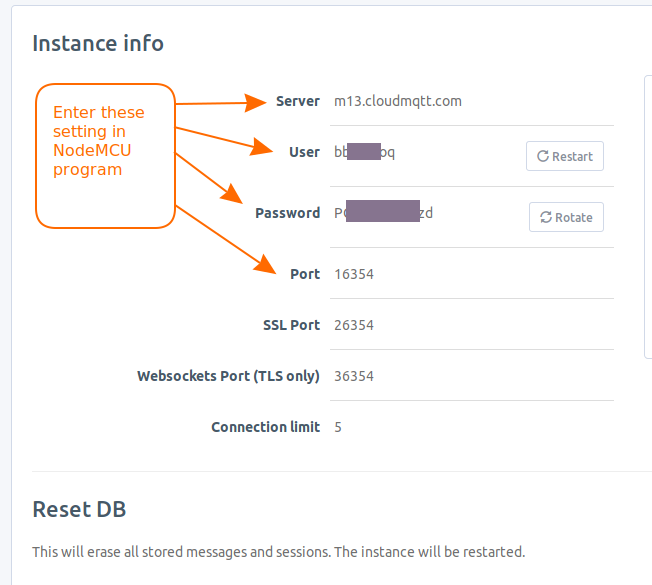
Step 5: Get Your MQTT Configurations
Click on Instance name “esp8266mqtt”

Copy this information and enter it in your NodeMCU program.
Now let’s move to NodeMCU programming part.
NodeMCU MQTT example code
Enter your WiFi and MQTT settings in program. For this program PubSubClient library is required download it from here: PubSubClient Library Download
From previous step we got few MQTT configurations such as user, password and port change this in below program.
- const int mqttPort = 16354; //Port number
- const char* mqttUser = “asdkrtevaoq”; //User
- const char* mqttPassword = “sfCJ8Rafbzd”; //Password
Results
In case you get connection failed error refer this and rectify problem
Error
|
State
|
| MQTT_CONNECTION_TIMEOUT |
-4
|
| MQTT_CONNECTION_LOST |
-3
|
| MQTT_CONNECT_FAILED |
-2
|
| MQTT_DISCONNECTED |
-1
|
| MQTT_CONNECTED |
0
|
| MQTT_CONNECT_BAD_PROTOCOL |
1
|
| MQTT_CONNECT_BAD_CLIENT_ID |
2
|
| MQTT_CONNECT_UNAVAILABLE |
3
|
| MQTT_CONNECT_BAD_CREDENTIALS |
4
|
| MQTT_CONNECT_UNAUTHORIZED |
5
|
At first time you may get connection failed error: 5, Check your mqtt configurations are same as your account settings.
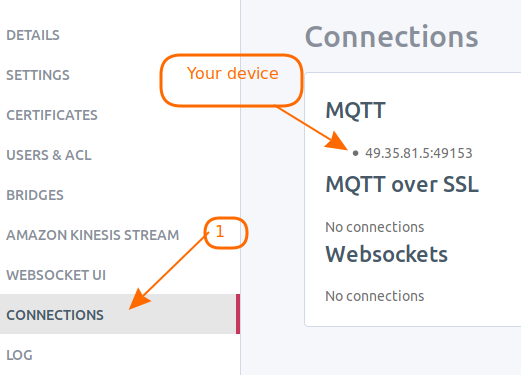
On successful connection you can view your ESP in Connections page
To send message to NodeMCU goto Websocket UI and enter topic name and message then click send. Observe Serial monitor.
Controlling LED over internet using MQTT
Keep same previous program in NodeMCU. Open notepad and create web page (html page) having on off button to control LED using below HTML code. In this we use javascript based MQTT library “paho-mqtt”. Which is included from CDN link.
Enter your MQTT configuration in below program and save this file as samplePage.html.
Open it in web browser and click on buttons. In case LED is not controlling then right click and click on inspect. Then click on console. Look for any error logs.
Results of above HTML code
Open this html file in web browser. And click on LED on/off buttons and observe On board LED of NodeMCU. This HTML code sends MQTT commands to MQTT server on same topic, as ESP is subscribed to same topic also receives LED on off commands. This way on board LED control takes place over internet.
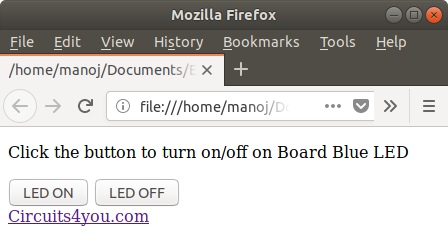
You can place this html code anywhere to control the LED.


沒有留言:
張貼留言