概述
MQTT(消息队列遥测传输)是目前最重要的物联网通信协议之一。
IBM公司开发了MQTT协议的第一个版本, 它的设计思想是轻巧、开放、简单、规范,易于实现。
这些特点使得它对很多场景来说都是很好的选择,特别是对于受限的环境如机器与机器的通信(M2M)以及物联网环境(IoT)。
IBM公司开发了MQTT协议的第一个版本, 它的设计思想是轻巧、开放、简单、规范,易于实现。
这些特点使得它对很多场景来说都是很好的选择,特别是对于受限的环境如机器与机器的通信(M2M)以及物联网环境(IoT)。
已经有许多工程项目实现了 MQTT协议。如:
Node-RED支持 0.14 版本以上的 MQTT 节点,以便正确配置 TLS 连接。
树莓派上基于Node.js 的Pimatic 家庭自动化框架提供了 MQTT 插件来完全支持 MQTT 协议。
Node-RED支持 0.14 版本以上的 MQTT 节点,以便正确配置 TLS 连接。
树莓派上基于Node.js 的Pimatic 家庭自动化框架提供了 MQTT 插件来完全支持 MQTT 协议。
基本概念
- 角色
代理端(Broker), 客户端(Client)
- 发布/订阅
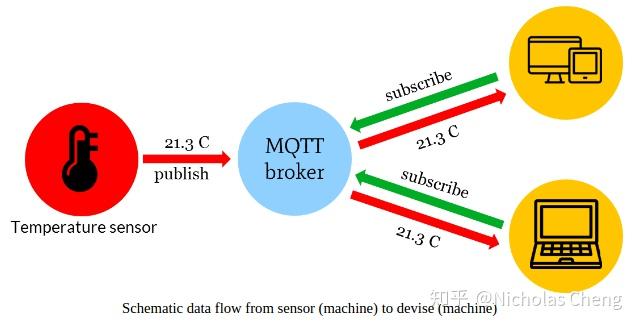
支持多客户端采用发布/订阅(subscribe/publish)形式进行通信, 代理端负责信息中转:

- 主题(Topic)
用于对消息进行分类
是一个UTF-8字符串
可进行分级

- 服务质量(QOS)
服务质量是为不同应用程序,用户或数据流提供的不同优先级的能力: - Qos0. 最多一次传送 (只负责传送,发送过后就不管数据的传送情况)
- Qos1. 至少一次传送 (确认数据交付)
- Qos2. 正好一次传送 (保证数据交付成功)
- 优势
采用代理通信的方式, 解耦了发布消息的客户(发布者)与订阅消息的客户(订阅者)之间的关系 - 发布者、订阅者不必了解彼此,只需认同一个代理
- 发布者、订阅者不需要交互,无须等待消息确认
- 发布者、订阅者不要要同时在线,可自由选择时间消费消息
更多资料
MQTT维基百科: https://zh.wikipedia.org/wiki/MQTT
ESP8266社区论坛:https://github.com/esp8266
2. esp8266-MQTT 示例
服务器(Broker)
Server: iot.eclipse.org

Port: 1883

网址: https://iot.eclipse.org/
在接下来的例子中, 我们使用 Eclipse IoT, 一个开源的物联网云服务器, 缺点是服务质量不稳定, 容易丢包. 推荐使用实验室提供的服务器. 如有条件, 也可购买阿里或腾讯的云服务器(10+¥/月)搭建一个云服务器.
esp8266 端(client)

PubSubClient 是一个非常好的发布订阅客户端库, 该库也被集成到了Arduino的库管理器中,在库管理器中可下载。
下载完成后,打开示例->pubsubclient->mqtt-esp8266,
填写esp8266将连接的==wifi名与密码、连接的代理服务器地址信息,如下:
填写esp8266将连接的==wifi名与密码、连接的代理服务器地址信息,如下:
// Update these with values suitable for your network.

const char* ssid = "Li-507-2";
const char* password = "blackwalnut";
const char* mqtt_server = "iot.eclipse.org";
运行程序, NodeMCU 每间隔 2S 向服务器发送 "#hello World" 的信息.
工作原理
- 连接 wifi
   void setup_wifi() {
   delay(10);
   WiFi.begin(ssid, password);
   }
   while (WiFi.status() != WL_CONNECTED) {
   delay(500);
   Serial.print(".");
   }
2. 接收回调函数
   void callback(char* topic, byte* payload, unsigned int
   length){
   //接收消息处理
   }
3. MQTT 配置
void setup() {
   ......
   setup_wifi();
   client.setServer(mqtt_server, 1883);//服务器地址+端口
   client.setCallback(callback);//设置接收消息回调函数
   }
4. MQTT 连接
void reconnect() {
       while (!client.connected()) {
           //设置客户端ID,如果重名,服务器会断开前一个连接
           if (client.connect(ESP.getChipID())) {
               //发布消息
               client.publish("outTopic", "hello world");
               //订阅消息
               client.subscribe("inTopic");
           } else {
               delay(5000);
           }
       }
   }
5. 消息接收或发送
void loop() {
    if (!client.connected()) {
         reconnect();
    }
   //处理订阅消息
   client.loop();
   long now = millis();

   //通过判断系统时间延迟信息的发送, 而非通过 delay()函数
   //因delay会导致该进程阻塞,导致在延迟期间无法订阅信息.
   if (now - lastMsg > 2000) {
       lastMsg = now;
       ++value;
       snprintf (msg, 75, "hello world #%ld", value);
       client.publish("outTopic", msg);
           //发送主题为“outTopic”的消息到服务器
   }
Android 端(client)
首先,保证你的手机连接上了因特网。
Mqtt的andoid端软件测试很多, 操作方式基本相同, 以下应用可在Google Play 下载,此处以MQTT Dashboard为例
Mqtt的andoid端软件测试很多, 操作方式基本相同, 以下应用可在Google Play 下载,此处以MQTT Dashboard为例

与在Arduino端中一样,配置Andoid端代理服务器地址与端口:
Server : iot.eclipse.org

Port : 1883
完成上述配置,android手机与esp8266间即可根据彼此确定的主题,进行发布/订阅双向通信。
3. JSON:轻松打包数据
当我们想要传输多组物联网节点属性的信息时, 可以对数据进行打包再发布, 在订阅端进行解包, 这样做的优点是: 确定我们订阅的信息归属于哪个属性的, 防止信息被错误地归属到其他的属性中, 保证信息的准确性. JSON 为我们提供了一种很好的数据编码格式.
JSON(JavaScript Object Notation) 是一种轻量级的数据交换格式。易于人阅读和编写。同时也易于机器解析和生成。
基础结构
- “名称/值”对的集合(A collection of name/value pairs)
- 值的有序列表(An ordered list of values)大部分语言中,它被理解为数组(array)
表示对象
JSON最常用的格式是对象的 键值对。例如下面这样:
{"firstName": "Brett", "lastName": "McLaughlin"}
表示数组
和普通的 JS 数组一样,JSON 表示数组的方式也是使用方括号 []。
{ "people": [

{ "firstName": "Brett", "lastName":"McLaughlin", "email": "aaaa" },

{ "firstName": "Jason", "lastName":"Hunter", "email": "bbbb"},

{ "firstName": "Elliotte", "lastName":"Harold", "email": "cccc" }

]}
在Arduino中使用:
ArduinoJson官网: https://arduinojson.org/
在 Arduino 库管理界面下载 ArduinoJson 库
打开示例->jsonGeneratorExample/ jsonParseExample, 可以尝试Json 打包与解包的示例
4. 实例: 订阅温湿度信息

DHT11传感器的通信协议是单总线协议,连线为:GND ~ GND, VCC ~ 3v3,data~ d×,非常简明。
在 Arduino 库管理器中搜索“dht”,下载库:DHT sensor library for ESP
打开示例->DHT_Test
设置与DHT sensor 连接的引脚, 运行即可在串口监视器看到温湿度等输出.
// dht.setup(17);
      dht.setup(D1); // Connect DHT sensor to GPIO D1
注: 上述库在运行时可能出现问题, 推荐下载库 SampleDHT, 运行该库中的示例
将温湿度两个属性的值打包成 JSON 格式, 通过 MQTT 协议发送到 Node-RED 平台, 在该平台上绘制出相应的图表完成数据的可视化. 这就是一个最小的物联网系统. 只要你的物联网节点与终端可以连接到 Internet, MQTT 代理服务器的提供的代理可靠, 你就可以实现对物联网节点的远程监控.
根据实例所写,可发送DHT温湿度传感器数据的Arduino代码如下:(要发送不同传感器的信息,只需替换传感器部分的代码)
#include "DHTesp.h"
#include <ArduinoJson.h>
#include <ESP8266WiFi.h>
#include <PubSubClient.h>

DHTesp dht;

char msg[100]; //存放json数据
float humidity;
float temperature;

const char* ssid = "******";    //你的wifi名
const char* password = "*******";   //你的wifi密码
const char* mqtt_server = "iot.eclipse.org";   //服务器地址

WiFiClient espClient;
PubSubClient client(espClient);
long lastMsg = 0;
int value = 0;

void setup()
{
  Serial.begin(115200);
  Serial.println();
//  Serial.println("Status\tHumidity (%)\tTemperature (C)\t(F)\tHeatIndex (C)\t(F)");

  setup_wifi();
  client.setServer(mqtt_server, 1883);
  client.setCallback(callback);

  dht.setup(D1); // Connect DHT sensor to GPIO D1
}

void loop()
{
  delay(dht.getMinimumSamplingPeriod());

   humidity = dht.getHumidity();
   temperature = dht.getTemperature();

  if (!client.connected()) {
    reconnect();
  }
  client.loop();

  encodeJson();

  long now = millis();
  if (now - lastMsg > 2000) {
    lastMsg = now;
    ++value;
//    snprintf (msg, 75, "hello world #%ld", value);
    Serial.print("Publish message: ");
    Serial.println(msg);
    client.publish("DHT11", msg);
  }

}

//JSON编码函数
void encodeJson(){
  DynamicJsonBuffer jsonBuffer;
  JsonObject& root1 = jsonBuffer.createObject();
  root1["Humidity"] = humidity;
  root1["Temperature"] = temperature;
//  root1.prettyPrintTo(Serial);
  root1.printTo(msg);
}

//JSON解码函数
void decodeJson(char msg[100]){
  DynamicJsonBuffer jsonBuffer;
  JsonObject& root = jsonBuffer.parseObject(msg);
  float temp = root["Temperature"];
  float hum = root["Humidity"];

  Serial.println(temp);
  Serial.println(hum);

}

void setup_wifi() {
  delay(10);
  // We start by connecting to a WiFi network
  Serial.println();
  Serial.print("Connecting to ");
  Serial.println(ssid);

  WiFi.begin(ssid, password);

  while (WiFi.status() != WL_CONNECTED) {
    delay(500);
    Serial.print(".");
  }

  Serial.println("");
  Serial.println("WiFi connected");
  Serial.println("IP address: ");
  Serial.println(WiFi.localIP());
}

void callback(char* topic, byte* payload, unsigned int length) {
  Serial.print("Message arrived [");
  Serial.print(topic);
  Serial.print("] ");
  for (int i = 0; i < length; i++) {
    Serial.print((char)payload[i]);
  }
  Serial.println();
}

void reconnect() {
  // Loop until we're reconnected
  while (!client.connected()) {
//    Serial.print("Attempting MQTT connection...");
    // Attempt to connect
    if (client.connect("ESP8266Client")) {
//      Serial.println("connected");
      // Once connected, publish an announcement...
      client.publish("outTopic", "hello world");
      // ... and resubscribe
      client.subscribe("inTopic");
    } else {
      Serial.print("failed, rc=");
      Serial.print(client.state());
      Serial.println(" try again in 5 seconds");
      // Wait 5 seconds before retrying
      delay(5000);
    }
  }
}

沒有留言:
張貼留言