ESP32: Subscribing to MQTT topic
The objective of this post is to explain how to connect to a MQTT broker and subscribe to a topic, using the ESP32 and the Arduino IDE libraries.
Introduction
The objective of this post is to explain how to connect to a MQTT broker and subscribe to a topic, using the ESP32 and the Arduino IDE libraries.
We will assume that the broker will be hosted on CloudMQTT. We are also going to use a MQTT library, called PubSubClient, which will expose the functionality needed to connect to the broker and subscribe to a topic.
Since we have already covered most of the coding needed to connect to the broker in this previous post, we will do a shorter explanation here.
The code
First, we start by including the libraries needed for all the functionality. We need the WiFi library, in order to be able to connect the ESP32 to a WiFi network, and the PubSubClient library, which will make available the MQTT related functionalities.
After that, we declare some global variables for holding the credentials of the connections. We need the WiFi credentials, to connect to the WiFi network. We will also need the information and credentials of the MQTT server. We will need the server address, the port, the username and the password, which can be obtained in the instance information page of CloudMQTT.
Then, we will declare an object of class WiFiClient, which will allow us to create a connection to a certain IP and port. We will also declare an object of class PubSubClient, which receives as input of the constructor the previously defined WiFiClient object.
1
2
3
4
5
6
7
8
9
10
11
12
| #include <WiFi.h>#include <PubSubClient.h>const char* ssid = "yourNetworkName";const char* password = "yourNetworkPassword";const char* mqttServer = "m11.cloudmqtt.com";const int mqttPort = 12948;const char* mqttUser = "yourMQTTuser";const char* mqttPassword = "yourMQTTpassword";WiFiClient espClient;PubSubClient client(espClient); |
Now, in the setup function, we will open a Serial connection, to output the results of the program. We will also establish the connection to the WiFi network.
Next, we need to specify the address and the port of the MQTT server. To do so, we call the setServer method on the PubSubClient object. This method will receive as first argument the address and as second the port, both defined early in global variables.
Then, we use the setCallback method on the same object to specify a handling function. This handling function will be executed when a MQTT message is received on a subscribed topic. We will leave the code of this function for latter.
1
2
3
4
5
6
7
8
9
10
11
12
| Serial.begin(115200);WiFi.begin(ssid, password);while (WiFi.status() != WL_CONNECTED) { delay(500); Serial.println("Connecting to WiFi..");}Serial.println("Connected to the WiFi network");client.setServer(mqttServer, mqttPort);client.setCallback(callback); |
Next, we will connect to the MQTT server. We will do it in a loop until we get success. You can check this previous post for a more detailed explanation of the methods used.
1
2
3
4
5
6
7
8
9
10
11
12
13
14
15
| while (!client.connected()) { Serial.println("Connecting to MQTT..."); if (client.connect("ESP32Client", mqttUser, mqttPassword )) { Serial.println("connected"); } else { Serial.print("failed with state "); Serial.print(client.state()); delay(2000); }} |
Finally, we will subscribe to the topic we want. This way, we will receive messages published on that topic from other clients. To do so, we call the subscribe method, which receives as input the name of the topic to which we want to subscribe. The topic for this tutorial will be “esp/test”.
1
| client.subscribe("esp/test"); |
The callback function
As said before, we still need to specify the callback function, to execute when a message is received for a subscribed topic. The arguments of this callback function are the name of the topic, the payload (in bytes) and the length of the message received. The message should also return void.
As can be seen in the code bellow, we will first print the topic name and then each byte of the message received. In the end we will also print some separator characters, to differentiate messages received.
1
2
3
4
5
6
7
8
9
10
11
12
13
14
| void callback(char* topic, byte* payload, unsigned int length) { Serial.print("Message arrived in topic: "); Serial.println(topic); Serial.print("Message:"); for (int i = 0; i < length; i++) { Serial.print((char)payload[i]); } Serial.println(); Serial.println("-----------------------");} |
The main loop
In the main loop function, we will need to call the loop method of the PubSubClient. As indicated in the documentation of the library, the function should be called on a regular basis, in order to allow the client to process incoming messages and maintain the connection to the MQTT server.
1
2
3
| void loop() {client.loop();} |
Check the full code bellow.
1
2
3
4
5
6
7
8
9
10
11
12
13
14
15
16
17
18
19
20
21
22
23
24
25
26
27
28
29
30
31
32
33
34
35
36
37
38
39
40
41
42
43
44
45
46
47
48
49
50
51
52
53
54
55
56
57
58
59
60
61
62
63
64
65
66
| #include <WiFi.h>#include <PubSubClient.h>const char* ssid = "yourNetworkName";const char* password = "yourNetworkPassword";const char* mqttServer = "m11.cloudmqtt.com";const int mqttPort = 12948;const char* mqttUser = "yourMQTTuser";const char* mqttPassword = "yourMQTTpassword";WiFiClient espClient;PubSubClient client(espClient);void callback(char* topic, byte* payload, unsigned int length) { Serial.print("Message arrived in topic: "); Serial.println(topic); Serial.print("Message:"); for (int i = 0; i < length; i++) { Serial.print((char)payload[i]); } Serial.println(); Serial.println("-----------------------");}void setup() { Serial.begin(115200); WiFi.begin(ssid, password); while (WiFi.status() != WL_CONNECTED) { delay(500); Serial.println("Connecting to WiFi.."); } Serial.println("Connected to the WiFi network"); client.setServer(mqttServer, mqttPort); client.setCallback(callback); while (!client.connected()) { Serial.println("Connecting to MQTT..."); if (client.connect("ESP32Client", mqttUser, mqttPassword )) { Serial.println("connected"); } else { Serial.print("failed with state "); Serial.print(client.state()); delay(2000); } } client.subscribe("esp/test");}void loop() { client.loop();} |
Testing the code
To test the code, just upload it to the ESP32 and open the Arduino IDE serial monitor.
As usual, we are also going to use MQTTLens for the tests. So, we just need to open it and publish a message to the post to which the ESP32 has subscribed, as shown in figure 1.
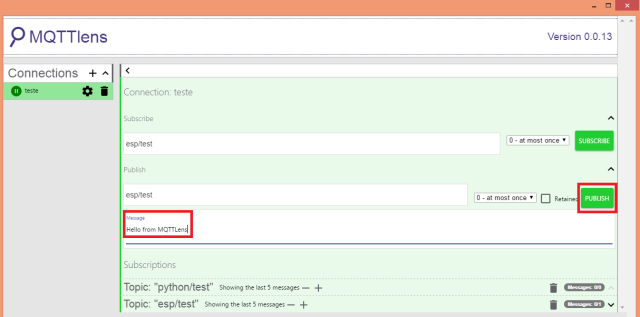
Figure 1 – Sending message to MQTT topic, from MQTTLens.
In the Arduino IDE serial monitor, we should get a result similar to figure 2, where the message previously sent to the topic is printed. In this case, I’ve sent a couple of them.
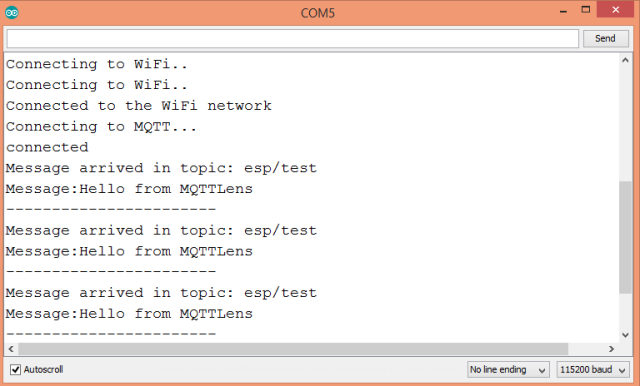
Figure 2 – Getting messages from subscribed MQTT topic.


沒有留言:
張貼留言