import tkinter as tk
my_w = tk.Tk()
my_w.geometry("300x200")
l1 = tk.Label(my_w, text='row=1,column=1 ')
l1.grid(row=1,column=1)
l2 = tk.Label(my_w, text=' row=1,column=2')
l2.grid(row=1,column=2)
l3 = tk.Label(my_w, text='row=2,column=1 ')
l3.grid(row=2,column=1)
l4 = tk.Label(my_w, text=' row=2,column=2')
l4.grid(row=2,column=2)
my_w.mainloop()

import tkinter as tk
my_w = tk.Tk()
my_w.geometry("250x100")
my_w.title("alex9ufo") # Adding a title
l1 = tk.Label(my_w, text='F Name (sticky=\'W\')' ) #added one Label
l1.grid(row=1,column=1,sticky='W')
e1 = tk.Entry(my_w, width=10,bg='yellow') # added one Entry box
e1.grid(row=1,column=2)
l2 = tk.Label(my_w, text='L Name (sticky=\'E\')') #
l2.grid(row=2,column=1,sticky='E')
e2 = tk.Entry(my_w, width=10,bg='yellow') # added one Entry box
e2.grid(row=2,column=2)
l3 = tk.Label(my_w, text='Add Door No and Street address')
l3.grid(row=3,column=1,sticky='W')
e3 = tk.Entry(my_w, width=10,bg='yellow') # added one Entry box
e3.grid(row=3,column=2)
my_w.mainloop()

import tkinter as tk
my_w = tk.Tk()
my_w.geometry("300x150")
l1 = tk.Label(my_w, text='First', width=20)
l1.grid(row=1,column=1)
l2 = tk.Label(my_w, text='Second', width=20)
l2.grid(row=2,column=1)
l3 = tk.Label(my_w, text='Third', width=20)
l3.grid(row=3,column=1)
t1 = tk.Text(my_w, height=3, width=8,bg='yellow') #text box
t1.grid(row=1,column=2,rowspan=3)
my_w.mainloop()

ipadx,ipady,padx,pady options
Tkinter window grid layout using padx pady and internal padding by using ipadx, ipady

ipadx and ipady adds inner padding or the internal padding of the widget border.
l4=tk.Label(my_w,text='ipadx=50,ipady=50',
	borderwidth=2,relief='ridge')
l4.grid(row=2,column=2,ipadx=50,ipady=50)l4=tk.Label(my_w,text='padx=50,pady=50',
borderwidth=2,relief='ridge')
l4.grid(row=2,column=2,padx=50,pady=50)grid_size()
This will return a tuple showing first empty columns and rows . In this example we have used upto row=3 and column=3 so we will get output as (4,4).import tkinter as tk
my_w = tk.Tk()
my_w.geometry("300x150")
l1 = tk.Label(my_w, text='First', width=8)
l1.grid(row=1,column=1)
l2 = tk.Label(my_w, text='Second', width=8)
l2.grid(row=2,column=2)
l3 = tk.Label(my_w, text='Third', width=8)
l3.grid(row=3,column=3)
print(my_w.grid_size()) # tuple columns , rows
my_w.mainloop()(4, 4)column=2 for last element.l3 = tk.Label(my_w, text='Third', width=8)
l3.grid(row=3,column=2) (3, 4)grid_slaves(row=None, column=None)
We will get a list of widgets manage by the grid.import tkinter as tk
my_w = tk.Tk()
my_w.geometry("300x150")
l1 = tk.Label(my_w, text='First', width=8)
l1.grid(row=1,column=1)
l2 = tk.Label(my_w, text='Second', width=8)
l2.grid(row=2,column=2)
l3 = tk.Label(my_w, text='Third', width=8)
l3.grid(row=3,column=2)
print(my_w.grid_slaves())
my_w.mainloop()[<tkinter.Label object .!label3>, <tkinter.Label object .!label2>,
<tkinter.Label object .!label>]print(my_w.grid_slaves(2,2)) [<tkinter.Label object .!label2>]grid_remove()
Remove the widget from the perticular grid. Can be added again.import tkinter as tk
my_w = tk.Tk()
my_w.geometry("300x150")
l1 = tk.Label(my_w, text='First', width=8)
l1.grid(row=1,column=1)
l2 = tk.Label(my_w, text='Second', width=8)
l2.grid(row=2,column=2)
l3 = tk.Label(my_w, text='Third', width=8)
l3.grid(row=3,column=2)
l3.grid_remove()
my_w.mainloop()l3.grid()grid_forget()
Remove the widget from the perticular grid. Can be added again at the new location. We have to specify the location while restoring, by default it takes the next new location.l3.grid_forget()l3.grid(row=3,column=2)Removing after some time delay
We can use the widget as message box and want to remove it after 300 seconds.l3.after(3000, lambda: l3.grid_remove() )Remove all widgets
for w in my_w.grid_slaves(): # Loop through each row
    w.grid_forget() # remove the row
Remove all widgets of 2nd row only
for w in my_w.grid_slaves(2):
    w.grid_forget()
Remove all widgets of 2nd column
for w in my_w.grid_slaves(None,2):
    w.grid_forget()
Delete widgets
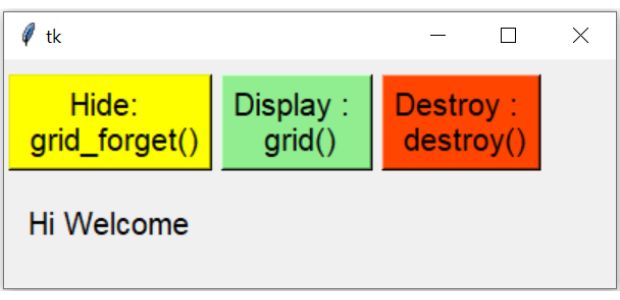
By using destroy() method we can delete a widget permanently. We can't restore it again.
import tkinter as tk
my_w = tk.Tk()
my_w.geometry("300x150")

b1=tk.Button(my_w,text='Hide: \n grid_forget()',
      command=lambda:l1.grid_forget())
b1.grid(row=0,column=0,padx=2,pady=10)
b2=tk.Button(my_w,text='Display : \n grid()',
      command=lambda:l1.grid())
b2.grid(row=0,column=1,padx=2,pady=10)
b3=tk.Button(my_w,text='Destroy : \n destroy()',
      command=lambda:l1.destroy())
b3.grid(row=0,column=2,padx=2)

l1 = tk.Label(my_w, text='Hi Welcome', width=10)
l1.grid(row=1,column=0,pady=10)
my_w.mainloop()
By using grid_slaves() and grid_forget() we can refresh the window after any delete or update operation. See example of deleting record
grid_info()
All information about the widget layout in the grid.import tkinter as tk
from tkinter import *
my_w = tk.Tk()
my_w.geometry("400x200") # Size of the window
my_w.title("www.plus2net.com") # Adding a title
l1 = tk.Label(my_w, text='row=1,column=1 ')
l1.grid(row=1,column=1,padx=10,pady=10,ipadx=3,ipady=4)
#dictionary elements(row,column,ipadx,ipday,sticky,rowspan,columnspan)
print(l1.grid_info()) # dictionary all elements value
print(l1.grid_info()['column'])# 1
print(l1.grid_info()['padx']) # 10
my_w.mainloop() # Keep the window open


沒有留言:
張貼留言