ESP32 — MQTT 基本範例
介紹
本課程將展示WOKWI ESP32 模擬的基本MQTT協定使用
- 每兩秒向主題“alex9ufo/outTopic”發布“hello world”。
- 訂閱主題“alex9ufo/inTopic”,列印收到的所有訊息。
- 它假設接收到的有效負載是字串而不是二進位。
- 如果訂閱的訊息為“ON”,則點亮板載LED。
- 如果訂閱的訊息為“OFF”,則熄滅板載LED。
準備:
- https://wokwi.com/projects/new/esp32 。 wokwi 註冊
- Node-RED 安裝
Windows 作業系統 源自於https://cumi.co/20221213/
1. 安裝Node.js主程式,下載安裝檔案,執行安裝。
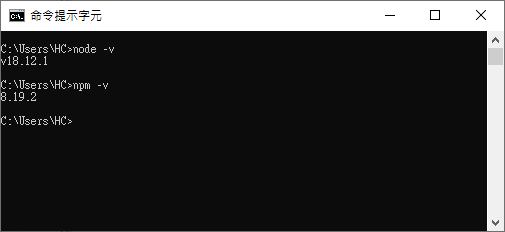
2. 安裝完成之後開啟CMD,確認node及npm版本。
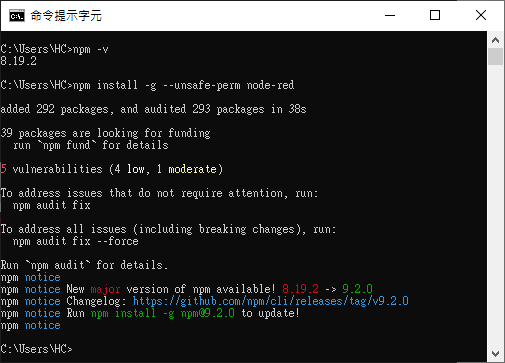
3. CMD輸入 npm install -g --unsafe-perm node-red 安裝Node-RED。
4. CMD輸入node-red啟動Node-RED。
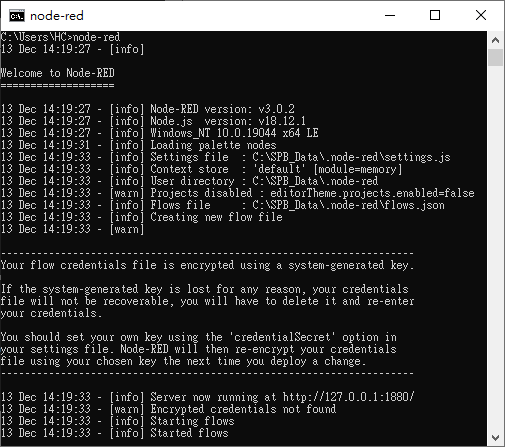
5. 瀏覽器開啟網址http://127.0.0.1:1880。
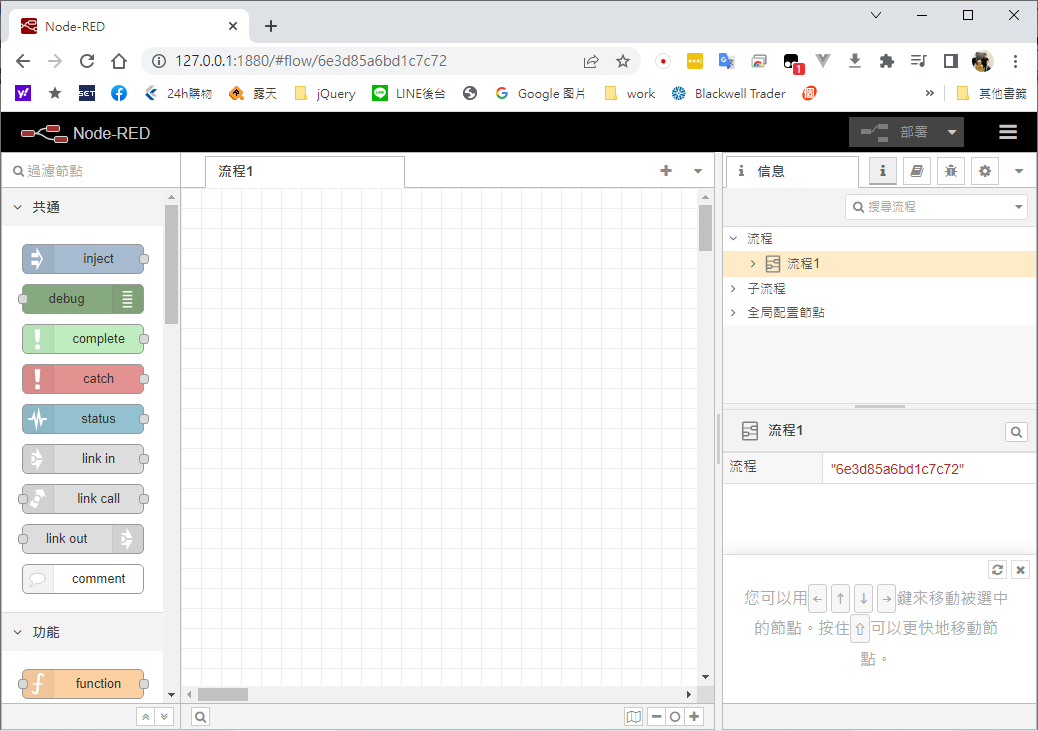
6. 找到Node-Red設定目錄。
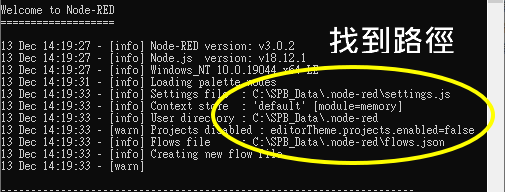
7. CMD輸入 node-red admin hash-pw,使用工具產生密碼加密。

8. 開啟Node-Red設定檔,adminAuth把註解移除,把加密的密碼貼上去。
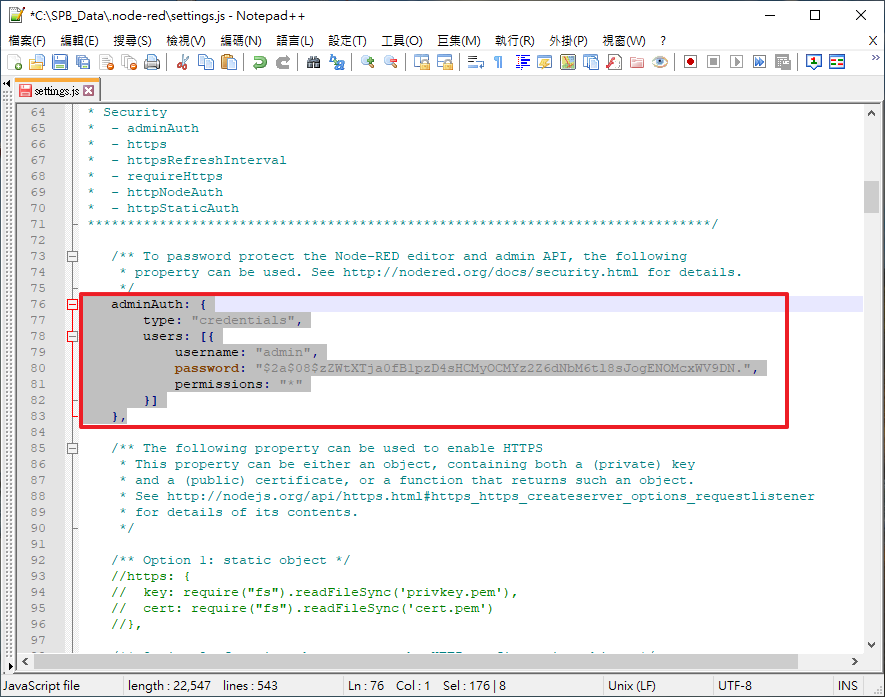
9. 重新啟用node-red,瀏覽器打開node-red輸入設定之帳號密碼,即可登入。
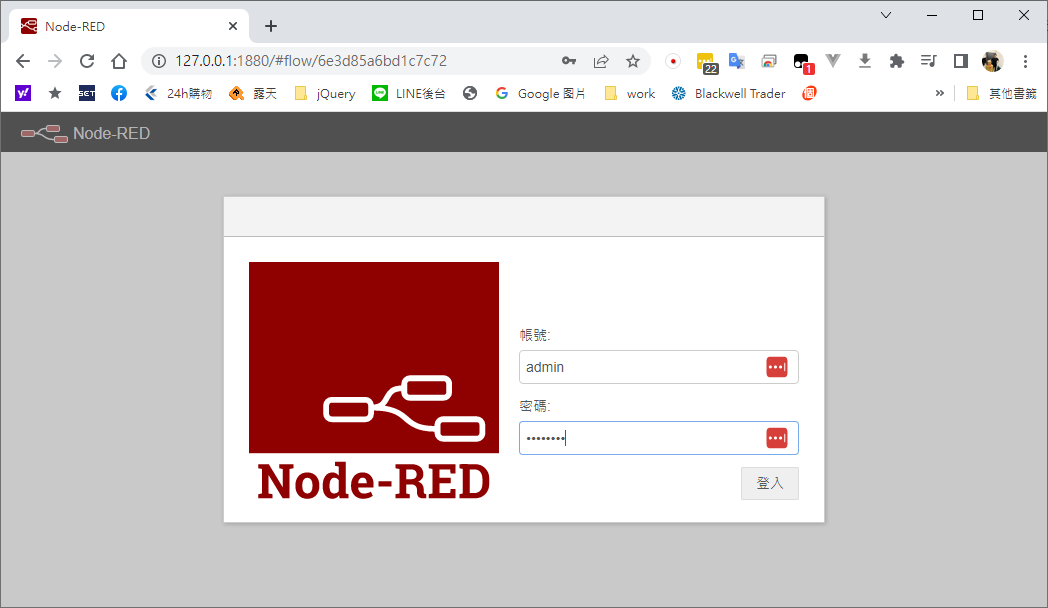
- [Node-RED] dashboard儀表板
node-red-dashboard
- http://blog.3dgowl.com/node-red-dashboard%E5%84%80%E8%A1%A8%E6%9D%BF/
node-red-node-sqlite
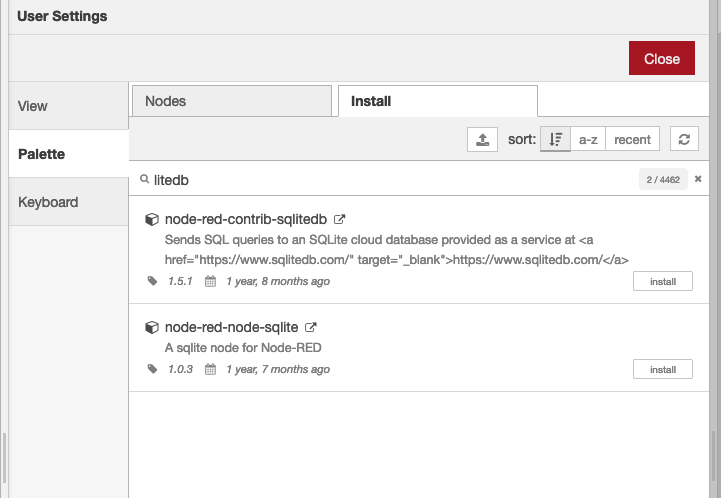
- 安裝sqlite節點
- sketch.ion程式。
#include <WiFi.h>
#include "PubSubClient.h"
// WiFi
char ssid[]="Wokwi-GUEST";
char pass[]="";
// MQTT Broker
const char *mqtt_broker = "broker.mqtt-dashboard.com";//"broker.emqx.io";//Public Broker
const char *mqtt_username = "hivemqtt";
const char *mqtt_password = "public";
const int mqtt_port = 1883;
// App Protcol ---> Port
const char *topic_publish = "alex9ufo/outTopic";//Topic ESP32 Pusblish
const char *topic_subsrcibe = "alex9ufo/inTopic";//Topic ESp32 Subscribe
WiFiClient hamada;//WIFI Opject
PubSubClient client(hamada);//OOP
void callback(char *topic, byte *payload, unsigned int length);
#define LED 2
bool ledState=false;
unsigned long lastMsg = 0;
#define MSG_BUFFER_SIZE (50)
char msg[MSG_BUFFER_SIZE];
int value = 0;
void reconnect() {
// Loop until we're reconnected
while (!client.connected()) {
Serial.print("Attempting MQTT connection...");
// Create a random client ID
String clientId = "ESP32Client-";
clientId += String(random(0xffff), HEX);
// Attempt to connect
if (client.connect(clientId.c_str())) {
Serial.println("connected");
// Once connected, publish an announcement...
client.publish(topic_publish, "Hello world.....");
client.subscribe(topic_subsrcibe);
} else {
Serial.print("failed, rc=");
Serial.print(client.state());
Serial.println(" try again in 5 seconds");
// Wait 5 seconds before retrying
delay(5000);
}
}
}
void setup(){
// Setting LED pin as output
pinMode(LED, OUTPUT);
digitalWrite(LED, LOW); // Turn off the LED initially
//Open a serial connection to display program results and establish a connection to the Wi-Fi network.
// Set software serial baud to 115200;
Serial.begin(115200);
// Connecting to a Wi-Fi network
WiFi.begin(ssid, pass);
while (WiFi.status() != WL_CONNECTED) {
delay(500);
Serial.println("Connecting to WiFi..");
}
Serial.println("Connected to the Wi-Fi network");
// Utilize PubSubClient to establish a connection with the MQTT broker.
//connecting to a mqtt broker
Serial.println("Before Connect MQTT");
//Broker Configuration
client.setServer(mqtt_broker, mqtt_port);
while (!client.connected()) {
String client_id = "esp32-client-";
client_id =client_id+ String(WiFi.macAddress());
//consloe.log("x"+"y");//xy
//ESP32-ID -----> esp32-client-macaddress
//variable.c_str()--->char [] , String
Serial.printf("The client %s connects to the public MQTT broker\n", client_id.c_str());
if (client.connect(client_id.c_str(), mqtt_username, mqtt_password)) {
Serial.println("Public MQTT broker connected");
} else {
Serial.print("failed with state ");
Serial.print(client.state());//1 , 2 , 5
delay(2000);
}
}
Serial.println("After Connect MQTT");
client.publish(topic_publish, "Hello world.....");
client.subscribe(topic_subsrcibe);
client.setCallback(callback);
}
void loop() {
if (!client.connected()) {
reconnect();
}
client.loop();
unsigned long now = millis();
if (now - lastMsg > 10000) {
lastMsg = now;
++value;
snprintf (msg, MSG_BUFFER_SIZE, "hello world #%ld", value);
Serial.print("Publish message: ");
Serial.println(msg);
client.publish(topic_publish, msg);
}
}
void callback(char* topic, byte* message, unsigned int length) {
printPayload(topic, message, length);
}
void printPayload(char* topic, byte* message, unsigned int length) {
// Printing Received Message
Serial.print("Message received on topic: ");
Serial.println(topic);
String messageTemp;
for(int i=0; i<length; i+=1) {
messageTemp += (char)message[i];
}
if(String(topic) == "alex9ufo/inTopic"){
Serial.println("alex9ufo/inTopic");
if(messageTemp=="ON"){
Serial.println("Led ON");
digitalWrite(LED,HIGH);
}
if(messageTemp=="OFF"){
Serial.println("Led OFF");
digitalWrite(LED,LOW);
}
}
Serial.println(messageTemp);
}
- diagram.json程式 (電路圖)。
{
"version": 1,
"author": "Anonymous maker",
"editor": "wokwi",
"parts": [
{ "type": "wokwi-esp32-devkit-v1", "id": "esp", "top": -321.7, "left": -168.2, "attrs": {} },
{
"type": "wokwi-resistor",
"id": "r1",
"top": -225.6,
"left": 37.85,
"rotate": 90,
"attrs": { "value": "1000" }
},
{
"type": "wokwi-led",
"id": "led1",
"top": -310.8,
"left": 32.6,
"attrs": { "color": "red" }
}
],
"connections": [
[ "esp:TX0", "$serialMonitor:RX", "", [] ],
[ "esp:RX0", "$serialMonitor:TX", "", [] ],
[ "led1:C", "esp:GND.1", "black", [ "v0" ] ],
[ "r1:1", "led1:A", "red", [ "h0" ] ],
[ "esp:D2", "r1:2", "red", [ "h0" ] ]
],
"dependencies": {}
}
Node-Red設定:
broker.mqtt-dashboard.com:1883/ws
一、安裝/刪除節點
二、匯入/匯出流程
一、安裝/刪除節點
1.點選右上角的三條橫線下拉選單→「節點管理」(圖1)
2.進入後可以看到已安裝的節點,在此可以禁用或刪除(圖2)
3.被刪除的節點可以再次重新安裝
4.切換至安裝頁面,上方可輸入關鍵字搜尋(圖3)
5.選取要得節點後按下右下角安裝即會進入安裝狀態
特別提醒:安裝和刪除時請確保Node-RED正確運作,切勿關閉或斷線,會造成系統異常而無法開啟和編輯
6.新增的節點將會出現於主畫面左側的節點區
二、匯入/匯出流程
1.點選右上角的三條橫線下拉選單→「匯入、匯出」(圖4)
(1)匯入:將外部檔案放入自己的Node-RED中編輯使用
(2)匯出:將自己的專案轉成jason或文字碼供他人使用
2.點選「匯入」→「匯入所選檔案」→「匯入」(圖5)
特別提醒:若匯入他人資料時本身沒有資料中的結點,Node-RED會無法辨識而跳出警示,需要針對該節點去新增安裝後重新匯入一次,始得正常使用
3.點選「匯出」→「現在的節點」→「下載」(圖6)
(1)按下下載後會匯出jason檔案,需要時再使用匯入功能即可取回資料至Node-RED中
(2)下載旁的「匯出到剪貼簿」會生成文字碼(記事本可開啟),兩種都可以作為匯出的方式
(3)建議當專案完成後即可匯出檔案作為備份以免遺失
- node-red 程式 。
[{"id":"5615c3139a44b5d0","type":"mqtt in","z":"01fd8e367f0ac467","name":"WOKWI--out","topic":"alex9ufo/outTopic","qos":"1","datatype":"auto-detect","broker":"841df58d.ee5e98","nl":false,"rap":true,"rh":0,"inputs":0,"x":370,"y":380,"wires":[["74d697432438f140","80fd252ac8b67c26"]]},{"id":"653778e8f0c52bd5","type":"ui_button","z":"01fd8e367f0ac467","name":"","group":"f652932debd19205","order":3,"width":3,"height":1,"passthru":false,"label":"ON","tooltip":"","color":"","bgcolor":"","className":"","icon":"","payload":"ON","payloadType":"str","topic":"topic","topicType":"msg","x":350,"y":200,"wires":[["8f57776b7e4e3094","32f91ec99294708e","74d697432438f140"]]},{"id":"56b07a7f5b5be766","type":"ui_button","z":"01fd8e367f0ac467","name":"","group":"f652932debd19205","order":5,"width":3,"height":1,"passthru":false,"label":"OFF","tooltip":"","color":"","bgcolor":"","className":"","icon":"","payload":"OFF","payloadType":"str","topic":"topic","topicType":"msg","x":350,"y":280,"wires":[["8f57776b7e4e3094","f6e2801b5c496dcb","74d697432438f140"]]},{"id":"80fd252ac8b67c26","type":"ui_text","z":"01fd8e367f0ac467","group":"f652932debd19205","order":9,"width":0,"height":0,"name":"","label":"向WOKWI訂閱的主題 : alex9ufo/outTopic","format":"{{msg.payload}}","layout":"row-left","className":"","x":660,"y":360,"wires":[]},{"id":"74d697432438f140","type":"ui_audio","z":"01fd8e367f0ac467","name":"","group":"f652932debd19205","voice":"Microsoft Yating - Chinese (Traditional, Taiwan)","always":"","x":560,"y":400,"wires":[]},{"id":"8f57776b7e4e3094","type":"mqtt out","z":"01fd8e367f0ac467","name":"ON/OFF","topic":"alex9ufo/inTopic","qos":"1","retain":"true","respTopic":"","contentType":"","userProps":"","correl":"","expiry":"","broker":"841df58d.ee5e98","x":560,"y":240,"wires":[]},{"id":"00cf1c6bb0742364","type":"ui_led","z":"01fd8e367f0ac467","order":6,"group":"f652932debd19205","width":"5","height":"4","label":"","labelPlacement":"left","labelAlignment":"left","colorForValue":[{"color":"#ff0000","value":"false","valueType":"bool"},{"color":"#008000","value":"true","valueType":"bool"}],"allowColorForValueInMessage":false,"shape":"circle","showGlow":true,"name":"","x":770,"y":160,"wires":[]},{"id":"3e44e13a2dbdc6ca","type":"inject","z":"01fd8e367f0ac467","name":"","props":[{"p":"payload"},{"p":"topic","vt":"str"}],"repeat":"","crontab":"","once":false,"onceDelay":0.1,"topic":"","payload":"true","payloadType":"bool","x":550,"y":100,"wires":[["00cf1c6bb0742364"]]},{"id":"c97bf463532d9220","type":"inject","z":"01fd8e367f0ac467","name":"","props":[{"p":"payload"},{"p":"topic","vt":"str"}],"repeat":"","crontab":"","once":false,"onceDelay":0.1,"topic":"","payload":"false","payloadType":"bool","x":550,"y":140,"wires":[["00cf1c6bb0742364"]]},{"id":"32f91ec99294708e","type":"function","z":"01fd8e367f0ac467","name":"function ON","func":"var test=msg.payload;\n\nif (test==\"ON\")\n msg.payload=true;\n\nreturn msg;","outputs":1,"noerr":0,"initialize":"","finalize":"","libs":[],"x":570,"y":200,"wires":[["00cf1c6bb0742364","f59989c133de1fcd"]]},{"id":"f6e2801b5c496dcb","type":"function","z":"01fd8e367f0ac467","name":"function OFF","func":"var test=msg.payload\nif (test==\"OFF\")\n msg.payload=false;\n\nreturn msg;","outputs":1,"noerr":0,"initialize":"","finalize":"","libs":[],"x":570,"y":280,"wires":[["00cf1c6bb0742364","f59989c133de1fcd"]]},{"id":"f59989c133de1fcd","type":"debug","z":"01fd8e367f0ac467","name":"debug 301","active":true,"tosidebar":true,"console":false,"tostatus":false,"complete":"false","statusVal":"","statusType":"auto","x":790,"y":260,"wires":[]},{"id":"841df58d.ee5e98","type":"mqtt-broker","name":"","broker":"broker.mqtt-dashboard.com","port":"1883","clientid":"","autoConnect":true,"usetls":false,"compatmode":false,"protocolVersion":"4","keepalive":"15","cleansession":true,"birthTopic":"","birthQos":"0","birthPayload":"","birthMsg":{},"closeTopic":"","closePayload":"","closeMsg":{},"willTopic":"","willQos":"0","willPayload":"","willMsg":{},"userProps":"","sessionExpiry":""},{"id":"f652932debd19205","type":"ui_group","name":"LED_WOKWI","tab":"b83c5c221c74411b","order":4,"disp":true,"width":"6","collapse":false,"className":""},{"id":"b83c5c221c74411b","type":"ui_tab","name":"Wokwi","icon":"dashboard","order":121,"disabled":false,"hidden":false}]


