顯示具有 NodeMCU 標籤的文章。 顯示所有文章

2020年11月3日 星期二

FRED中的litedb 無法使用SQLite

 What is FRED litedb

源自於http://noderedguide.com/tutorial-sqlite-and-node-red/

The Front End for Node-RED (FRED) manages instances of Node-RED for multiple users in the cloud. We manage and optimize your instance of Node RED so you worry about accomplishing your project, not setting up and maintaining your Node-RED instance.


About Sense Tecnic: Sense Tecnic Systems Inc have been building IoT applications and services since 2010. We provide FRED, cloud hosted Node-RED as a service to the community. We also offer a commercial version to our customers, as well as professional services. Learn more.


Create a FRED Account

To get started, create your own Node-RED instance in the cloud. Register for a free account at http://fred.sensetecnic.com.

After registering, make sure to activate your account via your email. You will not be able to login until you validate your account.

Installing the litedb node

First, you will need to ensure that you have installed the litedb node since it is not installed by default in FRED. After you register for FRED, or after you login, you will be presented with the FRED dashboard.

In the management panel, click “Add or Remove Nodes“, and find the litedb node.


Make sure the litedb node is installed for your instance. If the box beside ‘litedb’ is empty in your Nodes list, just simply check the box and restart your instance.

Make sure you start your instance by hitting the start button.  If it is already started, stop, and start it to ensure the new litedb node is available.  Create a new tab to start with an empty canvas.

Once the litedb node is installed, you should see the litedb node in your left panel. Drag a litedb node to the empty canvas, and we are ready to move on. You can also name the litedb node however you like by double clicking on the node to open the configuration dialog if you like.


For demo purposes, we are going to create a table and inject random numbers at a constant time interval. We will also look at how to view and manage this data later on.

Creating your first table

As documented on the info tab of litedb, the node takes in SQL queries in the input msg.topic, and then returns responses in the output msg.payload. To create a table to store some data, all we need to do is send the appropriate SQL command to the litedb node. A simple way to do that is to connect an inject node to the litedb node with the following settings:


where in the topic field, we have the query

CREATE TABLE RANDOMNUM( TIMESTAMP INT PRIMARY KEY NOT NULL, VALUE INT NOT NULL, BOOL INT NOT NULL)

As you can see, this demo table is called “RANDOMNUM“, and it has three columns, TIMESTAMP( Primary key column ), VALUE, and BOOL. (We will use BOOL to store an attribute which indicates if the number is larger than 50 or not) These three columns are all set to NOT NULL and with type INT.

Once you are done, connect a debug node to the litedb node, and deploy the current settings. Hit the inject button, and you should see that RANDOMNUM is created.


Inserting Data

We can use the same method to send an SQLite query to the database to inject a new value into the table.

Let’s set up another inject node that injects a new timestamp every 15 seconds simulating a sensor event. Followed by a function node, we will write a query with the input of the timestamp, and send the insertion query to the litedb node.

First, drag a new inject node, and add these settings.


then, let’s connect this timestamp node to a function node.


We name the function node “write query” and we define the code inside the function node would be as follows:

var randomNum = Math.round(Math.random()*100);
var largeBool = (randomNum > 50)?1:0;
var newMsg = {
 "topic": "INSERT INTO RANDOMNUM VALUES ( " + msg.payload + ", " + randomNum + ", " + largeBool + ")"
}

return newMsg;

In the above code, a new record is inserted into RANDOMNUM with a timestamp as its primary key, a randomly generated value (ranged from 0 to 100), and a boolean value as if the number is larger than 50. Notice that there is no actual boolean data type in SQLite, so we represented boolean as either 0 or 1.

Then, we can just connect the function node to the litedb node as follow. Once you hit deploy, the inject node will start inserting new records to the table.


Selecting from database

To see the records from our table, we can set up another new inject node, with this in the settings:


where the Topic field is

SELECT * FROM RANDOMNUM ORDER BY TIMESTAMP DESC LIMIT 100;

As you can see, we are showing the first 100 records in table RANDOMNUM ordered by the TIMESTAMP column in descending order.

After you deploy the nodes, and inject the SELECT query command, you should see something like this as the output of the debug node:

SELECT * FROM RANDOMNUM ORDER BY TIMESTAMP DESC LIMIT 100; : msg.payload : array [1][ { "TIMESTAMP": 1472684511852, "VALUE": 5, "BOOL": 0 } ]

Controlling the size of your database

If you follow this guide, you will notice how we set up an inject node that injects records in 15s intervals. In real world scenarios, the database grows in size and may eventually affect the performance of servers. In addition, and as mentioned above, the litedb node has a limit of 4Mb in size. Here we will show you an example of how to delete older records that you do not want to keep.

We will set up another new inject node, and call it ‘delete’. For this example, it will run the  delete query every minute, to remove the data that is older than 1 hour.


where the query in Topic field is

DELETE FROM RANDOMNUM WHERE TIMESTAMP <= strftime('%s','now', '-1 hours')*1000

Notice that, the timestamp generated from the inject node is UNIX epoch time in milliseconds, but the default timestamp return from the SQLite function strftime() is in seconds. That’s why we need to multiply 1000 at the end.

As you can see here, we use a modifier, ‘-1 hours’, to specify the time interval of data that we want to keep. In our case, this inject query means that we want to clean data that is one hour old every minute. We choose 1 hour in this case just for demo purpose. You can use different modifiers to suit your application, more info on the function strftime() and the modifiers can be found in: https://www.sqlite.org/lang_datefunc.html

While you are trying this deletion node, you can also set up an inject node to count the size of the table with this query

SELECT COUNT(*) FROM RANDOMNUM

Don’t forget to connect the inject nodes to the litedb node in order to send the query command into SQLite!

Now sit back and see how the node clears out the old data for you in the debug tab.

Visualizing data

Users are able to visualize the data by using the dashboard nodes. You can refer to the tutorial in A Node-RED dashboard using node-red-contrib-dashboard for more information on how to do this.  In this tutorial, we will show you another trick to visualize the data in a table form.

From the previous exercises, we know that when we send

SELECT * FROM RANDOMNUM ORDER BY TIMESTAMP DESC LIMIT 100;

into the litedb node, it returns an array of records in the response, we can simply use the ui template node to parse the information we want.

For example, we would like to have a table showing the first 20 records, just simply connect the template UI node to the litedb node:


in the template node, enter the following code:

<table style="width:100%">
  <tr>
    <th>Index</th> 
    <th>Timestamp</th>
    <th>Value</th> 
    <th>Bool</th>
  </tr>
  <tr ng-repeat="x in msg.payload | limitTo:20">
    <td>{{$index}}</td>
    <td>{{msg.payload[$index].TIMESTAMP}}</td>
    <td>{{msg.payload[$index].VALUE}}</td> 
    <td>{{msg.payload[$index].BOOL}}</td>
  </tr>
</table>

and it looks like this in the config tab:


This code simply generates a table in HTML, and places the index, TIMESTAMP, VALUE and BOOL fields from  msg.payload into the appropriate cells of the table. It then repeats for the next 19 records (using ng-repeat & limitTo). You can set up the table however you like. Once you deploy the nodes, the UI template node will update the table whenever SELECT * is sent to the litedb node, and an array of records are returned from the litedb node to the UI template node. The resulting table would look like this when you hit the URL https://{REPLACE-WITH-YOUR-USERNAME}.fred.sensetecnic.com/api/ui:


This covers basic usage of the litedb node. Although the example in this guide just stores random generated numbers into the database, you can grab data from any data source and insert it into the database, and query it any way you like. For more information on specific SQLite queries, see https://www.sqlite.org/lang.html

2020年11月1日 星期日

自動連接到WiFi 的 ESP32 , MQTT , Node-RED , Line , LED ,SQLite 實驗2

自動連接到WiFi 的 ESP32 , MQTT , Node-RED , Line , LED ,SQLite 實驗2 

1) 用收機控制  先到手機wifi 設定中找到esp32ap 的wifi  連上後

    進入設定 configure  new AP 設定連接到外網的WiFi ssid ,pwd

2) 下次不需要再設定 除非更換地點 或 WiFi


3) Arduino 與 Node-Red 畫面


Arduino程式

載點

http://www.mediafire.com/file/mblc033eux6h94l/AutoConnectWiFi_ESP32_RFID_MQTT_NODE_RED_LED.ino/file

#include <WiFi.h>

#include <PubSubClient.h>

#include <SPI.h>

#include "MFRC522.h"

//=========================================

#include <AutoConnect.h>

#include <WebServer.h>

WebServer server;

AutoConnect  Portal(server);

//=========================================

const int RST_PIN = 22; // Reset pin

const int SS_PIN = 21; // Slave select pin

//=========================================

//esp32     mfrc522

//21        SDA

//18        SCK

//23        MOSI

//21        MISO

//22        RST

//GND       GND

//3.3v      3.3V

//==========================

#define BUILTIN_LED 2

// Update these with values suitable for your network.


#define MQTTid              ""                           //id of this mqtt client

#define MQTTip              "broker.mqtt-dashboard.com"  //ip address or hostname of the mqtt broker

#define MQTTport            1883                         //port of the mqtt broker

#define MQTTuser            "alex9ufo"                   //username of this mqtt client

#define MQTTpsw             "alex1234"                   //password of this mqtt client

//#define MQTTuser          "your_username"              //username of this mqtt client

//#define MQTTpsw           "your_password"              //password of this mqtt client

#define MQTTpubQos          2                            //qos of publish (see README)

#define MQTTsubQos          1                            //qos of subscribe


MFRC522 mfrc522(SS_PIN, RST_PIN); // Create MFRC522 instance


//Variables

long lastMsg = 0;

String IDNo_buf="";    //client.publish("alex9ufo/outTopic/RFID/json"

char jsonChar1[100];


String json = "";     //client.publish("alex9ufo/led/led_status",

char jsonChar2[100];


bool Flash = false;  //true

bool Timer = false;  //true

bool Send = false;  //true

int Count= 0;

//=============================================================================

boolean pendingDisconnect = false;

void mqttConnectedCb(); // on connect callback

void mqttDisconnectedCb(); // on disconnect callback

void mqttDataCb(char* topic, byte* payload, unsigned int length); // on new message callback


WiFiClient wclient;

PubSubClient client(MQTTip, MQTTport, mqttDataCb, wclient);

//======================================================

void rootPage() {

  char content[] = "Hello, world";

  server.send(200, "text/plain", content);

}  

//=======================================================

String printHex(byte *buffer, byte bufferSize) {

      String id = "";

      for (byte i = 0; i < bufferSize; i++) {

        id += buffer[i] < 0x10 ? "0" : "";

        id += String(buffer[i], HEX);

      }

      return id;

    }

//======================================================== 

void mqttConnectedCb() {

  Serial.println("connected");


  // Once connected, publish an announcement...

  client.publish("alex9ufo/outTopic/RFID/json", jsonChar1, MQTTpubQos, true); // true means retain

  // Once connected, publish an announcement...

  client.publish("alex9ufo/led/led_status", jsonChar2, MQTTpubQos, true); // true means retain

  // ... and resubscribe

  client.subscribe("alex9ufo/inTopic/led/led_event", MQTTsubQos);


}

//======================================================= 

void mqttDisconnectedCb() {

  Serial.println("disconnected");

}

//======================================================= 

void mqttDataCb(char* topic, byte* payload, unsigned int length) {


  /*

  you can convert payload to a C string appending a null terminator to it;

  this is possible when the message (including protocol overhead) doesn't

  exceeds the MQTT_MAX_PACKET_SIZE defined in the library header.

  you can consider safe to do so when the length of topic plus the length of

  message doesn't exceeds 115 characters

  */

  char* message = (char *) payload;

  message[length] = 0;


  Serial.print("Message arrived [");

  Serial.print(topic);

  Serial.print("] ");

  Serial.println(message);

  String s = message;


  s.trim();

  // Switch on the LED if an 1 was received as first character

  if (s == "OFF") {

     digitalWrite(BUILTIN_LED, LOW);   // Turn the LED on (Note that LOW is the voltage level

     // but actually the LED is on; this is because 

     Serial.println("Received OFF , Send LOW TO BuildIn_LED");

     Flash = false;

     Timer = false;

     json ="OFF";

     Send = true ;

    } // if (s == "OFF")


   if (s == "ON") {

     digitalWrite(BUILTIN_LED, HIGH);   // Turn the LED off (Note that HIGH is the voltage level

     // but actually the LED is on; this is because

     Serial.println("Received ON , Send HIGH TO BuildIn_LED");

     Flash = false; 

     Timer = false; 

     json ="ON";

     Send = true ;

   } //if (s == "ON")


   if (s == "TOGGLE") {

     digitalWrite(BUILTIN_LED, !digitalRead(BUILTIN_LED));   // Turn the LED toggle 

     // but actually the LED is on; this is because

     Serial.println("Received TOGGLE , Send Toggle(H->L , L->H) TO BuildIn_LED");

     Flash = false; 

     Timer = false; 

     json ="TOGGLE";

     Send = true ;     

   } //if (s == "TOGGLE") 


   if (s == "FLASH") {

     digitalWrite(BUILTIN_LED, HIGH);   // Turn the LED off (Note that HIGH is the voltage level

     // but actually the LED is on; this is because

     Serial.println("Received FLASH , Flashing BuildIn_LED ");

     Flash = true;

     Timer = false;

     json ="FLASH";

     Send = true ;  

    } //if (message[0] == 'FLASH')


    if (s == "TIMER") {

     digitalWrite(BUILTIN_LED, HIGH);   // Turn the LED off (Note that HIGH is the voltage level

     // but actually the LED is on; this is because

     Serial.println("Received TIMER ,  BuildIn_LED ON 5 SEC");

     Flash = false;

     Timer = true;

     Count= 10;

     json ="TIMER";

     Send = true ; 

    } //if (message[0] == 'TIMER')


}

//======================================================

void setup() {

  Serial.begin(115200);

  Serial.println("Configuring ESP32...");

  pinMode(BUILTIN_LED, OUTPUT);

  Serial.println(F("Booting...."));

  SPI.begin();           // Init SPI bus

  mfrc522.PCD_Init();    // Init MFRC522

  //=================================================

  Serial.println("Configuring your Mobile WiFi to esp32ap...");

  Serial.println("Configuring another WiFi SSID,PWD...");


  server.on("/", rootPage);

  if (Portal.begin()) {

    Serial.println("HTTP server:" + WiFi.localIP().toString());

  }

  //=================================================== 

  Serial.println(F("Ready!"));

  Serial.println(F("Control Build LED ON,OFF,FLASH,TOGGLE,TIMER...."));

  Serial.println(F("======================================================")); 

  Serial.println(F("Scan for Card and print UID:"));

}

//======================================================

void process_mqtt() {

  if (WiFi.status() == WL_CONNECTED) {

    if (client.connected()) {

      client.loop();

    } else {

    // client id, client username, client password, last will topic, last will qos, last will retain, last will message

      if (client.connect(MQTTid, MQTTuser, MQTTpsw, MQTTid "/status", 2, true, "0")) {

          pendingDisconnect = false;

          mqttConnectedCb();

      }

    }

  } else {

    if (client.connected())

      client.disconnect();

  }

  if (!client.connected() && !pendingDisconnect) {

    pendingDisconnect = true;

    mqttDisconnectedCb();

  }

}

//======================================================

void loop() {

  process_mqtt();

  long now = millis();

if (Flash)

  {

    digitalWrite(BUILTIN_LED, !digitalRead(BUILTIN_LED));

    delay(500);

  }

  if (Timer) 

  {

    digitalWrite(BUILTIN_LED, HIGH);

    delay(500);

    Count=Count-1;

    if (Count == 0 ){

       Timer=false;

       digitalWrite(BUILTIN_LED, LOW);

    }


  }

  if (Send) {

     // Convert JSON string to character array

     json.toCharArray(jsonChar2, json.length()+1);

     if  (client.connected()) {

              Serial.print("Publish message: ");

              Serial.println(json);

              // Publish JSON character array to MQTT topic

             client.publish("alex9ufo/led/led_status",jsonChar2);

         } 

     Send = false;    

   }


  if (WiFi.status() == WL_CONNECTED) { 

    //========Auto Connect===============================


  if (mfrc522.PICC_IsNewCardPresent() && mfrc522.PICC_ReadCardSerial()) { // 如果出現新卡片就讀取卡片資料

     delay(100);

     String IDNo = printHex(mfrc522.uid.uidByte, mfrc522.uid.size);

     // Show some details of the PICC (that is: the tag/card)

     if ((IDNo != IDNo_buf) || (now - lastMsg > 3000)) {  //不同卡片 或是 等3秒

         lastMsg = now; 

         Serial.print(F("Card UID:"));

         Serial.println(IDNo);

         //Serial.println(IDNo_buf);


         IDNo_buf="";

         IDNo_buf=IDNo;

         // Convert data to JSON string 

         String json1 =

         "{\"data\":{"

         "\"RFID_No\": \"" + IDNo + "\"}"

         "}";

         // Convert JSON string to character array

         json1.toCharArray(jsonChar1, json1.length()+1);


         if  (client.connected()) {

              Serial.print("Publish message: ");

              Serial.println(json1);

              // Publish JSON character array to MQTT topic

             client.publish("alex9ufo/outTopic/RFID/json",jsonChar1);

         } 

      } // if ((IDNo != IDNo_buf) || (now - lastMsg > 5000))

   }  // if (mfrc522.PICC_IsNewCardPresent()

  } //========Auto Connect===============================

  Portal.handleClient();

}   //Loop

//=========================================================

Node-Red 程式

[{"id":"80e8a15c.9a43a","type":"mqtt in","z":"ef8014ea.9e2208","name":"RFID MQTT","topic":"alex9ufo/outTopic/RFID/json","qos":"2","datatype":"auto","broker":"e4d9b72d.d14398","x":90,"y":100,"wires":[["d8975ea3.d6b2d","6d542f25.8292b","19d89100.3cc0cf","f2aa9d36.72e04"]]},{"id":"ae83d984.283368","type":"mqtt out","z":"ef8014ea.9e2208","name":"","topic":"alex9ufo/inTopic/led/led_event","qos":"1","retain":"true","broker":"e4d9b72d.d14398","x":390,"y":580,"wires":[]},{"id":"d8975ea3.d6b2d","type":"function","z":"ef8014ea.9e2208","name":"json+時分秒","func":"var date = new Date();\nvar h = date.getHours();\nvar m = date.getMinutes();\nvar s = date.getSeconds();\nif(h<10){\n    h = '0'+h;\n}\nif(m<10){\n    m = '0' + m;\n}\nif(s<10){\n    s = '0' + s;\n}\nmsg.payload = 'Time:(' + h + ':' + m + ':' + s + ')'+ msg.payload ;\nreturn msg;\n","outputs":1,"noerr":0,"x":330,"y":60,"wires":[["7a8621cd.7f66e"]]},{"id":"6d542f25.8292b","type":"switch","z":"ef8014ea.9e2208","name":"","property":"payload","propertyType":"msg","rules":[{"t":"cont","v":"966aa5f4","vt":"str"},{"t":"cont","v":"7021ed10","vt":"str"},{"t":"cont","v":"96928cf4","vt":"str"},{"t":"cont","v":"b68b19f5","vt":"str"},{"t":"cont","v":"","vt":"str"}],"checkall":"true","repair":false,"outputs":5,"x":190,"y":180,"wires":[["368d174e.401868"],["4bf29407.123f9c"],["ca5bcb72.e07398"],["f1392d5.af2ded"],["931930c7.cc556"]]},{"id":"7d71a791.e7a828","type":"debug","z":"ef8014ea.9e2208","name":"","active":false,"tosidebar":true,"console":false,"tostatus":false,"complete":"payload","x":590,"y":160,"wires":[]},{"id":"fbd3e5d7.f0f6e8","type":"ui_audio","z":"ef8014ea.9e2208","name":"播放聲音","group":"ac0f1141.eb50e","voice":"zh-TW","always":true,"x":900,"y":280,"wires":[]},{"id":"50beda15.1ddae4","type":"sqlite","z":"ef8014ea.9e2208","mydb":"61a261a8.68f6a","sqlquery":"msg.topic","sql":"","name":"RFID","x":410,"y":400,"wires":[["ef3e8db7.278a5"]]},{"id":"748d1b0b.5f4244","type":"function","z":"ef8014ea.9e2208","name":"Format timestamp","func":"var date = new Date();\nvar h = date.getHours();\nvar m = date.getMinutes();\nvar s = date.getSeconds();\nif(h<10){\n    h = '0'+h;\n}\nif(m<10){\n    m = '0' + m;\n}\nif(s<10){\n    s = '0' + s;\n}\nmsg.payload = msg.payload + ' --> Time:(' + h + ':' + m + ':' + s + ')' ;\n\nreturn msg;","outputs":1,"noerr":0,"initialize":"","finalize":"","x":410,"y":640,"wires":[["adfb95bb.e98c38","3247aa9f.3de716"]]},{"id":"fcaf1db1.3cee3","type":"debug","z":"ef8014ea.9e2208","name":"","active":false,"tosidebar":true,"console":false,"tostatus":false,"complete":"payload","x":830,"y":340,"wires":[]},{"id":"2bf36d48.766c32","type":"inject","z":"ef8014ea.9e2208","name":"CREATE DB","repeat":"","crontab":"","once":false,"onceDelay":0.1,"topic":"CREATE TABLE RFIDtable( id INT PRIMARY KEY NOT NULL, currenttime TEXT , uidname TEXT)","payload":"","payloadType":"date","x":170,"y":440,"wires":[["50beda15.1ddae4"]]},{"id":"adfb95bb.e98c38","type":"debug","z":"ef8014ea.9e2208","name":"","active":true,"tosidebar":true,"console":false,"tostatus":false,"complete":"false","x":630,"y":640,"wires":[]},{"id":"32021eb.2e78ce2","type":"ui_text_input","z":"ef8014ea.9e2208","name":"","label":"","tooltip":"","group":"ac0f1141.eb50e","order":9,"width":0,"height":0,"passthru":true,"mode":"text","delay":"0","topic":"","x":720,"y":280,"wires":[["fbd3e5d7.f0f6e8","c516fe51.4baf4"]]},{"id":"73c414b8.f25e4c","type":"ui_button","z":"ef8014ea.9e2208","name":"","group":"ac0f1141.eb50e","order":0,"width":"4","height":"1","passthru":false,"label":"聲音測試","tooltip":"","color":"white","bgcolor":"orange","icon":"fa-circle","payload":"聲音測試","payloadType":"str","topic":"","x":720,"y":200,"wires":[["32021eb.2e78ce2"]]},{"id":"ef3e8db7.278a5","type":"ui_template","z":"ef8014ea.9e2208","group":"ac0f1141.eb50e","name":"","order":0,"width":"12","height":"4","format":"<table style=\"width:100%\">\n  <tr>\n    <th>Index</th> \n    <th>Date</th> \n    <th>RFID</th>\n  </tr>\n  <tr ng-repeat=\"x in msg.payload | limitTo:20\">\n    <td>{{$index}}</td>\n    <td>{{msg.payload[$index].currenttime}}</td>\n    <td>{{msg.payload[$index].uidname}}</td> \n  </tr>\n</table>","storeOutMessages":true,"fwdInMessages":true,"resendOnRefresh":false,"templateScope":"local","x":560,"y":400,"wires":[[]]},{"id":"7a8621cd.7f66e","type":"ui_text","z":"ef8014ea.9e2208","group":"ac0f1141.eb50e","order":0,"width":0,"height":0,"name":"","label":"MQTT_send_Message","format":"{{msg.payload}}","layout":"row-left","x":620,"y":60,"wires":[]},{"id":"8a30de3f.86402","type":"function","z":"ef8014ea.9e2208","name":"INSERT","func":"msg.topic = \"INSERT INTO RFIDtable (id,currenttime, uidname) VALUES (?,?,?)\";\n\nvar Today = new Date();\nvar yyyy = Today.getFullYear(); //年\nvar MM = Today.getMonth()+1;    //月\nvar dd = Today.getDate();       //日\nvar h = Today.getHours();       //時\nvar m = Today.getMinutes();     //分\nvar s = Today.getSeconds();     //秒\n\nif(MM<10)\n{\n   MM = '0'+MM;\n}\n\nif(dd<10)\n{\n   dd = '0'+dd;\n}\n\nif(h<10)\n{\n   h = '0'+h;\n}\n\nif(m<10)\n{\n  m = '0' + m;\n}\n\nif(s<10)\n{\n  s = '0' + s;\n}\nvar hms= yyyy + '/'+ MM + '/'+ dd + ' ' + h + ':' + m + ':' + s ;\nvar id= Date.now() ;\nmsg.payload = [id ,hms, msg.payload];\nreturn msg;\n","outputs":1,"noerr":0,"initialize":"","finalize":"","x":660,"y":340,"wires":[["50beda15.1ddae4","fcaf1db1.3cee3"]]},{"id":"931930c7.cc556","type":"function","z":"ef8014ea.9e2208","name":"不合法卡片","func":"var st1 = msg.payload.split('\": \"')[1].substr(0,8);\nvar st2='';\n switch (st1)\n {\n case '966aa5f4':\n     st2 = 'Alex9ufo Car';\n     break;\n case '7021ed10':\n     st2 = 'RaspberryPi Card';\n     break;\n case '96928cf4':\n     st2 = 'Node-red Car';\n     break;\n case 'b68b19f5':\n     st2 = 'VIP Car';\n     break;\n default:\n   st2 = 'illegal Card';\n }\n msg.payload=st2;\nreturn msg;\n","outputs":1,"noerr":0,"initialize":"","finalize":"","x":370,"y":300,"wires":[["32021eb.2e78ce2","4efb2990.c6ee48"]]},{"id":"dbc49985.ff32f8","type":"inject","z":"ef8014ea.9e2208","name":"","repeat":"","crontab":"","once":false,"onceDelay":0.1,"topic":"","payload":"","payloadType":"date","x":190,"y":300,"wires":[["931930c7.cc556"]]},{"id":"4bf29407.123f9c","type":"function","z":"ef8014ea.9e2208","name":"RaspberryPi卡片","func":"msg.payload = 'RaspberryPi Card'\nreturn msg;","outputs":1,"noerr":0,"x":390,"y":180,"wires":[["7d71a791.e7a828"]]},{"id":"368d174e.401868","type":"function","z":"ef8014ea.9e2208","name":"Alex9ufo卡片","func":"msg.payload = 'Alex9ufo Card'\nreturn msg;","outputs":1,"noerr":0,"x":370,"y":140,"wires":[["7d71a791.e7a828"]]},{"id":"3247aa9f.3de716","type":"function","z":"ef8014ea.9e2208","name":"Set Line API ","func":"msg.headers = {'content-type':'application/x-www-form-urlencoded','Authorization':'Bearer cEI4hx24xyopKGAArgZcKJNHE1V7KeeIi4Lzny3dDNO'};\nmsg.payload = {\"message\":msg.payload};\nreturn msg;","outputs":1,"noerr":0,"x":550,"y":680,"wires":[["f95ae1fb.2761a"]]},{"id":"f95ae1fb.2761a","type":"http request","z":"ef8014ea.9e2208","name":"","method":"POST","ret":"txt","url":"https://notify-api.line.me/api/notify","tls":"","x":700,"y":680,"wires":[["9f290ea8.c917e"]]},{"id":"9f290ea8.c917e","type":"debug","z":"ef8014ea.9e2208","name":"","active":true,"tosidebar":true,"console":false,"tostatus":false,"complete":"false","x":870,"y":680,"wires":[]},{"id":"19d89100.3cc0cf","type":"debug","z":"ef8014ea.9e2208","name":"","active":true,"tosidebar":true,"console":false,"tostatus":false,"complete":"false","x":290,"y":20,"wires":[]},{"id":"4efb2990.c6ee48","type":"json","z":"ef8014ea.9e2208","name":"","property":"payload","action":"str","pretty":false,"x":530,"y":340,"wires":[["8a30de3f.86402"]]},{"id":"1be5f49a.70e6eb","type":"ui_button","z":"ef8014ea.9e2208","name":"","group":"ac0f1141.eb50e","order":10,"width":"4","height":"1","passthru":false,"label":"View Data","tooltip":"","color":"","bgcolor":"","icon":"","payload":"檢視資料庫","payloadType":"str","topic":"SELECT * FROM RFIDtable ORDER BY  id  DESC LIMIT 100;","x":150,"y":400,"wires":[["50beda15.1ddae4","cd4f5dd0.4e578"]]},{"id":"bceb7f95.c71d4","type":"comment","z":"ef8014ea.9e2208","name":"CREATE TABLE RFIDtable","info":"CREATE TABLE RFIDtable( id INT PRIMARY KEY NOT NULL, currenttime TEXT , rfid TEXT)","x":150,"y":500,"wires":[]},{"id":"cc029f46.7f242","type":"ui_button","z":"ef8014ea.9e2208","name":"Alex9ufo","group":"ac0f1141.eb50e","order":2,"width":"4","height":"1","passthru":false,"label":"手動插入測試資料","tooltip":"","color":"","bgcolor":"","icon":"","payload":"{\"RFIDNo\":\"Alex9ufo測試\"}","payloadType":"json","topic":"","x":780,"y":400,"wires":[["c8ca3970.7ef988"]]},{"id":"c8ca3970.7ef988","type":"mqtt out","z":"ef8014ea.9e2208","name":"","topic":"alex9ufo/outTopic/RFID/json","qos":"1","retain":"true","broker":"e4d9b72d.d14398","x":980,"y":400,"wires":[]},{"id":"ee3949d5.f5a218","type":"ui_button","z":"ef8014ea.9e2208","name":"","group":"ac0f1141.eb50e","order":11,"width":"4","height":"1","passthru":false,"label":"建立資料庫(只能執行一次)","tooltip":"","color":"","bgcolor":" purple","icon":"","payload":"","payloadType":"str","topic":"CREATE TABLE RFIDtable( id INT PRIMARY KEY NOT NULL, currenttime TEXT , uidname TEXT)","x":190,"y":360,"wires":[["50beda15.1ddae4"]]},{"id":"ceaa0720.9d2068","type":"ui_button","z":"ef8014ea.9e2208","name":"","group":"ac0f1141.eb50e","order":0,"width":"4","height":"1","passthru":false,"label":"LED 開","tooltip":"","color":"white","bgcolor":"","icon":"fa-circle","payload":"ON","payloadType":"str","topic":"","x":80,"y":540,"wires":[["ae83d984.283368","748d1b0b.5f4244","cf1b1e28.343f4"]]},{"id":"991b17df.733278","type":"ui_button","z":"ef8014ea.9e2208","name":"","group":"ac0f1141.eb50e","order":0,"width":"4","height":"1","passthru":false,"label":"LED 關","tooltip":"","color":"black","bgcolor":"","icon":"fa-circle-o","payload":"OFF","payloadType":"str","topic":"","x":80,"y":580,"wires":[["ae83d984.283368","748d1b0b.5f4244","cf1b1e28.343f4"]]},{"id":"65121a65.e130a4","type":"ui_button","z":"ef8014ea.9e2208","name":"","group":"ac0f1141.eb50e","order":0,"width":"4","height":"1","passthru":false,"label":"LED 開關反向","tooltip":"","color":"blue","bgcolor":"","icon":"fa-circle-o","payload":"TOGGLE","payloadType":"str","topic":"","x":100,"y":660,"wires":[["ae83d984.283368","748d1b0b.5f4244","cf1b1e28.343f4"]]},{"id":"a8f45eaa.5165b","type":"ui_button","z":"ef8014ea.9e2208","name":"","group":"ac0f1141.eb50e","order":0,"width":"4","height":"1","passthru":false,"label":"LED 閃爍","tooltip":"","color":"blue","bgcolor":"","icon":"fa-circle-o","payload":"FLASH","payloadType":"str","topic":"","x":80,"y":620,"wires":[["ae83d984.283368","748d1b0b.5f4244","cf1b1e28.343f4"]]},{"id":"aaeae0ce.6e9ad","type":"ui_button","z":"ef8014ea.9e2208","name":"","group":"ac0f1141.eb50e","order":0,"width":"4","height":"1","passthru":false,"label":"LED 開5秒鐘","tooltip":"","color":"purple","bgcolor":"","icon":"fa-circle-o","payload":"TIMER","payloadType":"str","topic":"","x":90,"y":700,"wires":[["ae83d984.283368","748d1b0b.5f4244","cf1b1e28.343f4"]]},{"id":"5c6dc10.aaffb4","type":"comment","z":"ef8014ea.9e2208","name":"publish 到 HiveMQ Broker ","info":"將 alex9ufo/led/led_event 發行到(publish)HiveMQ Broker \n給 Arduino 訂閱(Subscribe)","x":310,"y":540,"wires":[]},{"id":"9221daf4.aed748","type":"comment","z":"ef8014ea.9e2208","name":"向 HiveMQ Broker 訂閱subscribe","info":"將  Arduino 發行到(publish)HiveMQ Broker alex9ufo/led/led_status \n給 Node-red 或 MQTTB-Box 訂閱(Subscribe)","x":670,"y":480,"wires":[]},{"id":"13edbe6c.6bf392","type":"mqtt in","z":"ef8014ea.9e2208","name":"","topic":"alex9ufo/led/led_status","qos":"1","datatype":"auto","broker":"841df58d.ee5e98","x":680,"y":520,"wires":[["4daf2345.35a50c","fc0340fb.a2c5c","389b8f13.36cd4","f955982.dc91968"]]},{"id":"fc0340fb.a2c5c","type":"debug","z":"ef8014ea.9e2208","name":"","active":false,"tosidebar":true,"console":false,"tostatus":false,"complete":"false","x":910,"y":460,"wires":[]},{"id":"4daf2345.35a50c","type":"ui_text","z":"ef8014ea.9e2208","group":"ac0f1141.eb50e","order":0,"width":0,"height":0,"name":"","label":"Node-Red 向MQTT Suscribe Data","format":"{{msg.payload}}","layout":"col-center","x":1180,"y":480,"wires":[]},{"id":"389b8f13.36cd4","type":"function","z":"ef8014ea.9e2208","name":"","func":"var st1;\nif (msg.payload === \"ON\") {\n   st1=\"LED開\"; \n} \nelse if (msg.payload === \"OFF\") {\n  st1=\"LED關\";\n}\nelse if (msg.payload === \"FLASH\") {\n  st1=\"LED閃爍\";\n}\nelse if (msg.payload === \"TIMER\") {\n  st1=\"LED開五秒鐘\";\n}\nelse if (msg.payload === \"TOGGLE\") {\n  st1=\"LED ON OFF 交換\";\n}\n\nmsg.payload=st1;\nreturn msg;","outputs":1,"noerr":0,"initialize":"","finalize":"","x":950,"y":520,"wires":[["4572bbe5.f55ae4","4daf2345.35a50c","837292c8.62c76"]]},{"id":"4572bbe5.f55ae4","type":"function","z":"ef8014ea.9e2208","name":"INSERT","func":"msg.topic = \"INSERT INTO LED (time_led, led_status) VALUES (?,?)\";\n//msg.topic = \"INSERT INTO LED (id, time_led, led_status) VALUES (?,?,?)\";\n\n\nvar Today = new Date();\nvar yyyy = Today.getFullYear(); //年\nvar MM = Today.getMonth()+1;    //月\nvar dd = Today.getDate();       //日\nvar h = Today.getHours();       //時\nvar m = Today.getMinutes();     //分\nvar s = Today.getSeconds();     //秒\n\nif(MM<10)\n{\n   MM = '0'+MM;\n}\n\nif(dd<10)\n{\n   dd = '0'+dd;\n}\n\nif(h<10)\n{\n   h = '0'+h;\n}\n\nif(m<10)\n{\n  m = '0' + m;\n}\n\nif(s<10)\n{\n  s = '0' + s;\n}\n\nvar hms= yyyy + '/'+ MM + '/'+ dd + ' ' + h + ':' + m + ':' + s ;\n//var id= Date.now() ;\n//msg.payload = [id ,hms, msg.payload];\nmsg.payload = [hms, msg.payload];\n\nreturn msg;\n","outputs":1,"noerr":0,"initialize":"","finalize":"","x":980,"y":580,"wires":[["e82f56fc.727678"]]},{"id":"e82f56fc.727678","type":"sqlite","z":"ef8014ea.9e2208","mydb":"19f59ce9.3edc23","sqlquery":"msg.topic","sql":"","name":"","x":1140,"y":580,"wires":[["ac9afcbf.47316"]]},{"id":"ac9afcbf.47316","type":"debug","z":"ef8014ea.9e2208","name":"","active":true,"tosidebar":true,"console":false,"tostatus":false,"complete":"false","statusVal":"","statusType":"auto","x":1310,"y":580,"wires":[]},{"id":"ca5bcb72.e07398","type":"function","z":"ef8014ea.9e2208","name":"Node-red卡片","func":"msg.payload = 'Node-red Card'\nreturn msg;","outputs":1,"noerr":0,"initialize":"","finalize":"","x":380,"y":220,"wires":[["7d71a791.e7a828"]]},{"id":"f1392d5.af2ded","type":"function","z":"ef8014ea.9e2208","name":"VIP卡片","func":"msg.payload = 'VIP Card'\nreturn msg;","outputs":1,"noerr":0,"initialize":"","finalize":"","x":360,"y":260,"wires":[["7d71a791.e7a828"]]},{"id":"cf1b1e28.343f4","type":"link out","z":"ef8014ea.9e2208","name":"RFID-1","links":["b4e6e9fe.7a2968","1a2e6a1f.317c06"],"x":295,"y":740,"wires":[]},{"id":"b4e6e9fe.7a2968","type":"link in","z":"ef8014ea.9e2208","name":"","links":["cf1b1e28.343f4"],"x":475,"y":100,"wires":[["7a8621cd.7f66e"]]},{"id":"bdd95fae.3f9e2","type":"link in","z":"ef8014ea.9e2208","name":"","links":["837292c8.62c76","cd4f5dd0.4e578"],"x":635,"y":220,"wires":[["32021eb.2e78ce2"]]},{"id":"c516fe51.4baf4","type":"debug","z":"ef8014ea.9e2208","name":"","active":true,"tosidebar":true,"console":false,"tostatus":false,"complete":"false","statusVal":"","statusType":"auto","x":910,"y":240,"wires":[]},{"id":"837292c8.62c76","type":"link out","z":"ef8014ea.9e2208","name":"RFIF-2","links":["bdd95fae.3f9e2","1a2e6a1f.317c06"],"x":1095,"y":520,"wires":[]},{"id":"cd4f5dd0.4e578","type":"link out","z":"ef8014ea.9e2208","name":"","links":["bdd95fae.3f9e2"],"x":375,"y":460,"wires":[]},{"id":"92e54fcf.b576a","type":"link in","z":"ef8014ea.9e2208","name":"LINE","links":["f2aa9d36.72e04","f955982.dc91968","d4c722e8.eaf73"],"x":355,"y":720,"wires":[["748d1b0b.5f4244"]]},{"id":"f2aa9d36.72e04","type":"link out","z":"ef8014ea.9e2208","name":"To LINE","links":["92e54fcf.b576a"],"x":225,"y":120,"wires":[]},{"id":"f955982.dc91968","type":"link out","z":"ef8014ea.9e2208","name":"TO Line 2","links":["92e54fcf.b576a"],"x":815,"y":580,"wires":[]},{"id":"e4d9b72d.d14398","type":"mqtt-broker","z":"","name":"","broker":"broker.mqtt-dashboard.com","port":"1883","clientid":"","usetls":false,"compatmode":true,"keepalive":"15","cleansession":true,"birthTopic":"","birthQos":"0","birthPayload":"","closeTopic":"","closePayload":"","willTopic":"","willQos":"0","willPayload":""},{"id":"ac0f1141.eb50e","type":"ui_group","z":"","name":"RFID讀取","tab":"e03ab9d0.1a8f08","order":1,"disp":true,"width":"15","collapse":false},{"id":"61a261a8.68f6a","type":"sqlitedb","z":"","db":"rfid.db","mode":"RWC"},{"id":"841df58d.ee5e98","type":"mqtt-broker","z":"","name":"","broker":"broker.mqtt-dashboard.com","port":"1883","clientid":"","usetls":false,"compatmode":false,"keepalive":"15","cleansession":true,"birthTopic":"","birthQos":"0","birthPayload":"","closeTopic":"","closePayload":"","willTopic":"","willQos":"0","willPayload":""},{"id":"19f59ce9.3edc23","type":"sqlitedb","z":"","db":"MQTT_LED.db","mode":"RWC"},{"id":"e03ab9d0.1a8f08","type":"ui_tab","z":"","name":"RFID","icon":"dashboard","order":1}]

2020年8月31日 星期一

MQTT發送的數據通過Node-RED創建的流程從MQTT通信消息轉換為LINE消息。

MQTT發送的數據通過Node-RED創建的流程從MQTT通信消息轉換為LINE消息。

 Node-RED , Line , MQTT 


參考來源 https://qiita.com/kmaepu/items/6711c127c2a0434d5d98


[{"id":"e650e7b0.c39ae8","type":"tab","label":"MQTT與Node-RED","disabled":false,"info":""},{"id":"3b836a0b.8ed016","type":"inject","z":"e650e7b0.c39ae8","name":"","topic":"","payload":"Hello","payloadType":"str","repeat":"","crontab":"","once":false,"onceDelay":0.1,"x":130,"y":300,"wires":[["68813400.ac67dc","84138d0b.7d64a"]]},{"id":"bd044a6.39730b8","type":"inject","z":"e650e7b0.c39ae8","name":"","topic":"","payload":"開始您的腹肌訓練!我要你支持我!","payloadType":"str","repeat":"","crontab":"","once":false,"onceDelay":0.1,"x":220,"y":360,"wires":[["cd6e0953.5c6ca8"]]},{"id":"91c15743.930228","type":"inject","z":"e650e7b0.c39ae8","name":"","topic":"","payload":"我想我做了20次!誇獎我!","payloadType":"str","repeat":"","crontab":"","once":false,"onceDelay":0.1,"x":190,"y":420,"wires":[["b1952dda.729eb"]]},{"id":"94627113.a5326","type":"template","z":"e650e7b0.c39ae8","name":"","field":"payload","fieldType":"msg","format":"handlebars","syntax":"mustache","template":"從現在開始,我將開始肌肉訓練!\n這次支持您的腹肌!","output":"str","x":291,"y":63,"wires":[["68813400.ac67dc","84138d0b.7d64a"]]},{"id":"20006501.84109a","type":"template","z":"e650e7b0.c39ae8","name":"","field":"payload","fieldType":"msg","format":"handlebars","syntax":"mustache","template":"這次我做了{{payload}}次!\n謝謝你的努力!","output":"str","x":290,"y":120,"wires":[["68813400.ac67dc","84138d0b.7d64a"]]},{"id":"131bafc1.02d7b","type":"template","z":"e650e7b0.c39ae8","name":"","field":"payload","fieldType":"msg","format":"handlebars","syntax":"mustache","template":"達到{{payload}}次!","output":"str","x":290,"y":180,"wires":[["68813400.ac67dc","84138d0b.7d64a"]]},{"id":"fe70ce7c.f6261","type":"comment","z":"e650e7b0.c39ae8","name":"測試流程","info":"","x":120,"y":240,"wires":[]},{"id":"ffcee50d.2742e8","type":"comment","z":"e650e7b0.c39ae8","name":"通過MQTT與Node-RED 進行數據傳輸/接收","info":"","x":220,"y":20,"wires":[]},{"id":"ff251965.b65f28","type":"mqtt in","z":"e650e7b0.c39ae8","name":"/start","topic":"alex9ufo/IOT/MQTT_test/start","qos":"1","datatype":"auto","broker":"841df58d.ee5e98","x":110,"y":60,"wires":[["94627113.a5326"]]},{"id":"cd6e0953.5c6ca8","type":"mqtt out","z":"e650e7b0.c39ae8","name":"/start","topic":"alex9ufo/IOT/MQTT_test/start","qos":"1","retain":"false","broker":"841df58d.ee5e98","x":470,"y":360,"wires":[]},{"id":"ce743adb.d39768","type":"mqtt in","z":"e650e7b0.c39ae8","name":"/end","topic":"alex9ufo/IOT/MQTT_test/end","qos":"1","datatype":"auto","broker":"841df58d.ee5e98","x":110,"y":120,"wires":[["20006501.84109a"]]},{"id":"e4573e54.a1bd7","type":"mqtt in","z":"e650e7b0.c39ae8","name":"/count","topic":"alex9ufo/IOT/MQTT_test/count","qos":"1","datatype":"auto","broker":"841df58d.ee5e98","x":110,"y":180,"wires":[["131bafc1.02d7b"]]},{"id":"b1952dda.729eb","type":"mqtt out","z":"e650e7b0.c39ae8","name":"/end","topic":"alex9ufo/IOT/MQTT_test/end","qos":"1","retain":"false","broker":"841df58d.ee5e98","x":470,"y":420,"wires":[]},{"id":"68813400.ac67dc","type":"function","z":"e650e7b0.c39ae8","name":"Set Line  Notify API ","func":"msg.headers = {'content-type':'application/x-www-form-urlencoded','Authorization':'Bearer cEI4hx24xyopKGAArgZcKJNHE1V7KeeIi4Lzny3dDNO'};\nmsg.payload = {\"message\":msg.payload};\nreturn msg;","outputs":1,"noerr":0,"x":570,"y":140,"wires":[["fa76df59.8a107"]]},{"id":"fa76df59.8a107","type":"http request","z":"e650e7b0.c39ae8","name":"","method":"POST","ret":"txt","paytoqs":false,"url":"https://notify-api.line.me/api/notify","tls":"","persist":false,"proxy":"","authType":"","x":600,"y":200,"wires":[["d72767b0.3fa668"]]},{"id":"d72767b0.3fa668","type":"debug","z":"e650e7b0.c39ae8","name":"","active":true,"tosidebar":true,"console":false,"tostatus":false,"complete":"false","x":750,"y":200,"wires":[]},{"id":"84138d0b.7d64a","type":"function","z":"e650e7b0.c39ae8","name":"傳送信息 MQTT2","func":"// CHANNEL_ACCESS_TOKEN = 'Messaging API Token';\n// USER_ID ='使用者ID(不是Line ID)';\n//MQTT2\nCHANNEL_ACCESS_TOKEN = 'UOf9DXSFQxPaDHLPl9jbsqj2Jhf9StEiqqjgLpa8PzKPsWaTAVwIRCmGfHXTkkuctxI1KLs8tc9kLU6VsWvSkCiydI0GQzaI2KnT3e4t7f8OVzy7wuj43qW+Eynp3V+QXKQdk2rZfB1T33fnT7crhwdB04t89/1O/w1cDnyilFU=';\nUSER_ID = 'Ua212f6426d82a75d31dee884a6fdfa95f76'; \nmessage = {\n    type:'text',\n    text: msg.payload\n};\nheaders = {\n    'Content-Type': 'application/json; charset=UTF-8',\n    'Authorization': 'Bearer ' + CHANNEL_ACCESS_TOKEN,\n};\npayload = {\n    'to':  USER_ID,\n    'messages': [message]\n};\nmsg.headers = headers;\nmsg.payload = payload;\nreturn msg;","outputs":1,"noerr":0,"x":650,"y":300,"wires":[["f7cde34f.82131","2e80e7cc.890338"]]},{"id":"f7cde34f.82131","type":"http request","z":"e650e7b0.c39ae8","name":"Messaging API 傳送","method":"POST","ret":"txt","paytoqs":false,"url":"https://api.line.me/v2/bot/message/push","tls":"","persist":false,"proxy":"","authType":"","x":680,"y":360,"wires":[["69a08235.940abc"]]},{"id":"69a08235.940abc","type":"debug","z":"e650e7b0.c39ae8","name":"","active":true,"tosidebar":true,"console":false,"tostatus":false,"complete":"false","x":870,"y":360,"wires":[]},{"id":"2e80e7cc.890338","type":"debug","z":"e650e7b0.c39ae8","name":"","active":true,"tosidebar":true,"console":false,"tostatus":false,"complete":"false","x":880,"y":300,"wires":[]},{"id":"841df58d.ee5e98","type":"mqtt-broker","z":"","name":"","broker":"broker.mqtt-dashboard.com","port":"1883","clientid":"","usetls":false,"compatmode":false,"keepalive":"15","cleansession":true,"birthTopic":"","birthQos":"0","birthPayload":"","closeTopic":"","closePayload":"","willTopic":"","willQos":"0","willPayload":""}]

2019年10月17日 星期四

Input Data on HTML Form ESP32/ESP8266 Web Server using Arduino IDE

Input Data on HTML Form ESP32/ESP8266 Web Server using Arduino IDE


In this guide, you’ll learn how to create an ESP32/ESP8266 web server with three input fields to pass values to your ESP using an HTML form. Then, you can use those values as variables in your code. We’ll be using the Arduino IDE to program the boards.
ESP32 ESP8266 Input Data on HTML Form Web Server using Arduino IDE

Project Overview

In this tutorial we’ll build an asynchronous web server using the ESPAsyncWebServer library that displays three input fields to pass values that you can use in your code to update variables.
We’ll take a look at two similar examples. The following figure illustrates how the first example works.
ESP32 ESP8266 HTML Form Input Data Project Overview
You have a web page with three input fields that you can access with any browser in your network. When you type a new value and press the “Submit” button, your ESP will update a variable with the new value.
If you ever needed to update a variable through an ESP web server, you should follow this project. With this method, you avoid hard coding variables because you can create an input field in a web page to update any variable with a new value. This can be specially useful to set threshold values, set SSID/password, change API Keys, etc…
Later, we’ll also show you how to save those variables permanently using SPIFFS and how to access them. Here’s how this second example works.
ESP32 ESP8266 HTML Form Input Data Project Overview SPIFFS
This web page allows you to enter three types of variables: String, Int and Float. Then, every time you submit a new value, that value is stored in a SPIFFS file. This web page also contains a placeholder to show the current values.
To learn more about building a web server using SPIFFS, you can refer to the next tutorials:

Prerequisites

Make sure you check all the prerequisites in this section before continuing with the project in order to compile the code.

1. Install ESP32/ESP8266 Board in Arduino IDE

We’ll program the ESP32 and ESP8266 using Arduino IDE. So, you must have the ESP32 or ESP8266 add-on installed. Follow one of the next tutorials to install the ESP add-on:

2. Installing Libraries

To build the asynchronous web server, you need to install these libraries.
These libraries aren’t available to install through the Arduino Library Manager, so you need to copy the library files to the Arduino Installation folder. Alternatively, in your Arduino IDE, you can go to Sketch > Include Library > Add .zip Library and select the libraries you’ve just downloaded.

3. Parts Required

To follow this tutorial you just need an ESP32 or ESP8266 (read ESP32 vs ESP8266). There’s no circuit for this project.

1. ESP32/ESP8266 Handle Input Fields on Web Page with HTML Form

Copy the following code to the Arduino IDE. Then, type your network credentials (SSID and password) to make it work for you.
/*********/*********
  Rui Santos
  Complete project details at https://RandomNerdTutorials.com/esp32-esp8266-input-data-html-form/
  
  Permission is hereby granted, free of charge, to any person obtaining a copy
  of this software and associated documentation files.
  
  The above copyright notice and this permission notice shall be included in all
  copies or substantial portions of the Software.
*********/

#include <Arduino.h>
#ifdef ESP32
  #include <WiFi.h>
  #include <AsyncTCP.h>
#else
  #include <ESP8266WiFi.h>
  #include <ESPAsyncTCP.h>
#endif
#include <ESPAsyncWebServer.h>

AsyncWebServer server(80);

// REPLACE WITH YOUR NETWORK CREDENTIALS
const char* ssid = "REPLACE_WITH_YOUR_SSID";
const char* password = "REPLACE_WITH_YOUR_PASSWORD";

const char* PARAM_INPUT_1 = "input1";
const char* PARAM_INPUT_2 = "input2";
const char* PARAM_INPUT_3 = "input3";

// HTML web page to handle 3 input fields (input1, input2, input3)
const char index_html[] PROGMEM = R"rawliteral(
<!DOCTYPE HTML><html><head>
  <title>ESP Input Form</title>
  <meta name="viewport" content="width=device-width, initial-scale=1">
  </head><body>
  <form action="/get">
    input1: <input type="text" name="input1">
    <input type="submit" value="Submit">
  </form><br>
  <form action="/get">
    input2: <input type="text" name="input2">
    <input type="submit" value="Submit">
  </form><br>
  <form action="/get">
    input3: <input type="text" name="input3">
    <input type="submit" value="Submit">
  </form>
</body></html>)rawliteral";

void notFound(AsyncWebServerRequest *request) {
  request->send(404, "text/plain", "Not found");
}

void setup() {
  Serial.begin(115200);
  WiFi.mode(WIFI_STA);
  WiFi.begin(ssid, password);
  if (WiFi.waitForConnectResult() != WL_CONNECTED) {
    Serial.println("WiFi Failed!");
    return;
  }
  Serial.println();
  Serial.print("IP Address: ");
  Serial.println(WiFi.localIP());

  // Send web page with input fields to client
  server.on("/", HTTP_GET, [](AsyncWebServerRequest *request){
    request->send_P(200, "text/html", index_html);
  });

  // Send a GET request to <ESP_IP>/get?input1=<inputMessage>
  server.on("/get", HTTP_GET, [] (AsyncWebServerRequest *request) {
    String inputMessage;
    String inputParam;
    // GET input1 value on <ESP_IP>/get?input1=<inputMessage>
    if (request->hasParam(PARAM_INPUT_1)) {
      inputMessage = request->getParam(PARAM_INPUT_1)->value();
      inputParam = PARAM_INPUT_1;
    }
    // GET input2 value on <ESP_IP>/get?input2=<inputMessage>
    else if (request->hasParam(PARAM_INPUT_2)) {
      inputMessage = request->getParam(PARAM_INPUT_2)->value();
      inputParam = PARAM_INPUT_2;
    }
    // GET input3 value on <ESP_IP>/get?input3=<inputMessage>
    else if (request->hasParam(PARAM_INPUT_3)) {
      inputMessage = request->getParam(PARAM_INPUT_3)->value();
      inputParam = PARAM_INPUT_3;
    }
    else {
      inputMessage = "No message sent";
      inputParam = "none";
    }
    Serial.println(inputMessage);
    request->send(200, "text/html", "HTTP GET request sent to your ESP on input field (" 
                                     + inputParam + ") with value: " + inputMessage +
                                     "<br><a href=\"/\">Return to Home Page</a>");
  });
  server.onNotFound(notFound);
  server.begin();
}

void loop() {
 }

How the code works

Let’s take a quick look at the code and see how it works.

Including libraries

First, include the necessary libraries. You include different libraries depending on the board you’re using. If you’re using an ESP32, the code loads the following libraries:
#include <WiFi.h>
#include <AsyncTCP.h>
#include <ESPAsyncWebServer.h>
If you’re using an ESP8266, you include these libraries:
#include <ESP8266WiFi.h>
#include <ESPAsyncTCP.h>
#include <ESPAsyncWebServer.h>

Network credentials

Don’t forget to insert your network credentials in the following variables, so that the ESP32 or ESP8266 can connect to your network.
const char* ssid = "REPLACE_WITH_YOUR_SSID";
const char* password = "REPLACE_WITH_YOUR_PASSWORD";

HTML Forms and Input Fields

First, let’s take a look at the HTML that we need to display the input fields.
In our example, we display three input fields and each field has a “Submit” button. When the user enters data and presses the “Submit” button, that value is sent to the ESP and updates the variable.
For that, create three forms:
<form action="/get">
  input1: <input type="text" name="input1">
  <input type="submit" value="Submit">
</form><br>
<form action="/get">
  input2: <input type="text" name="input2">
  <input type="submit" value="Submit">
</form><br>
<form action="/get">
  input3: <input type="text" name="input3">
  <input type="submit" value="Submit">
</form>
In HTML, the <form> tag is used to create an HTML form for user input. In our case, the form should contain an input field and a submit button.
ESP32 ESP8266 Web Server with Input Fields
Let’s take a look at the first form to see how it works (the other forms work in a similar way).
<form action="/get">
  input1: <input type="text" name="input1">
  <input type="submit" value="Submit">
</form>
The action attribute specifies where to send the data inserted on the form after pressing submit. In this case, it makes an HTTP GET request to /get?input1=value. The value refers to the text you enter in the input field.
Then, we define two input fields: one text field and one submit button.
The following line defines a one line text input field.
input1: <input type="text" name="input1">
The type attribute specifies we want a text input field, and the name attribute specifies the name of the input element.
The next line defines a button for submitting the HTML form data.
<input type="submit" value="Submit">
In this case, the type attribute specifies you want a submit button, and the value specifies the text on the button.

Connect to your network

In the setup(), connect to your local network.
Serial.begin(115200);
WiFi.mode(WIFI_STA);
WiFi.begin(ssid, password);
if (WiFi.waitForConnectResult() != WL_CONNECTED) {
  Serial.println("WiFi Failed!");
  return;
}
Serial.println();
Serial.print("IP Address: ");
Serial.println(WiFi.localIP());

Handle HTTP GET requests

Then, you need to handle the HTTP GET requests.
When, you access the route URL, you send the HTML page to the client. In this case, the HTML text is saved on the index_html variable.
server.on("/", HTTP_GET, [](AsyncWebServerRequest *request){
  request->send_P(200, "text/html", index_html);
});
Then, you need to handle what happens when you receive a request on the /get routes.
server.on("/get", HTTP_GET, [] (AsyncWebServerRequest *request) {
We create two variables: inputMessage and inputParam to save the input value and the input field.
Then, we need to check whether the HTTP GET request contains the input1, input2, or input3 parameters. These are saved on the PARAM_INPUT_1, PARAM_INPUT_2 and PARAM_INPUT_3 variables.
If the request contains the PARAM_INPUT_1 (i.e. input1), we set the inputMessage to the value inserted in the input1 field.
inputMessage = request->getParam(PARAM_INPUT_1)->value();
Now you have the value you’ve just inserted on the first form saved on the inputMessage variable.
Then, set the inputParam variable to PARAM_INPUT_1 so that we know where the input value comes from.
When you submit the form, you get a message saying the value you’ve inserted and in which field. We also display a link to get back to the route URL (Home Page).
request->send(200, "text/html", "HTTP GET request sent to your ESP on input field (" 
                                + inputParam + ") with value: " + inputMessage +
                                "<br><a href=\"/\">Return to Home Page</a>");
ESP32 ESP8266 HTML Form Input Data HTTP GET Request
If you make a request on an invalid URL, we call the notFound() function, defined at the beginning of the sketch.
void notFound(AsyncWebServerRequest *request) {
  request->send(404, "text/plain", "Not found");
}
Finally, start the server to handle clients.
server.begin();

Demonstration

After uploading code to your board, open your Arduino IDE Serial Monitor at a baud rate of 115200 to find the ESP IP address.
ESP32 ESP8266 IP Address Arduino IDE Serial Monitor
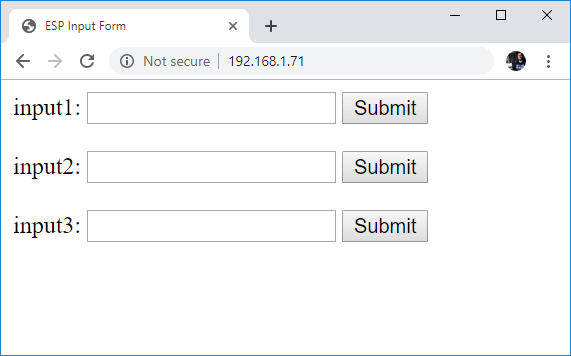
Then, open your browser and type the IP address. This web page should load:
ESP32 ESP8266 HTML Form 3 Input Fields and Save data to ESP using Arduino IDE
For example, type 123456 on input1 field, then press the “Submit” button. A new page should load saying that value 123456 was sent to your ESP:
ESP32 ESP8266 HTML Form Input Data demonstration

2. ESP32/ESP8266 Save Input Fields to SPIFFS

Now, let’s proceed to the second example. This example saves the data inserted on the input fields permanently on SPIFFS. We’ve also added placeholders on the web page to show the current values.
Copy the following sketch to Arduino IDE. Then, before uploading type your network credentials (SSID and password).
/*********
  Rui Santos
  Complete project details at https://RandomNerdTutorials.com/esp32-esp8266-input-data-html-form/
  
  Permission is hereby granted, free of charge, to any person obtaining a copy
  of this software and associated documentation files.
  
  The above copyright notice and this permission notice shall be included in all
  copies or substantial portions of the Software.
*********/

#include <Arduino.h>
#ifdef ESP32
  #include <WiFi.h>
  #include <AsyncTCP.h>
  #include <SPIFFS.h>
#else
  #include <ESP8266WiFi.h>
  #include <ESPAsyncTCP.h>
  #include <Hash.h>
  #include <FS.h>
#endif
#include <ESPAsyncWebServer.h>

AsyncWebServer server(80);

// REPLACE WITH YOUR NETWORK CREDENTIALS
const char* ssid = "REPLACE_WITH_YOUR_SSID";
const char* password = "REPLACE_WITH_YOUR_PASSWORD";

const char* PARAM_STRING = "inputString";
const char* PARAM_INT = "inputInt";
const char* PARAM_FLOAT = "inputFloat";

// HTML web page to handle 3 input fields (inputString, inputInt, inputFloat)
const char index_html[] PROGMEM = R"rawliteral(
<!DOCTYPE HTML><html><head>
  <title>ESP Input Form</title>
  <meta name="viewport" content="width=device-width, initial-scale=1">
  <script>
    function submitMessage() {
      alert("Saved value to ESP SPIFFS");
      setTimeout(function(){ document.location.reload(false); }, 500);   
    }
  </script></head><body>
  <form action="/get" target="hidden-form">
    inputString (current value %inputString%): <input type="text" name="inputString">
    <input type="submit" value="Submit" onclick="submitMessage()">
  </form><br>
  <form action="/get" target="hidden-form">
    inputInt (current value %inputInt%): <input type="number " name="inputInt">
    <input type="submit" value="Submit" onclick="submitMessage()">
  </form><br>
  <form action="/get" target="hidden-form">
    inputFloat (current value %inputFloat%): <input type="number " name="inputFloat">
    <input type="submit" value="Submit" onclick="submitMessage()">
  </form>
  <iframe style="display:none" name="hidden-form"></iframe>
</body></html>)rawliteral";

void notFound(AsyncWebServerRequest *request) {
  request->send(404, "text/plain", "Not found");
}

String readFile(fs::FS &fs, const char * path){
  Serial.printf("Reading file: %s\r\n", path);
  File file = fs.open(path, "r");
  if(!file || file.isDirectory()){
    Serial.println("- empty file or failed to open file");
    return String();
  }
  Serial.println("- read from file:");
  String fileContent;
  while(file.available()){
    fileContent+=String((char)file.read());
  }
  Serial.println(fileContent);
  return fileContent;
}

void writeFile(fs::FS &fs, const char * path, const char * message){
  Serial.printf("Writing file: %s\r\n", path);
  File file = fs.open(path, "w");
  if(!file){
    Serial.println("- failed to open file for writing");
    return;
  }
  if(file.print(message)){
    Serial.println("- file written");
  } else {
    Serial.println("- write failed");
  }
}

// Replaces placeholder with stored values
String processor(const String& var){
  //Serial.println(var);
  if(var == "inputString"){
    return readFile(SPIFFS, "/inputString.txt");
  }
  else if(var == "inputInt"){
    return readFile(SPIFFS, "/inputInt.txt");
  }
  else if(var == "inputFloat"){
    return readFile(SPIFFS, "/inputFloat.txt");
  }
  return String();
}

void setup() {
  Serial.begin(115200);
  // Initialize SPIFFS
  #ifdef ESP32
    if(!SPIFFS.begin(true)){
      Serial.println("An Error has occurred while mounting SPIFFS");
      return;
    }
  #else
    if(!SPIFFS.begin()){
      Serial.println("An Error has occurred while mounting SPIFFS");
      return;
    }
  #endif

  WiFi.mode(WIFI_STA);
  WiFi.begin(ssid, password);
  if (WiFi.waitForConnectResult() != WL_CONNECTED) {
    Serial.println("WiFi Failed!");
    return;
  }
  Serial.println();
  Serial.print("IP Address: ");
  Serial.println(WiFi.localIP());

  // Send web page with input fields to client
  server.on("/", HTTP_GET, [](AsyncWebServerRequest *request){
    request->send_P(200, "text/html", index_html, processor);
  });

  // Send a GET request to <ESP_IP>/get?inputString=<inputMessage>
  server.on("/get", HTTP_GET, [] (AsyncWebServerRequest *request) {
    String inputMessage;
    // GET inputString value on <ESP_IP>/get?inputString=<inputMessage>
    if (request->hasParam(PARAM_STRING)) {
      inputMessage = request->getParam(PARAM_STRING)->value();
      writeFile(SPIFFS, "/inputString.txt", inputMessage.c_str());
    }
    // GET inputInt value on <ESP_IP>/get?inputInt=<inputMessage>
    else if (request->hasParam(PARAM_INT)) {
      inputMessage = request->getParam(PARAM_INT)->value();
      writeFile(SPIFFS, "/inputInt.txt", inputMessage.c_str());
    }
    // GET inputFloat value on <ESP_IP>/get?inputFloat=<inputMessage>
    else if (request->hasParam(PARAM_FLOAT)) {
      inputMessage = request->getParam(PARAM_FLOAT)->value();
      writeFile(SPIFFS, "/inputFloat.txt", inputMessage.c_str());
    }
    else {
      inputMessage = "No message sent";
    }
    Serial.println(inputMessage);
    request->send(200, "text/text", inputMessage);
  });
  server.onNotFound(notFound);
  server.begin();
}

void loop() {
  // To access your stored values on inputString, inputInt, inputFloat
  String yourInputString = readFile(SPIFFS, "/inputString.txt");
  Serial.print("*** Your inputString: ");
  Serial.println(yourInputString);
  
  int yourInputInt = readFile(SPIFFS, "/inputInt.txt").toInt();
  Serial.print("*** Your inputInt: ");
  Serial.println(yourInputInt);
  
  float yourInputFloat = readFile(SPIFFS, "/inputFloat.txt").toFloat();
  Serial.print("*** Your inputFloat: ");
  Serial.println(yourInputFloat);
  delay(5000);
}

Important: if you’re using an ESP8266, make sure you’ve enabled SPIFFS in Tools > Flash Size menu:
Select ESP8266 NodeMCU board with SPIFFS Arduino IDE

How the Code Works

This code is very similar with the previous one with a few tweaks. Let’s take a quick look at it and see how it works.

Including libraries

The code loads the following libraries if you’re using the ESP32. You need to load the SPIFFS library to write to SPIFFS.
#include <WiFi.h>
#include <ESPAsyncWebServer.h>
#include <AsyncTCP.h>
#include <SPIFFS.h>
If you’re using an ESP8266, you need to include the FS library to interface with SPIFFS.
#include <ESP8266WiFi.h>
#include <ESPAsyncWebServer.h>
#include <ESPAsyncTCP.h>
#include <Hash.h>
#include <FS.h>

HTML Form

In this example, when you submit the values, a window opens saying the value was saved to SPIFFS, instead of being redirected to another page as in the previous example.
For that, we need to a add a JavaScript function, in this case it’s called submitMessage() that pops an alert message saying the value was saved to SPIFFS. After that pop up, it reloads the web page so that it displays the current values.
<script>
  function submitMessage() {
    alert("Saved value to ESP SPIFFS");
    setTimeout(function(){ document.location.reload(false); }, 500);
  }
</script>
The forms are also a bit different from the previous ones. Here’s the form for the first input.
<form action="/get" target="hidden-form">
  inputString (current value %inputString%): <input type="text" name="inputString">
  <input type="submit" value="Submit" onclick="submitMessage()">
</form>
In this case, the target attribute and an <iframe> are used so that you remain on the same page after submitting the form.
The name that shows up for the input field contains a placeholder %inputString% that will then be replaced by the current value of the inputString variable.
The onclick=”submitMessage()” calls the submitMessage() JavaScript function after clicking the “Submit” button.

Read and Write to SPIFFS

Then, we have some functions to read and write from SPIFFS.
The readFile() reads the content from a file:
String readFile(fs::FS &fs, const char * path){
  Serial.printf("Reading file: %s\r\n", path);
  File file = fs.open(path, "r");
  if(!file || file.isDirectory()){
    Serial.println("- empty file or failed to open file");
    return String();
  }
  Serial.println("- read from file:");
  String fileContent;
  while(file.available()){
    fileContent+=String((char)file.read());
  }
  Serial.println(fileContent);
  return fileContent;
The writeFile() writes content to a file:
void writeFile(fs::FS &fs, const char * path, const char * message){
  Serial.printf("Writing file: %s\r\n", path);
  File file = fs.open(path, "w");
  if(!file){
    Serial.println("- failed to open file for writing");
    return;
  }
  if(file.print(message)){
    Serial.println("- file written");
  } else {
    Serial.println("- write failed");
  }
}

processor()

The processor() is responsible for searching for placeholders in the HTML text and replacing them with actual values saved on SPIFFS.
String processor(const String& var){
  //Serial.println(var);
  if(var == "inputString"){
    return readFile(SPIFFS, "/inputString.txt");
  }
  else if(var == "inputInt"){
    return readFile(SPIFFS, "/inputInt.txt");
  }
  else if(var == "inputFloat"){
    return readFile(SPIFFS, "/inputFloat.txt");
  }
  return String();
}

Handle HTTP GET requests

Handling the HTTP GET requests works the same way as in the previous example, but this time we save the variables on SPIFFS.
For example, for the inputString field:
if (request->hasParam(PARAM_STRING)) {
  inputMessage = request->getParam(PARAM_STRING)->value();
  writeFile(SPIFFS, "/inputString.txt", inputMessage.c_str());
}
When the request contains inputString (i.e. PARAM_STRING), we set the inputMessage variable to the value submitted on the inputString form.
inputMessage = request->getParam(PARAM_STRING)->value();
Then, save that value to SPIFFS.
writeFile(SPIFFS, "/inputString.txt", inputMessage.c_str());
A similar process happens for the other forms.

Accessing the variables

In the loop(), we demonstrate how you can access the variables.
For example, create a String variable called yourInputString that reads the content of the inputString.txt file on SPIFFS.
String yourInputString = readFile(SPIFFS, "/inputString.txt");
Then, print that variable in the Serial Monitor.
Serial.println(yourInputString);

Demonstration

After uploading code to your board, open your Arduino IDE Serial Monitor at a baud rate of 115200 to find the ESP IP address.
ESP32 ESP8266 IP Address Arduino IDE Serial Monitor
Open your browser and type the IP address. A similar web page should load (at first your current values will be blank).
ESP32 ESP8266 HTML Form 3 Input Fields and Save data to ESP SPIFFS files using Arduino IDE
Type a String in the first input field and press “Submit”, repeat the same process for the Int and Float input values. Every time you press the Submit button for a field, you’ll see an alert message like this:
ESP32 ESP8266 HTML Form Input Data demonstration alert message web page reload
Press the “OK” button to reload the web page and see the current values updated.
If you have your Arduino IDE Serial Monitor open, you’ll see that the stored values are being printed over and over again:
ESP32 ESP8266 Input Fields HTML Form Demonstration Arduino IDE Serial Monitor
For a final project, you can delete all those lines in your loop() that print all stored values every 5 seconds, we just left them on purpose for debugging.

Wrapping Up

In this tutorial you’ve learned how to handle input fields in a web page to update the ESP variable values. You can modify this project to set thresholds, change API Key values, set a PWM value, change a timer, set SSID/password, etc.
Here’s other projects that you might like:
Learn more about the ESP32 with our best-selling course:

結合桌面視窗介面 (GUI)、雲端資料庫與社群通訊推播的自動化氣象監控系統

視窗介面 (GUI)、雲端資料庫與社群通訊推播的自動化氣象監控系統 這份 gui_app_timer.py 程式是一個 結合桌面視窗介面 (GUI)、雲端資料庫與社群通訊推播的自動化氣象監控系統 。 整體架構採用 事件驅動 (Event-Driven) 與 多執行緒非同步設計...