2019年9月23日 星期一

RFID Reader MFRC522 interface with NodeMCU using Arduino IDE

RFID Reader MFRC522 interface with NodeMCU using Arduino IDE


In this tutorial we will learn How to interface NodeMCU with RC522 RF ID Reader using Arduino library for MFRC522 and other RFID RC522 based modules.
This library read and write different types of Radio-Frequency IDentification (RFID) cards on your Arduino or NodeMCU using a RC522 based reader connected via the Serial Peripheral Interface (SPI) interface. Before we move to actual code lets know more about RF ID.
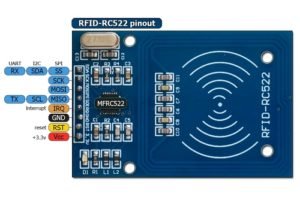
RF ID Reader MFRC-522
RF ID Reader

What is RFID?

Radio-Frequency Identification (RFID) is the use of radio waves to read and capture information stored on a tag attached to an object. A tag can be read from up to several feet away and does not need to be within direct line-of-sight of the reader to be tracked. This is the advantage over Bar-code.
A RFID reader is a device used to gather information from an RFID tag, which is used to track individual objects. Radio waves are used to transfer data from the tag to a reader.
A passive tag is an RFID tag that does not contain a battery, the power is supplied by the reader. When radio waves from the reader are encountered by a passive rfid tag, the coiled antenna within the tag forms a magnetic field. The tag draws power from it, energizing the circuits in the tag.

What are the RC522 RF ID Reader Specifications?

RC522 – RFID Reader / Writer 13.56MHz with Cards Kit includes a 13.56MHz RF reader cum writer module that uses an RC522 IC and two S50 RFID cards. The MF RC522 is a highly integrated transmission module for contact-less communication at 13.56 MHz. RC522 supports ISO 14443A/MIFARE mode.
RC522 – RFID Reader features an outstanding modulation and demodulation algorithm to serve effortless RF communication at 13.56 MHz. The S50 RFID Cards will ease up the process helping you to learn and add the 13.56 MHz RF transition to your project.
The module uses SPI to communicate with microcontrollers. The open-hardware community already has a lot of projects exploiting the RC522 – RFID Communication, using Arduino.

RC522 – RFID Reader / Writer Features:

  • Integrated MF RC522
  • 13.56MHz contactless communication card chip.
  • Low-voltage, low-cost, small size of the non-contact card chip to read and write.
  • Suitable for Smart meters and portable handheld devices.
  • Advanced modulation and demodulation concept completely integrated in all types of 13.56MHz passive contactless communication methods and protocols.
  • 14443A compatible transponder signals.
  • ISO14443A frames and error detection.
  • Supports rapid CRYPTO1 encryption algorithm, terminology validation MIFARE products.
  • MFRC522 support MIFARE series of high-speed non-contact communication, two-way data transmission rate up to 424kbit/s.
  • Low cost, and ideal for user equipment development.
  • The reader and RF card terminal design meets advanced applications development and production needs.
  • Can be directly loaded into the various reader molds, very convenient.

RC522 – RFID Reader / Writer Specifications:

  • Operating Current :13-26mA / DC 3.3V
  • Idle Current :10-13mA / DC 3.3V
  • Sleep Current: < 80uA
  • Peak Current: < 30mA
  • Operating Frequency: 13.56MHz
  • Supported card types: mifare1 S50, mifare1 S70 MIFARE Ultralight, mifare Pro, MIFARE DESFire
  • Environmental Operating Temperature: -20 – 80 degrees Celsius
  • Environmental Storage Temperature: -40 – 85 degrees Celsius
  • Relative humidity: relative humidity 5% – 95%
  • Reader Distance: ≥ 50mm / 1.95″ (mifare 1)
  • Module Size: 40mm × 60mm
  • Module interface: SPI
  • Data transfer rate: Maximum 10Mbit/s

Hardware Components

  • NodeMCU
  • MFRC522 RFID Reader
  • RFID Tags ( 13.56 MHz )
  • Bread Board
  • Jumper Wires
  • Micro USB Cable

Software Components

  • Arduino IDE

Connections of MFRC522 RF ID Reader With Node MCU
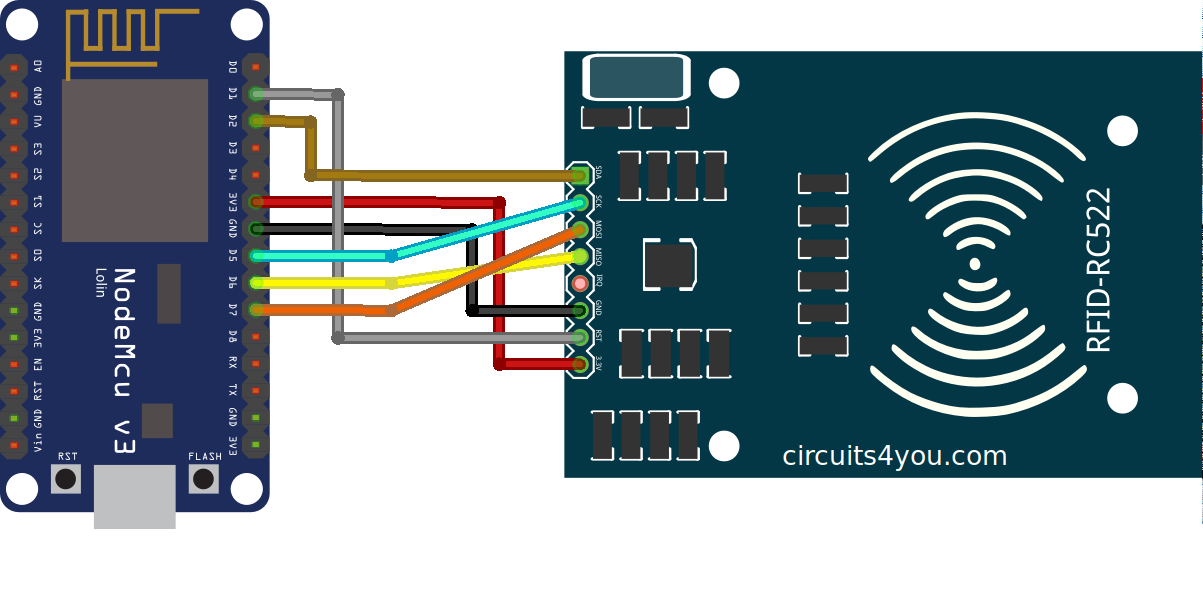
NodeMCU RC522 Interface Circuit
NodeMCU RC522 Interface
or Refer Connection Chart Given in Code

Arduino Code for MFRC522 RF ID Reader

For this program we need RF ID Library Download it from here.rfid-master
Upload Sketch to NodeMCU and test it.

Results and Testing

Open serial monitor with baud rate settings of 115200. and move card near to the card Reader module. Observe serial monitor. It will show UID for that card.
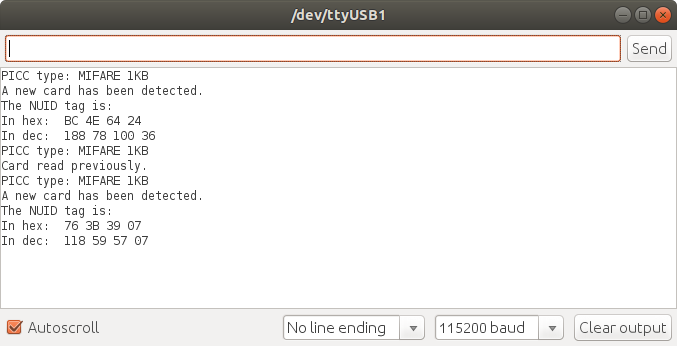
RC522 NodeMCU Reader

Additional resources

2019年9月22日 星期日

ESP8266 Json & MQTT

//WemosD1


#include <ArduinoJson.h>
#include <ESP8266WiFi.h>
#include <PubSubClient.h>

//const char* ssid = "yourNetworkName";
//const char* password =  "yourNetworkPassword";
//const char *ssid = "PTS-2F";
//const char *pass = "";
const char *ssid = "74170287";
const char *pass = "24063173";

#define MQTTid              ""                           //id of this mqtt client
#define MQTTip              "broker.mqtt-dashboard.com"  //ip address or hostname of the mqtt broker
#define MQTTport            1883                         //port of the mqtt broker
#define MQTTuser            "alex9ufo"                   //username of this mqtt client
#define MQTTpsw             "alex9981"                   //password of this mqtt client
//#define MQTTuser          "your_username"              //username of this mqtt client
//#define MQTTpsw           "your_password"              //password of this mqtt client
#define MQTTpubQos          2                            //qos of publish (see README)
#define MQTTsubQos          1                            //qos of subscribe

#define BUILTIN_LED        2                             // Arduino standard is GPIO13 but lolin nodeMCU is 2
//Variables
bool Flash = false;  //true
long lastMsg = 0;
//=============================================================================
boolean pendingDisconnect = false;
void mqttConnectedCb(); // on connect callback
void mqttDisconnectedCb(); // on disconnect callback
void mqttDataCb(char* topic, byte* payload, unsigned int length); // on new message callback

WiFiClient wclient;
PubSubClient client(MQTTip, MQTTport, mqttDataCb, wclient); 
char JSONmessageBuffer[100];
//=============================================================================
void mqttConnectedCb() {
  Serial.println("connected");
  // Once connected, publish an announcement...
  client.publish("alex9ufo/outTopic/Json", JSONmessageBuffer, MQTTpubQos, true); // true means retain
  // ... and resubscribe
  client.subscribe("alex9ufo/inTopic", MQTTsubQos);
}
//=============================================================================
void mqttDisconnectedCb() {
  Serial.println("disconnected");
}
//=============================================================================
void mqttDataCb(char* topic, byte* payload, unsigned int length) {

  /*
  you can convert payload to a C string appending a null terminator to it;
  this is possible when the message (including protocol overhead) doesn't
  exceeds the MQTT_MAX_PACKET_SIZE defined in the library header.
  you can consider safe to do so when the length of topic plus the length of
  message doesn't exceeds 115 characters
  */
  char* message = (char *) payload;
  message[length] = 0;

  Serial.print("Message arrived [");
  Serial.print(topic);
  Serial.print("] ");
  Serial.println(message);
  String message1;
  for (int i = 0; i < length; i++) {
    message1 = message1 + (char)payload[i];  //Conver *byte to String
  }
  Serial.println(message1);
  //Serial.print(message);
  if(message1 == "#on" || message1 == "0") 
  { 
      digitalWrite(BUILTIN_LED,LOW);
      Flash = false;
      Serial.println("Received #on or 0 , Send LOW TO BuildIn_LED");
  }   //LED on  
  if(message1 == "#off" || message1 == "1") 
  {
    digitalWrite(BUILTIN_LED,HIGH);
    Flash = false;
    Serial.println("Received #off or 1 , Send HIGH TO BuildIn_LED");
  } //LED off
  if(message1== "#flash" || message1 == "2" ) {
     Flash = true; 
     digitalWrite(BUILTIN_LED, HIGH); 
     Serial.println("Received #flash or 2 , Flashing BuildIn_LED "); 
   } // if(message== "#flashLED")
}
//======================================================
void process_mqtt() {
  if (WiFi.status() == WL_CONNECTED) {
    if (client.connected()) {
      client.loop();
    } else {
    // client id, client username, client password, last will topic, last will qos, last will retain, last will message
      if (client.connect(MQTTid, MQTTuser, MQTTpsw, MQTTid "/status", 2, true, "0")) {
          pendingDisconnect = false;
          mqttConnectedCb();
      }
    }
  } else {
    if (client.connected())
      client.disconnect();
  }
  if (!client.connected() && !pendingDisconnect) {
    pendingDisconnect = true;
    mqttDisconnectedCb();
  }
}

//==============================================
void setup_wifi() {
  delay(10);
  // We start by connecting to a WiFi network
  Serial.println();
  Serial.print("Connecting to ");
  Serial.println(ssid);
  WiFi.begin(ssid, pass);
  while (WiFi.status() != WL_CONNECTED) {
    delay(500);
    Serial.print(".");
  }
  Serial.println("");
  Serial.println("WiFi connected");
  Serial.println("IP address: ");
  Serial.println(WiFi.localIP());
}
//====================================================== 
void setup() {
  delay(10);
  Serial.begin(115200);
  setup_wifi();
  pinMode(BUILTIN_LED, OUTPUT);
  Serial.println(F("Booting...."));
  Serial.println(F("Ready!"));
}
//====================================================== 
void loop() {
  process_mqtt();
  if (Flash)  //Test Flash Command
  {
    digitalWrite(BUILTIN_LED, !digitalRead(BUILTIN_LED));
    delay(250);
  }
  long now = millis();
  if ( now - lastMsg > 10000)
  {  // 等10秒
    lastMsg = now;
    StaticJsonBuffer<300> JSONbuffer;
    JsonObject & JSONencoder = JSONbuffer.createObject();
    JSONencoder["device"] = "WeMosD1";
    JSONencoder["sensorType"] = "Random";
    JsonArray& values = JSONencoder.createNestedArray("values");
    int i = random(100);
    values.add(i);
    int j = random(100);
    values.add(j);
    int k = random(100);
    values.add(k);
    JSONencoder.printTo(JSONmessageBuffer, sizeof(JSONmessageBuffer));
    Serial.println("Sending message to MQTT topic..");
    Serial.println(JSONmessageBuffer);
    if  (client.connected()) {
      client.publish("alex9ufo/outTopic/Json", JSONmessageBuffer);
      Serial.println("Success sending message");
    } else {
      Serial.println("Error sending message");
    }
    Serial.println("-------------");
  } // if ( now - lastMsg > 10000)
}
//===============================================


  清除項目編譯快取 執行 flutter clean 重新取得套件依賴 執行 flutter pub get 完整重新編譯並執行 flutter run 1. 新增專案套件 (pubspec.yaml) 在 Flutter 專案根目錄下的 pubspec.yaml 中,新增 ...