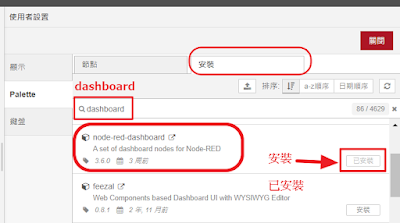
Node-RED dashboard 安裝
1. 安裝dashboard。

安裝完節點後,就可以在左邊的節點清單找到剛剛安裝的「dashboard」。
測試 dashboard
將 下面程式 匯入 node-red中
[{"id":"a4fdb5a5.dd1ee8","type":"function","z":"57d155240ad43441","name":"generator","func":"msg.payload=Math.round (Math.random()*100);\nreturn msg;","outputs":1,"noerr":0,"initialize":"","finalize":"","libs":[],"x":280,"y":140,"wires":[["0089d590ce9f96c4","c22114befe6b9abe","3ed690d56d305d4d","3c8c799ac9a80fb7"]]},{"id":"8bdcda3c31bf2d93","type":"inject","z":"57d155240ad43441","name":"","props":[{"p":"payload"},{"p":"topic","vt":"str"}],"repeat":"5","crontab":"","once":false,"onceDelay":0.1,"topic":"","payload":"","payloadType":"date","x":100,"y":140,"wires":[["a4fdb5a5.dd1ee8"]]},{"id":"0089d590ce9f96c4","type":"debug","z":"57d155240ad43441","name":"debug 194","active":true,"tosidebar":true,"console":false,"tostatus":false,"complete":"false","statusVal":"","statusType":"auto","x":490,"y":140,"wires":[]},{"id":"c22114befe6b9abe","type":"ui_gauge","z":"57d155240ad43441","name":"","group":"b7d12b8d.651c8","order":1,"width":"4","height":"3","gtype":"gage","title":"gauge","label":"units","format":"{{value}}","min":0,"max":"100","colors":["#00b500","#e6e600","#ca3838"],"seg1":"25","seg2":"75","className":"","x":470,"y":180,"wires":[]},{"id":"3ed690d56d305d4d","type":"ui_text","z":"57d155240ad43441","group":"b7d12b8d.651c8","order":2,"width":"4","height":"3","name":"","label":"亂數","format":"{{msg.payload}}","layout":"row-left","className":"","x":470,"y":220,"wires":[]},{"id":"3c8c799ac9a80fb7","type":"ui_chart","z":"57d155240ad43441","name":"","group":"b7d12b8d.651c8","order":3,"width":"4","height":"3","label":"chart","chartType":"line","legend":"false","xformat":"HH:mm:ss","interpolate":"linear","nodata":"","dot":false,"ymin":"","ymax":"100","removeOlder":1,"removeOlderPoints":"","removeOlderUnit":"3600","cutout":0,"useOneColor":false,"useUTC":false,"colors":["#1f77b4","#aec7e8","#ff7f0e","#2ca02c","#98df8a","#d62728","#ff9896","#9467bd","#c5b0d5"],"outputs":1,"useDifferentColor":false,"className":"","x":470,"y":260,"wires":[[]]},{"id":"b7d12b8d.651c8","type":"ui_group","name":"Default","tab":"fe5d396a.0d6d4","order":1,"disp":true,"width":"20","collapse":false},{"id":"fe5d396a.0d6d4","type":"ui_tab","name":"Home","icon":"dashboard","disabled":false,"hidden":false}]
最後,部署流程。
部署成功後,開啟瀏覽器,輸入網址「http://127.0.0.1:1880/ui/」,即可看到每5秒產生一個亂數的折線圖。


沒有留言:
張貼留言